EduRe – TAFE QLD Help & Training
In this topic
• What is a Business Opportunity?
• Create a Business Opportunity
i. Details
ii. Enquire Details
iii. Related Records
iv. Competitors
v. Completing the Qualify stage
i. Details
ii. Lead Personnel
iii. Business Proposal
iv. Business Proposal Contents
vii. Completing the Prepare Proposal stage
iii. Funding
iv. Recalculating the Cost Summary
vi. Completing the Cost Proposal stage
◊ Internal/External Approval stage
ii. Generate the Business Proposal
• Closing the Business Opportunity as Won or Lost
◊ Close from a Parent Business Opportunity
What is a Business Opportunity?
A Business Opportunity is a type of CRM record that represents a potential revenue generating arrangement between TAFE and an external organisation. This can be a potential contract (e.g. Training Services Agreement), or a commercial sale of an existing TAFE offering.
Important Note: Some contracts may also need to be linked to a Partnership Opportunity CRM record (e.g. Third-Party Agreements). See: Business Proposal
The Business Opportunity form is made up of a Header, Business Process Flow, messages, Body, and Footer, as shown below.
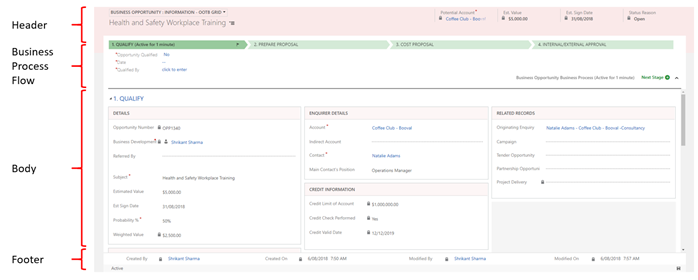
The Business Opportunity record is broken down into multiple sections within the Body of the form. These sections are aligned with the stages that make up the EduRe sales business process flow.
The business process flow provides a focus on the information required for each stage of the EduRe Business Opportunity sales process.
The stages are Qualify, Prepare Proposal, Cost Proposal and Internal/External Approval. These stages are meant to guide you through creating a business opportunity, preparing the business proposal, and submitting the proposal for internal approval and acceptance by the client.
Only the sections within the body of the Business Opportunity, corresponding with the current and/or completed stages, are visible to the user; all other sections are hidden.
Users can read all Business Opportunities regardless of the “owning” Business Unit, however, you may only update and assign Business Opportunities that belong to your Business Unit.
Qualifying a Business Opportunity means that there is alignment between the client and TAFE Queensland on the cost to the client, the service can be delivered in an agreed timeframe and the expected outcome(s) of the client can be met.
Business scenario
Business Development Managers (BDM) can progress through a sales process following a pre-defined sequence of stages, presented as steps within the EduRe Business Opportunity module.
Mark has converted an Enquiry into a Business Opportunity because Andrew Ross from Roma Hospital has shown interest in the product/service that is available from TAFE Queensland. However, Mark now needs to determine if there is a match on price (budget), timing of delivery and expected outcomes.
The first step in the EduRe Business Opportunity Module is to ‘Qualify’ the opportunity.
Mark has spoken with Andrew and there is an alignment on price, outcomes and delivery times but Andrew is also speaking with a private education provider and a University. Mark speaks with internal stakeholders at TQSW and prepares the details of the proposal and associated costs. Mark receives Internal Approval for the Proposal Content and Associated Pricing and moves the Business Opportunity through the stages.
Mark negotiates the proposal with Andrew and gets agreement on the details.
Having won the Business Opportunity, Mark uploads all relevant documentation, completes the details on the Business Opportunity form in EduRe, and converts the Business Opportunity into a Project Delivery (Contract Management).
Business standards
1. Qualify means that there is alignment between the client and TAFE Queensland on the cost to the client, the service can be delivered in an agreed timeframe and the expected outcome(s) of the client can be met. If these elements cannot be met, then the Business Opportunity should be closed as lost with a relevant description provided. It is important not to spend time on Business Opportunities that cannot be won.
2. All conversations are recorded as notes and all activities such as meetings, phone calls, emails, proposals, other documents, etc.… are recorded against the business opportunity as it moves through the stages.
3. An Opportunity is won when the SIGNED contract is received. Verbal acceptance does NOT mean the Opportunity is won. For Opportunities that are not formal contracts, the Opportunity is won when the sale has been made.
4. If at any time during the sales process the opportunity is lost then the opportunity is closed as lost with a relevant description and reason code.
Create a Business Opportunity
1. Select EduRe in the navigation bar
2. Click on Business Opportunities in the menu options
3. Choose +NEW from the command bar
4. Enter the relevant information for each stage and be guided by the Business Process Flow:
Qualify stage
The Qualify stage is used to capture, and maintain, information regarding the BDM, subject, related records including the client, estimated value, and any competitor details.
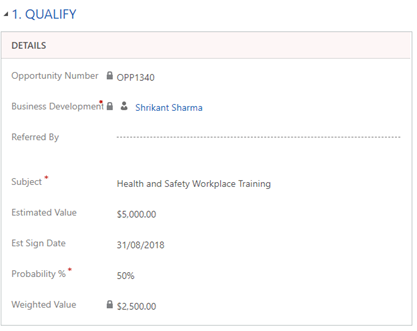
Details
The Details section is used to capture business opportunity’s identity, the Business Development Officer (mandatory), the Referred by reference (e.g. If the opportunity was referred to you by a colleague or a staff member from another region), Subject (mandatory), Estimated Sign Date and Estimated Value, plus the Probability % for winning the business.
Note: Although there is nothing mentioned in the business standards regarding Subject naming conventions for Business Opportunities, we recommend that the subject name should enable anyone to understand what this business opportunity is for, without needing to open the record.
Enquirer Details
The Enquirer Details section enables you to associate an Account and Contact with the Business Opportunity; plus capture the contact’s position.

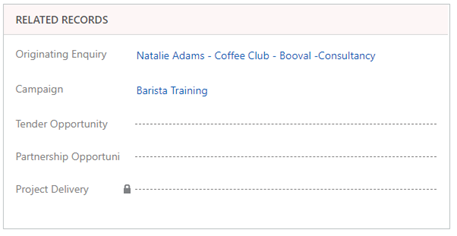
Related Records
The Related records section enables you to manually enter any originating enquiry, campaign, tender, partnership or project delivery associated with this Business Opportunity.
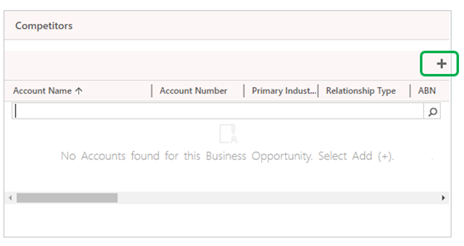
Competitors
The Competitors section allows you to identify any known competitors vying for this Business Opportunity. These competitor Accounts may only be added once the Business Opportunity has been saved, by clicking on the plus sign outlined in green below.
Completing the Qualify stage
1. The flag icon in the business process flow ribbon indicates the current stage of this Business Opportunity.
Ensure that you have entered as much information as possible in the above sections before completing this stage.
2. Click on the Opportunity Qualified field to change it to Yes.
This action will automatically populate the Date and Qualified By fields.
3. Click on Next Stage.
Note: This action will “tick” the Qualify stage, and move the flag icon to the next stage, exposing the prepare proposal section.

Prepare Proposal stage
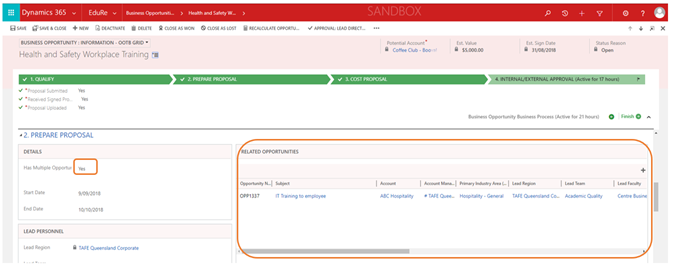
The Prepare Proposal stage is used to capture and maintain information regarding whether the customer has multiple Business Opportunities, start and end dates, associated TAFE personnel, contents of the business proposal, and who (TAFE or Client) is providing what.
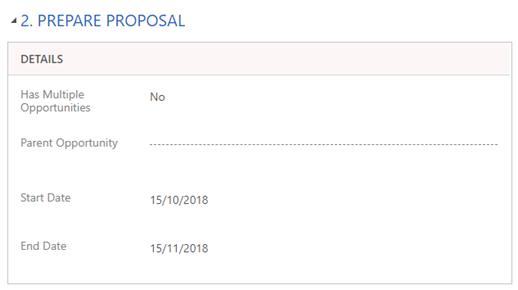
Details
This Details section is used to capture the proposed start and end date of the business deal, and whether this Business Opportunity is the “parent” or a “child” opportunity.
If Has Multiple Opportunities field is set to Yes, then this identifies the record as a parent of other Business Opportunities.
This may be applicable where a client is requesting multiple scenario proposals, for customized training for 10, 20 or 25 participants. Each participant value, possible proposal content variations, and set of costs, would require a unique “child” Business Opportunity to be created.
Multiple “child” Business Opportunities may be easily created using the Clone a Business Opportunity function, then using the Edit a Business Opportunity function to vary the proposal values, content and costs.
If Has Multiple Opportunities field is set to No, and the Parent Opportunity is blank; then this identifies the record as a single unique Business Opportunity, without any “parent” or “child” Business Opportunities.
If Has Multiple Opportunities field is set to No, and the Parent Opportunity field contains data; then this identifies the record as a “child” Business Opportunity. “Child” Business Opportunities may only be closed as lost or won via the “Parent” Business Opportunity.
The Start Date and End Date fields are required to calculate the set of “proposed invoice dates” in accordance with the proposed contract or course start and end dates.
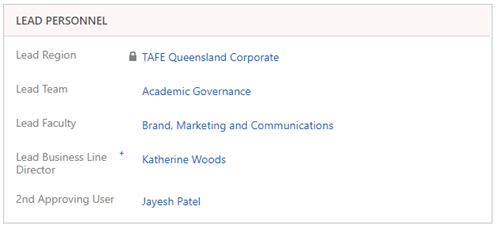
Lead Personnel
The Lead Personnel section is used to identify the TAFE Queensland region, teams and business managers associated with the Business Opportunity.
The Lead Region field is tightly linked to the Business Unit of the Business Development Officer/Owner of the Business Opportunity.
The Lead Team and Lead Faculty fields is used to indicate the Lead Faculty and/or Team associated with the Business Opportunity.
The Lead Business Line Director (BLD) field is used to assign a first level approver for the Opportunity (e.g. Faculty Director or Business Development Manager).
Important Note: Entering a user’s name in this field will require their approval through the CRM before the Opportunity can be won. You may leave this field and the 2nd approving user field blank if your region’s established approval process is external to the CRM.
The 2nd Approving User field is used to assign an additional approver after approval has been given from the first approver (e.g. contract team or Director of Business Unit).
Business Proposal
The Business Proposal section allows you to identify the contract type for this business proposal.

Contract Type Definitions
ο Training Services Agreement – A formal agreement to deliver training services to a commercial client.
ο Commercial Sale – Commercial client enrolling in a pre-existing TAFE offering
ο Third Party Delivery – Training being delivered by a third party provider. This type of opportunity must be linked to a co-provider Partnership Opportunity. See: Related Records
ο Funding Agreement – Funding received from an organisation to deliver services to eligible students. This type of Opportunity must be linked to a funding agreement Partnership Opportunity: See: Related Records
ο Other – None of the above. If selecting this option, make sure you include notes to explain the nature of the opportunity.
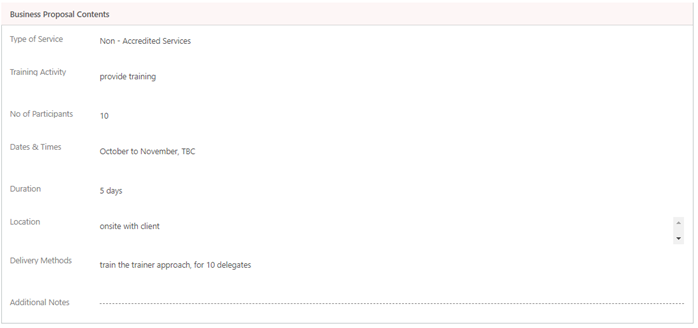
Business Proposal Contents
The Business Proposal Contents section allows you to specify various information regarding the proposed services provision.
All information entered in this section will be imported onto the Business Proposal document.
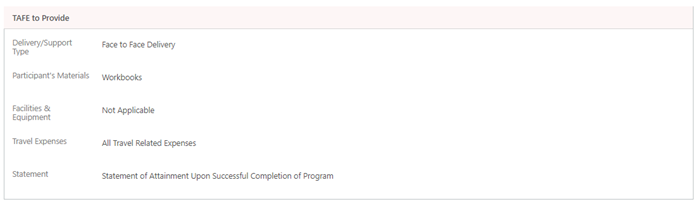
TAFE to Provide
The TAFE to Provide section allows you to specify various details regarding the TAFE Queensland supplied components.
All information entered in this section will be imported onto the Business Proposal document.
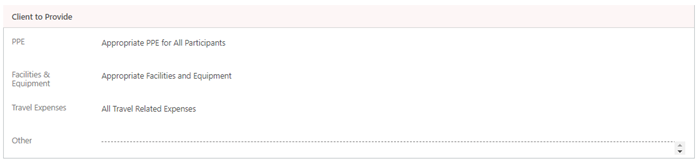
Client to Provide
The Client to Provide section allows you to specify various details regarding what the client will be supplying.
All information entered in this section will be imported onto the Business Proposal document.
Completing the Prepare Proposal stage
1. The flag icon in the business process flow ribbon indicates the current stage of this Business Opportunity.
Ensure that you have entered as much information as possible in the above sections before completing this stage.
2. Click on the Finalise Proposed Content field to change it to Yes.
This action will automatically populate the Date and Finalised By fields.
3. Click on Next Stage.
Note: This action will “tick” the Prepare Proposal stage, and move the flag icon to the next stage, exposing the cost proposal section.

Cost Proposal stage
The Cost Proposal stage is used to capture and maintain information regarding TAFE’s revenue and the client’s costs associated with the Business Opportunity. This section is broken down into 4 main segments, Delivery, Non-Delivery, Funding and Invoice Requirements.
Important Note: If custom pricing is required for this agreement, the TQ Costing and Pricing Tool must be used before completing this section in the CRM. If a custom costing has been completed, you must also attach a copy of the completed costing in the Notes section.
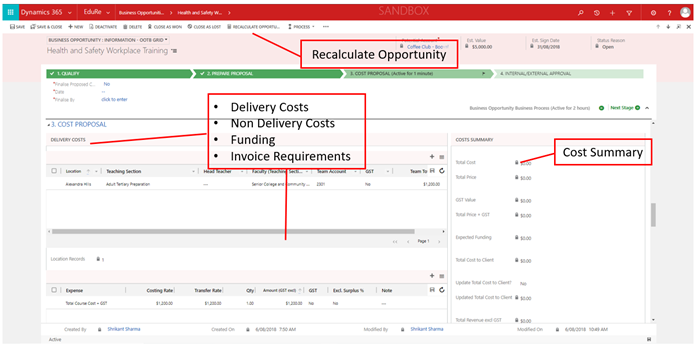
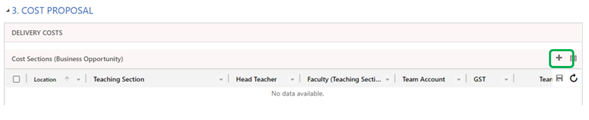
Delivery Costs
The Delivery Costs section is used to capture the total revenue applicable to each team involved in the potential delivery of the services.
1. In the first table, enter a row for each team delivering services in this opportunity. The location should refer to the location of the team, not necessarily the location where the program is being delivered. To add a new Cost Section record, click (+) in the top right of the table
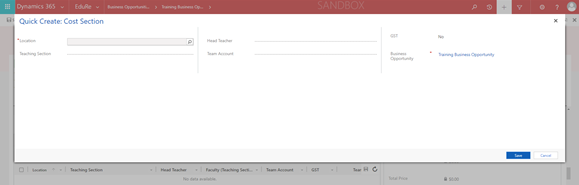
2. Complete the Quick Create: Cost Section options as required
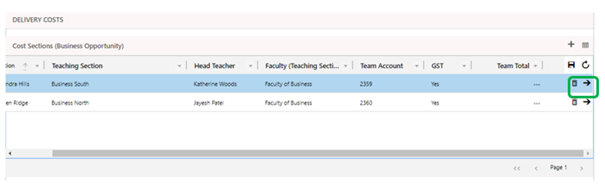
Tip: If you need to edit or remove a Cost Section, select the applicable record within the table and scroll to the right, where you will be presented with options to delete either delete the record reopen the Quick Create: Cost Section and edit as required.
3. Click on the save icon at the top right corner of the table once all Cost Sections are added.
Tip: If you need to edit or remove a Cost Section, select the applicable record within the table and scroll to the right, where you will be presented with options to delete either delete the record reopen the Quick Create: Cost Section and edit as required.
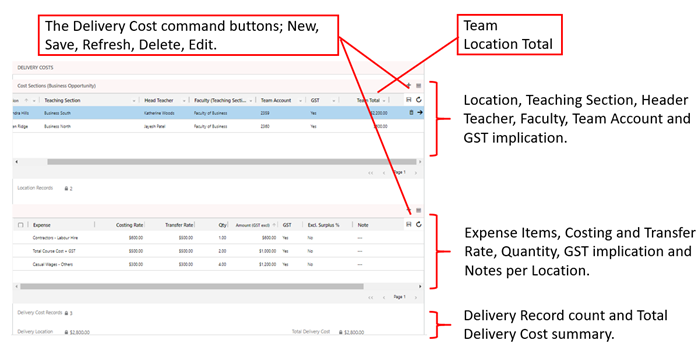
4. In the second table, enter a row for each service or program being delivered by clicking the (+) in the top right of the table to enter cost details.

Tip: In the Cost Section field, select the team delivering the program or services. You will only be able to select from teams you have added in the first table.
5. In the expense field, use either Total Course excl. GST or Total Course + GST as appropriate.
6. In the Costing Rate field, indicate the total revenue TAFE receives for one service delivery (e.g. the student contribution + subsidy amount for a single student completing a program). In the Quantity field, indicate the number of services being delivered (e.g. number of students).
7. If GST is applicable, click on the GST field to switch from ‘No’ to ‘Yes’.
8. In the note section, you may indicate the DP number, qualification code, or any other relevant information.
9. Click on the save icon at the top right corner of the second table.
Tip: you will only be able to add costs once you created and saved a Location and a team.
Note: use F5 to refresh the web page if the Delivery Cost command buttons are not visible.
Non-Delivery Costs
The Non-Delivery Costs table is currently not in use by TAFE Queensland, therefore does not need to be completed.
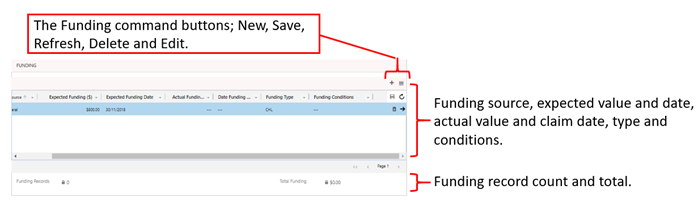
Funding
The Funding section is used to identify revenue TAFE Queensland expects to receive for this opportunity from sources other than the client (i.e. subsidies), and captures the fund sources, values, and conditions. These funds offset the total Cost to the Client within the Cost Summary.
1. Add a row for each type of funding applicable to this business opportunity.
2. In Expected Funding, enter the total amount expected to be received from the subsidy.
3. In the Funding Conditions section, you may also indicate how this figure was calculated (e.g. $1,000 per x10 students on the program).
Note: use F5 to refresh the web page if the Funding command buttons are not visible.
Recalculating the Cost Summary
The Cost Summary section summarizes the values entered in the Delivery Costs, Non-Delivery Costs and Funding sections.
To calculate for the first time, or recalculate the summary values, you must use the following method.
1. Click on the Recalculate Opportunity button in the command bar.
Tip: if this button is not visible, look in more commands (the 3 dots),

After recalculating, check the costs summary table to ensure information has been added correctly.
Tip: Check the Total Cost to Client, Expected Funding and Total Revenue values are correct.

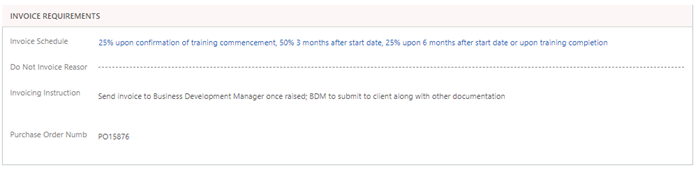
Invoice Requirements
The Invoice Requirements section is used to indicate the invoice schedule definition, invoicing instructions and capture the client’s purchase order number.
Note: Business Opportunities “closed as won” will automatically create a Project Delivery record associated with the Business Opportunity.
Note: if “Do not invoice” is selected for the Invoice Schedule, then no invoice schedule will be created for any associated Project Delivery. Please ensure that a “Do Not Invoice Reason” is entered in this scenario.
Tip: Invoice Instructions and the client’s Purchase Order Number are pulled onto all invoice schedules when they are created for a Project Delivery.
Completing the Cost Proposal stage
1. The flag icon in the business process flow ribbon indicates the current stage of this Business Opportunity.
Ensure that you have entered as much information as possible in the above sections before completing this stage.
2. Click on the Finalise Proposed Costings field to change it to Yes.
a. This action will automatically populate the Date and Finalise By fields.
b. As soon as “Finalise Proposed Costings” is set to Yes in the Business Process Flow a workflow email will fire to the Lead Business Line Director captured in stage 2. Prepare Proposal, within the Lead Personnel section.
c. If a user completes every section in sequential order, and fills out the fields accordingly, there should be no issue with the workflow email firing (if they leave sections blank, and update the “Finalise Proposed Costings“ to Yes, then no email will be sent).
3. Click on Next Stage.
Note: This action will “tick” the Cost Proposal stage, and move the flag icon to the next stage, exposing the internal approval section.

Internal/External Approval stage
The Internal/External Approval stage has a dual purpose, the management of the internal approval process, and the management of the business proposal process.
Request Internal Approval
The Internal Approval section is used to capture and maintain details regarding who the approver(s) are, when they have added their approval, and any additional comment they wish to make.
Internal approval is a two-step process, which includes the persons nominated in the Lead Business Line Director (Approver 1) field, and the 2nd Approving User field (Approver 2).
Only users with the appropriate security permissions will see the “APPROVAL…” command bar buttons.
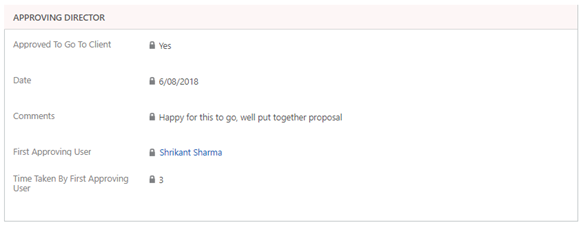
Approving Director
Approver 1 will be sent an email as soon as the “Finalise Proposed Costing” field is set to Yes. An example of the email is shown below.
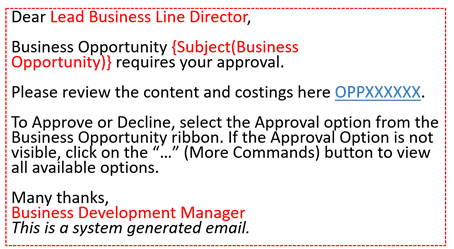
Users can view all “overdue” Business Opportunities submitted for approval by using the “Opportunity Approval Status Report For First Approver” system view.
Note: a reminder email will be sent to each approver, 1 day after the initial email was sent.
To “Approve” or “Decline” the 1st step in the approval process, use the following method.
1. Click on the OPPXXXXXX hyperlink within the received email, to open the business opportunity.
Tip: you may need to look in your Junk Email folder to initially find these emails.
2. Review the business opportunity’s content and attachments.
3. Click on the “APPROVAL: LEAD DIRECTOR” button in the command bar.

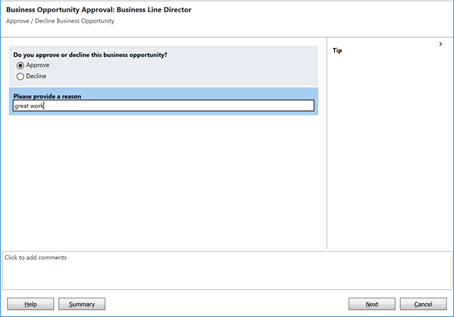
4. In the “Business Opportunity Approval: Business Line Director” popup
a. Click “Approve” or “Decline”.
b. Enter a reason in the “Please provide a reason” field.
c. Click on Next, then click on Finish.
The Business Opportunity will be updated with the information entered by the Business Line Director. The “Time Taken by First Approving User” starts counting the number of days between the initial email send and the nominated person approving or declining the Business opportunity.
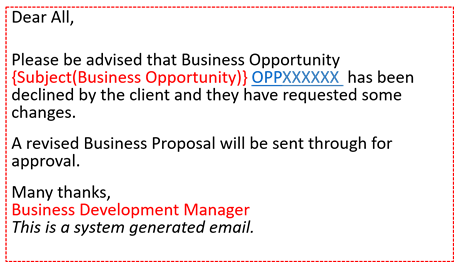
If the Business Line Director declines the business opportunity, you as owner of the business opportunity, will receive an email, like the example below.
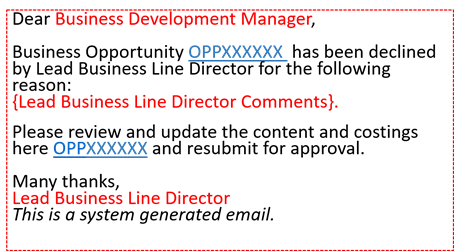
When this happens the Business Process Flow will revert to the Cost Proposal stage, and clear the Finalise Proposed Costings, Date and Finalise By fields. This allows you to modify the entered information and costings and resubmit the Business Opportunity for approval.
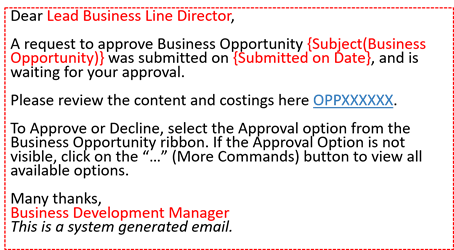
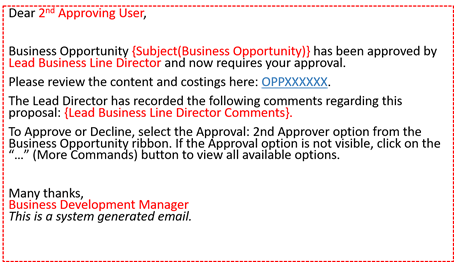
2nd Approving User
Approver 2 will be sent an email as soon as Approver 1 has approved the Business Opportunity. An example of the email is shown below.
Users can view all “overdue” Business Opportunities submitted for approval by using the “Opportunity Approval Status Report For Second Approver” system view.
Note: a reminder email will be sent to the 2nd approver, 1 day after the initial email was sent.
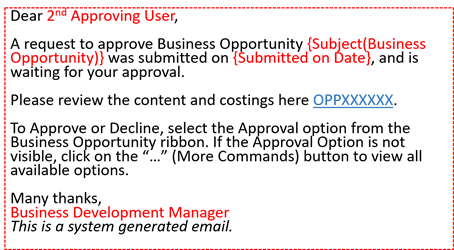
To “Approve” or “Decline” the 2nd step in the approval process, use the following method.
1. Click on the OPPXXXXXX hyperlink within the received email, to open the business opportunity.
Tip: you may need to look in your Junk Email folder to initially find these emails.
2. Review the business opportunity’s content and attachments.
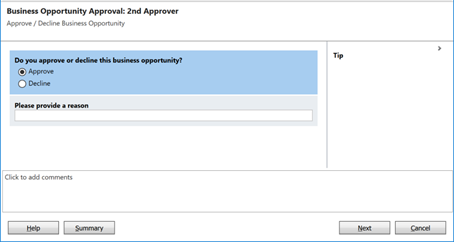
3. Click on the “APPROVAL: 2ND APPROVER” button in the command bar.

4. In the “Business Opportunity Approval: 2nd Approver” popup.
a. Click “Approve” or “Decline”.
b. Enter a reason in the “Please provide a reason” field.
c. Click on Next, then click on Finish.
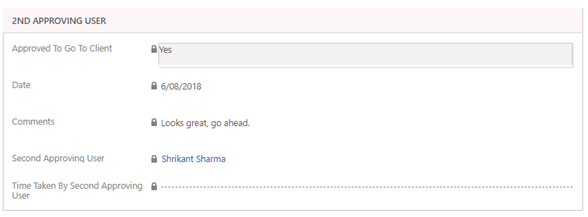
The Business Opportunity will be updated with the information entered by the 2nd Approver. The “Time Taken by Second Approving User” starts counting the number of days between the initial email send and the nominated person approving or declining the Business opportunity.
If the 2nd Approver declines the business opportunity, you as owner of the business opportunity, will receive an email, like the example below.
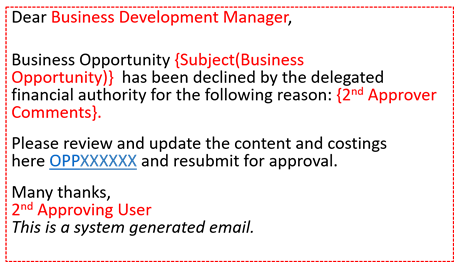
When this happens the Business Process Flow will revert to the Cost Proposal stage, and clear the Finalise Proposed Costings, Date and Finalise By fields. This allows you to modify the entered information and costings and resubmit the Business Opportunity for approval.
Generate the Business Proposal
To generate a business proposal for your business opportunity, use the following method.
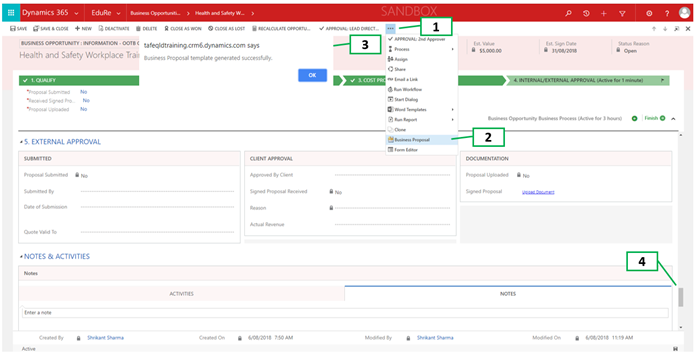
1. Click on the more commands button.
2. Click on Business Proposal.
Note: Wait until the pop up dialogue box appears (see screenshot) to advise Business Proposal template generated successfully.
3. Click on OK, in pop up dialogue box.
4. Scroll down to Notes & Activities
5. Click on “Business Proposal Template For Business Opportunity.docx” in Notes.
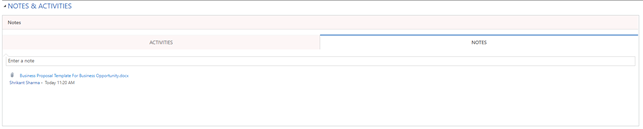
Tip: if the Note and associated attachment are not listed, refresh the web page (F5).
6. Choose Microsoft Word (default), If asked to open the document with what program.
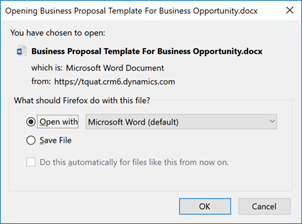
7. Click on OK.
8. Click on Enable Editing, when the Word document opens.

Solicit Client Approval
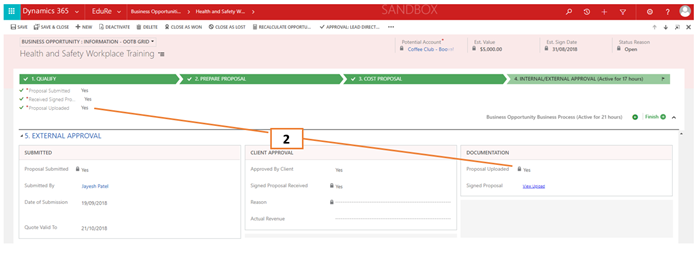
The External Approval section is used to capture and maintain details regarding the client sign-off process.
Client sign-off is a three-step process, which includes when and who submitted the proposal to the client, the client’s response, and hopefully the upload of the client’s signed response.
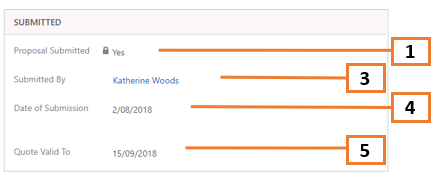
Submitted
The Submitted sub-section allows you to specify whether the business proposal has been submitted, who and when it was submitted, and the expiration date of the business proposal.
Once the Business Proposal has been sent to the client you should update the Business opportunity with submission specifics.
To enter the submission specifics, use the following method.
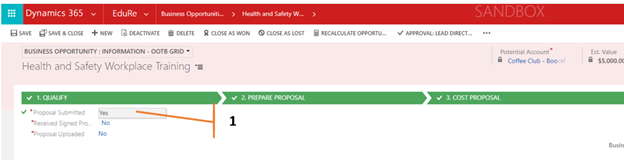
1. Click in the Proposal Submitted field to change the value to Yes.
Note: this action will update the Proposal Submitted field in the Submitted sub-section.
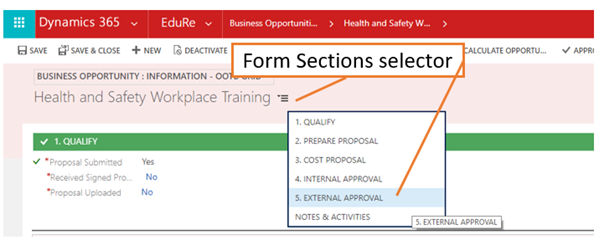
2. Scroll down to 5. External Approval section.
– OR –
Click on the Form Sections link, then select.
3. Click in the Submitted By field.
a. Click on the look up icon (magnifying glass).
b. Choose Look Up More Records, then search for and select a user.
4. Click in the Date of Submission field, then enter or select a date from the calendar.
5. Click in the Quote Valid To field, then enter or select a date from the calendar.
Client Approval
The Client Approval sub-section allows you to specify whether the client has given approval of business proposal or not, and whether you have received the signed proposal back from the client.
To enter the client approval or their rejection of the business proposal, use the following method.
1. Click in the Approved By Client field to change the value to: –
a. Yes, if the client approves the business proposal.
– OR –
b. No, if the client declines the business proposal.
Note: this action will send an email to internal approvers to advise them that the client has asked for changes to the business proposal.
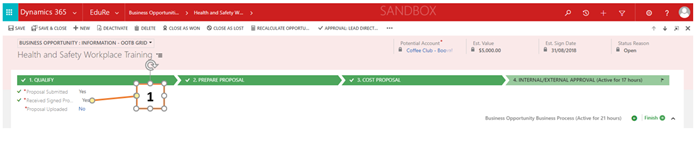
Note: In this scenario, the Business Development Officer must manually revert the Business Opportunity back to “3. COST PROPOSAL” by click on the Back arrow within the business process flow. This action will allow you to make changes to the business opportunity. Follow the steps outlined in the Cost Proposal stage to reconfirm the Finalise Proposed Costings.

To acknowledge receipt of a client signed copy of the business proposal, use the following method.
1. Click in the Received Signed Proposal field, changing the value to Yes.
Documentation
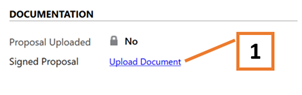
The Documentation sub-section allows you to indicate that the client signed copy of the business proposal has been uploaded as an attachment to a Note, and a short cut to perform the upload.
To attach the sign copy and update the uploaded flag, use the following method.
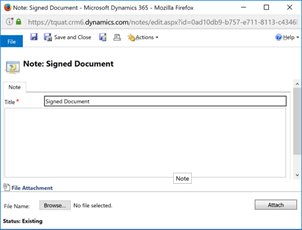
1. Click on the Upload Document hyperlink, and wait for the Note: Signed Document pop up to appear.
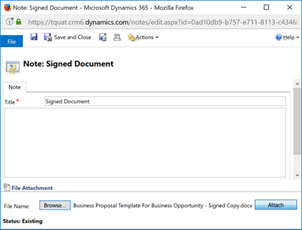
a. Click on Browse, to enable you to find and select the signed proposal.
b. Click on Attach, to attach the document to the Note.
c. Click on Save and Close.
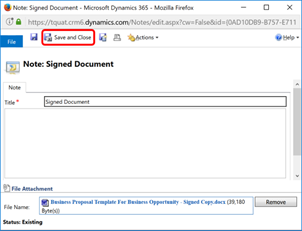
Tip: the client signed copy of the business proposal will be added as an attachment to a Note, in the Notes & Activities section.
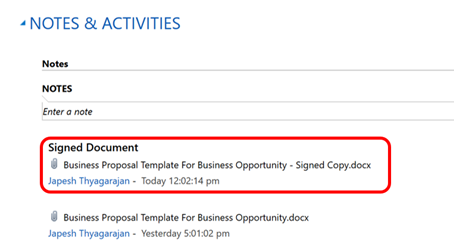
2. Click in the Proposal Uploaded field, changing the value to Yes.
Closing the Business Opportunity as Won or Lost
To complete business opportunity process, it is imperative to “Close” each Business Opportunity upon completion of the Internal/External Approval stage.
Close as Won
To close a business opportunity as won, use the following method.
1. Select EduRe in the navigation bar.
2. Click on Business Opportunities in the menu options.
3. Find and select the required record from the displayed list of records.
– OR –
Enter a search word to find the required record.
4. Click on the Subject field, of the required record.
– OR –
Click once (in white space) on the required record, then click on +EDIT from the command bar.
– OR –
Double click (in white space) from the displayed records.
Note: all these actions will open the required Business Opportunity record.
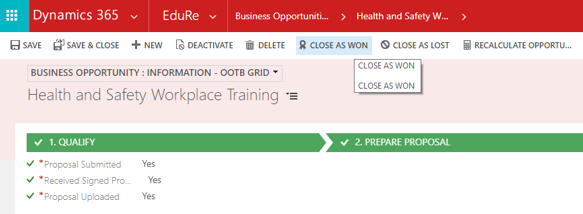
5. Click on CLOSE AS WON in the command bar.
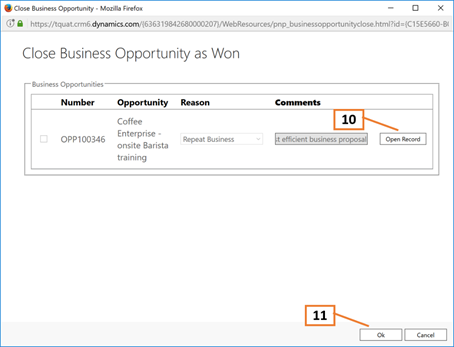
6. Select a Reason from dropdown list of options.
7. Enter a Comment.
8. Click on OK.
Note: this action will automatically create a Project Delivery record, deactivate the Business Opportunity, and add the Business Opportunity as a reference in the Project Delivery’s Related Records section.
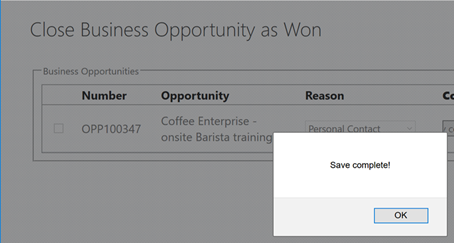
9. When the “Save complete!” pop up displays, then click OK.
10. Click on Open Record, to open the newly created Project Delivery record in a new window.
Tip: The Project Delivery by default will be assigned to the same person that owned the Business Opportunity. You may wish to reassign the Project Delivery to the member of staff who will be overseeing the delivery of the services at this time (e.g. Contract Manager, Key Account Coordinator, Faculty Administration etc.).
11. Click on Cancel to close the “Close Business Opportunity as Won” pop up.
Note: An automated Email is sent to the Approving users, and Lead Head
Close as Lost
To close a business opportunity as lost, use the following method.
1. Select EduRe in the navigation bar.
2. Click on Business Opportunities in the menu options.
3. Find and select the required record from the displayed list of records.
– OR –
Enter a search word to find the required record.
4. Click on the Subject field, of the required record.
– OR –
Click once (in white space) on the required record, then click on +EDIT from the command bar.
– OR –
Double click (in white space) from the displayed records.
Note: all these actions will open the required Business Opportunity record.
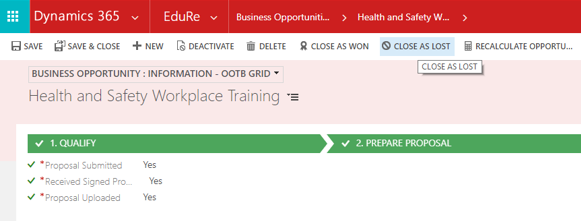
5. Click on CLOSE AS LOST in the command bar.
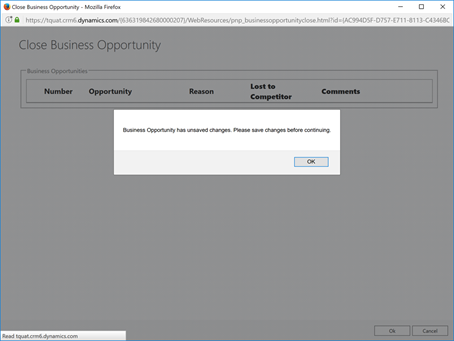
6. Click on OK, when the pop up message is displayed.
7. Click on Cancel.
Close from a Parent Business Opportunity
To close child business opportunities as lost or won that are related to a parent business opportunity, use the following method.
Note: you may need to mark multiple child opportunities as won or lost, dependent upon the client’s response.
1. Select EduRe in the navigation bar.
2. Click on Business Opportunities in the menu options.
3. Find and select the required parent business opportunity record from the displayed list of records.
– OR –
Enter a search word to find the required parent business opportunity record.
4. Click on the Subject field, of the required record.
– OR –
Click once (in white space) on the required record, then click on +EDIT from the command bar.
– OR –
Double click (in white space) from the displayed records.
Note: all these actions will open the required parent Business Opportunity record.
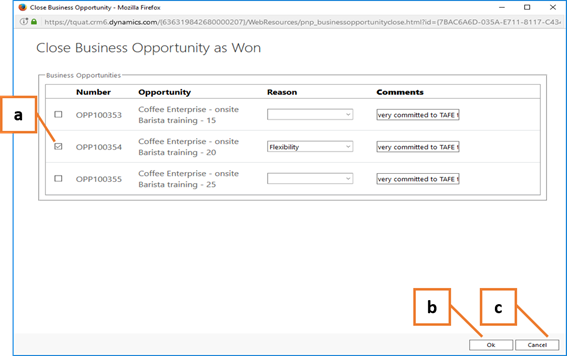
5. Click on CLOSE AS WON.

6. In the “Close Business Opportunity as Won” pop up window.
a. Select all the child business opportunities that have been accepted by the client.
b. Click on OK, then click on OK again, in the Save complete pop up.
c. Click on Cancel.
Note; this set of actions will deactivate the won business opportunities and automatically create the related Project Deliveries.
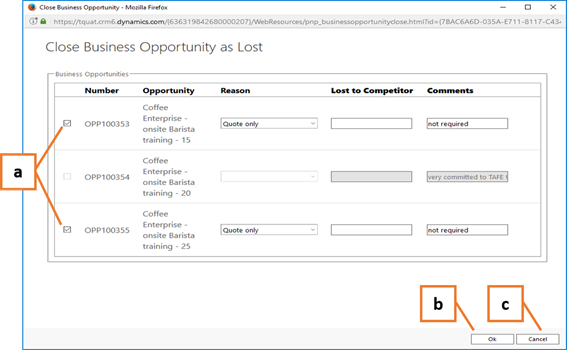
7. Click on CLOSE AS LOST.
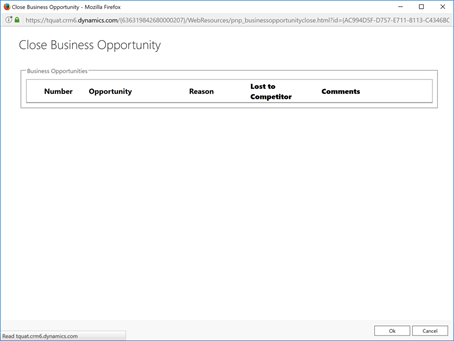
8. In the “Close Business Opportunity as Lost” pop up window.
a. Select all the child business opportunities that have not been accepted by the client.
b. Click on OK.
c. Click on Cancel.
Note: this set of actions will deactivate the lost business opportunities.
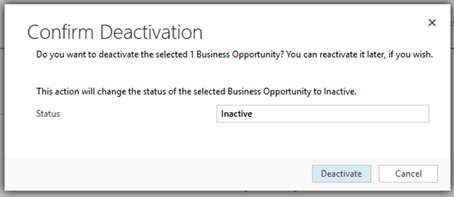
 9. Click on Deactivate in the command bar, to deactivate the parent business opportunity.
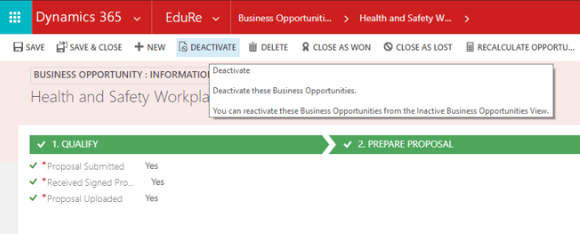
10. Click on Deactivate in the “Confirm Deactivation” pop up.
Edit a Business Opportunity
1. Select EduRe in the navigation bar.
2. Click Business Opportunities in the menu options.
3. Find and select the required record from the displayed list of records.
– OR –
Enter a search word to find the required record.
4. Click on the Subject of the required record.
– OR –
Click once (in white space) on the required record, then click on +EDIT from the command bar.
– OR –
Double click (in white space) from the displayed records.
Note: all these actions will open the required Business Opportunity record.
5. Enter or alter the relevant fields or promote or demote the stage of the record.
6. Click on SAVE & CLOSE (to save the entered information and close the Business Opportunity).
– OR –
Click on SAVE (to save the Business Opportunity and continue working on the record).
Edit a Business Opportunity that has already been Closed as Won
Important Note: This procedure should only be used to correct an administrative error. If actual changes to the Opportunity have occurred after it has been won (e.g. change to the number of students), the changes should be updated directly to the Project Delivery record.
1. Click on Activate on the command bar.
2. Make corrections to the Opportunity as needed. Click Save.
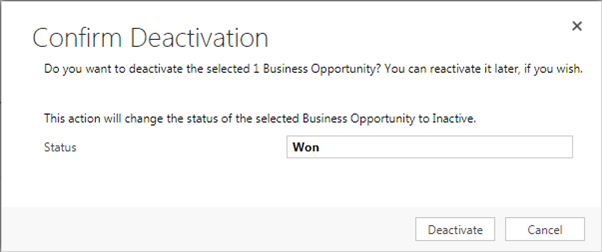
3. Click Deactivate on the command bar.
4. Change the status to Won. Click Deactivate.
Clone a Business Opportunity
Cloning a Business Opportunity is a simple process, and can be performed on Active or Inactive records.
To clone a business opportunity, use the following method.
1. Select EduRe in the navigation bar.
2. Click Business Opportunities in the menu options.
3. Find and select the required record from the displayed list of records.
– OR –
4. Enter a search word to find the required record.
5. Click on the Subject field, of the required record.
– OR –
Click once (in white space) on the required record, then click on +EDIT from the command bar.
– OR –
Double click (in white space) from the displayed records.
Note: all these actions will open the required Business Opportunity record.
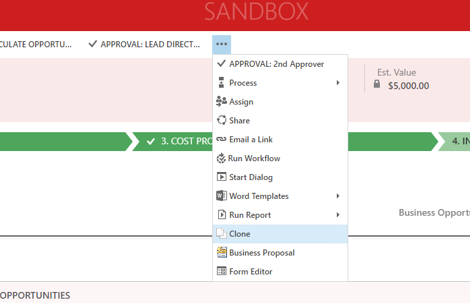
6. Click on CLONE.

– OR –
Click on More Commands (“…”)
7. Click OK, when you are asked to confirm the cloning action.
8. Click OK, when the Record cloned successfully pop up is displayed.
Assign a Business Opportunity to a user
If a Business Opportunity should be owned by another person within your organisation, you can assign the record to that person.
To assign 1 or more Business Opportunities from any of the Business Opportunity views, or from within an open Business Opportunity record; use the following method.
1. Select EduRe in the navigation bar.
2. Click Business Opportunities in the menu options.
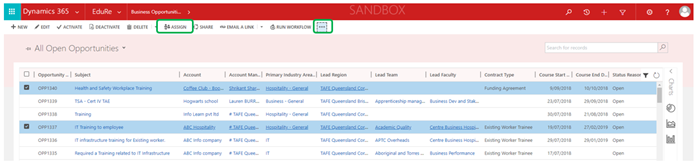
3. Find and select the required record(s) from any of the Business Opportunity views
4. Click on the Assign button in the command bar (or from more commands …)
 – OR –

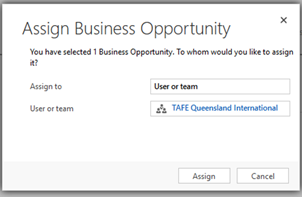
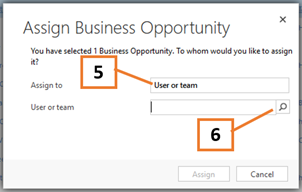
5. Select User or Team by clicking in the Assign to field.
6. Enter a value from the User or Team field, or click the magnifying glass icon to Look Up More Records.
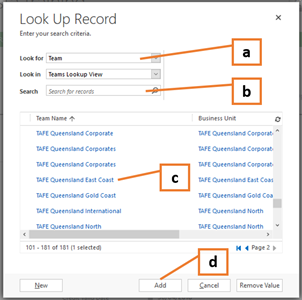
7. In the Look Up Record pop up
a. Select Team or User in the Look for field.
b. Enter a search word in the Search field.
c. Select a record from the list of records.
d. Click on Add.
8. Click on Assign, to initiate the assign process.