
EduRe – TAFE QLD Help & Training
What is Dynamics 365 Marketing?
If your job involves creating, running and monitoring targeted marketing campaigns, then you will need to use the Microsoft Dynamics 365 Marketing module. The module allows you to create activities for each campaign and assign them to different team members.
Microsoft Dynamics 365 is your database for storing and managing contact details for all the people and companies that will be the recipients of your marketing communications.
Microsoft Dynamics 365 can also track customer responses and costs for each campaign; plus allow you to gauge recipient interest, and link contacts to Enquiries (leads), and Business Opportunities, Partnerships, and Tenders.
The Marketing work area within Dynamics 365 provides basic marketing features and gets you started with running marketing campaigns. However, an additional marketing communications tool usually manages the communications send process, such as email (Electronic Direct Marketing), SMS (text messaging), or post (Direct Marketing); which is not part of your current EduRe release. These tools can also provide, but not limited to, campaign automation and event management.
Note: it is important to always keep your data up to date.
Manage Account & Contact preferences
Both the Account and Contact record types contain fields which indicate the individuals, or businesses, communications preferences. These fields must be used when creating or managing marketing lists.
Note: to find out how to create Accounts or Contacts, see
EduRe B2B Concepts > Manage Accounts; OR EduRe B2B Concepts > Manage Contacts
1. Select Marketing in the navigation bar
2. Click on Accounts in the menu options
– OR –
Click on Contacts in the menu options
3. Find and select the required record from the displayed list of records.
– OR –
Enter a search string to find the required record.
4. Click on the Subject field, of the required record.
– OR –
Click once (in white space) on the required record, then click on +EDIT from the command bar.
– OR –
Double click (in white space) from the displayed records.
Note: all these actions will open the required Business Opportunity record.
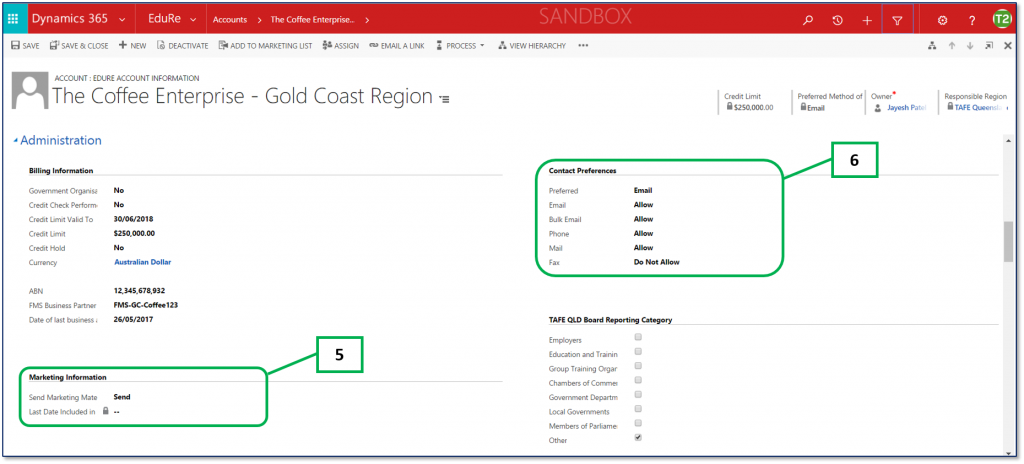
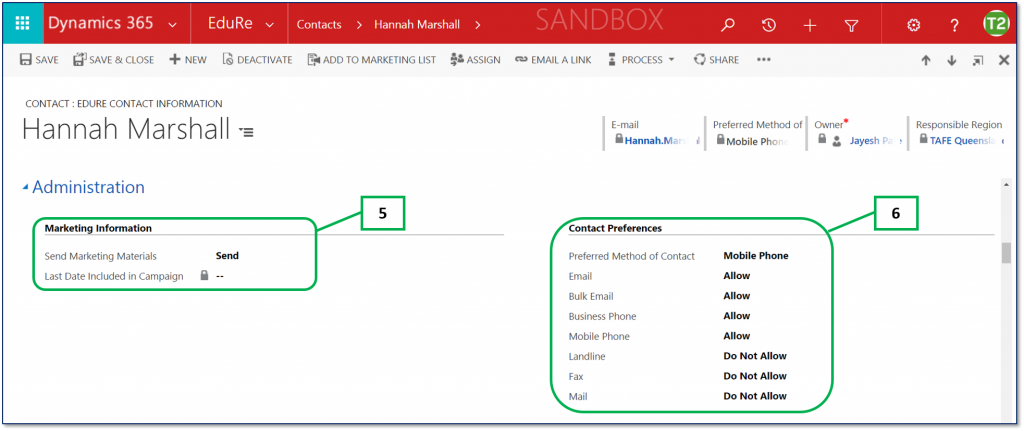
5. Click in the Send Marketing Materials field to change its value.
a. Send indicates that the Account or Contact wishes to receive marketing communications.
b. Do Not Send indicates that the Account or Contact does not want to receive any marketing communications.
Tip: The Send Marketing Materials field, when set to Do Not Send, must overrule any of the individual preference settings
Tip: The Last Date Included in Campaign is updated automatically when an additional marketing communications tool is used
Tip: The Checkbox at the end of the WEF – “Consents to receive Marketing Information” if checked, will set the “Bulk Email” field to “Allow”
6. Click in each of the preference fields to change their individual values.
a. Preferred Method of Contact
Tip: must be used to determine if the Account or Contact allows any marketing communications to be sent when building marketing lists
b. Email
c. Bulk Email
Tip: must be used to determine if the Account or Contact allows Electronic Direct Marketing to be sent when building marketing lists
Tip: can be updated via the Web Enquiry Form (WEF)
d. Phone (only available for Accounts)
e. Business Phone (only available for Contacts)
f. Mobile Phone (only available for Contacts)
g. Landline (only available for Contacts)
h. Fax
i. Mail
Tip: must be used to determine if the Account or Contact allows mailed communications to be sent when building marketing lists
Note: you will need to ensure that one or more preferences are set to “Allow” when building marketing lists. The preferences used will depend upon the purpose of the list, e.g. phone fields used for cold calling, follow up calls, etc..
Manage Account & Contact preferences
Both the Account and Contact record types contain fields which indicate the individuals, or businesses, communications preferences. These fields must be used when creating or managing marketing lists.
Note: to find out how to create Accounts or Contacts, see
EduRe B2B Concepts > Manage Accounts; OR EduRe B2B Concepts > Manage Contacts
1. Select Marketing in the navigation bar
2. Click on Accounts in the menu options
– OR –
Click on Contacts in the menu options
3. Find and select the required record from the displayed list of records.
– OR –
Enter a search string to find the required record.
4. Click on the Subject field, of the required record.
– OR –
Click once (in white space) on the required record, then click on +EDIT from the command bar.
– OR –
Double click (in white space) from the displayed records.
Note: all these actions will open the required Business Opportunity record.
5. Click in the Send Marketing Materials field to change its value.
a. Send indicates that the Account or Contact wishes to receive marketing communications.
b. Do Not Send indicates that the Account or Contact does not want to receive any marketing communications.
Tip: The Send Marketing Materials field, when set to Do Not Send, must overrule any of the individual preference settings
Tip: The Last Date Included in Campaign is updated automatically when an additional marketing communications tool is used
Tip: The Checkbox at the end of the WEF – “Consents to receive Marketing Information” if checked, will set the “Bulk Email” field to “Allow”
6. Click in each of the preference fields to change their individual values.
a. Preferred Method of Contact
Tip: must be used to determine if the Account or Contact allows any marketing communications to be sent when building marketing lists
b. Email
c. Bulk Email
Tip: must be used to determine if the Account or Contact allows Electronic Direct Marketing to be sent when building marketing lists
Tip: can be updated via the Web Enquiry Form (WEF)
d. Phone (only available for Accounts)
e. Business Phone (only available for Contacts)
f. Mobile Phone (only available for Contacts)
g. Landline (only available for Contacts)
h. Fax
i. Mail
Tip: must be used to determine if the Account or Contact allows mailed communications to be sent when building marketing lists
Note: you will need to ensure that one or more preferences are set to “Allow” when building marketing lists. The preferences used will depend upon the purpose of the list, e.g. phone fields used for cold calling, follow up calls, etc..
Manage Marketing Lists
Your marketing list is the core of running a successful marketing campaign. It can include any one type of customer record, such as accounts or contacts. The Leads referred to in the Targeted At field is not the EduRe Enquiry record type, but an out-of-the-box record type not currently used.
You can create two types of marketing lists:
- Static Use a static list if you prefer to add and update members manually.
- Dynamic Use a dynamic marketing list if you want the list to return a list of members dynamically when needed, based on search criteria you set. For example, if you want to run a campaign to members of a specific city, use a dynamic list. A dynamic marketing list retrieves the updated list of members each time you open the list, create a quick campaign from the list, or distribute a campaign activity for a campaign associated with the list.
Create or edit a marketing list
1. Select Marketing in the navigation bar
2. Click on Marketing Lists in the menu options
3. To create a new campaign,
a. Click +New in the command bar.
OR –
To edit an existing campaign,
b. Find and select the required record from the displayed list of records.
OR –
c. Enter a search string to find the required record.
4. Add or change the information in the Summary area.
Note: To look up records in the Owner field, first click Save, or you’ll lose your changes.
5. Click on SAVE & CLOSE (to save the entered information and close the marketing list).
OR –
Click on SAVE (to save the marketing list and continue working on the record).
6. Add any other information that applies to your marketing list in the Notes
7. Click Save & Close when you are finished.
Add members to a marketing list
1. In any marketing list record, in the Members area, click the Add ![]() button
button
2. In the Manage Members dialog box, select one of the following options, and then click Continue.
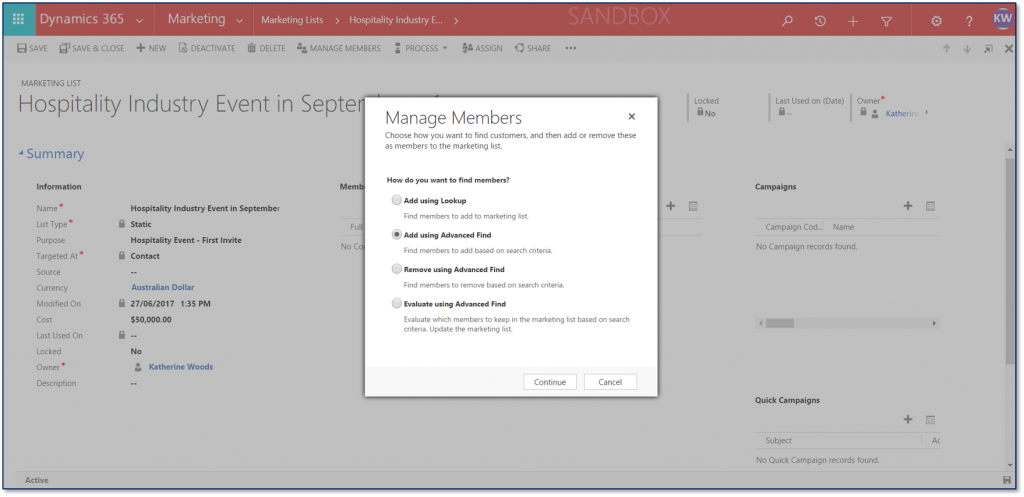
Add using Lookup
1. In the Look Up Records dialog box, select your search criteria.
2. Select the records that you want to add, click Select, and then click Add.
Add using Advanced Find
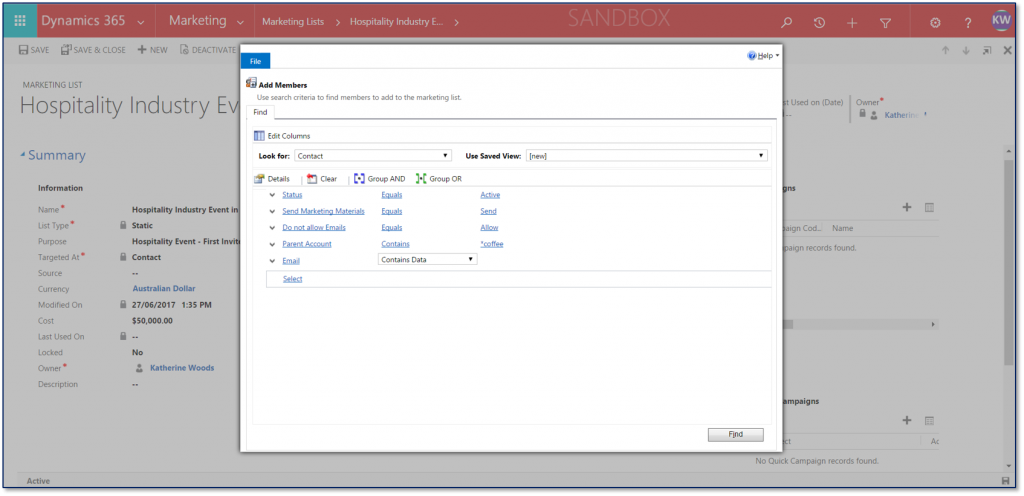
1. In the Add Members dialog box, click Select, and then select the field on which you want to search, such as Account Name or City. You can select fields from the current record type, or from related record types. When you select a related record type, a new line appears with another Select list for the related record type.
2. Click Equals, and then select a query relational operator (for example Contains or Begins With).
3. Click Enter Text, and then type the value that you want to locate.
4. To specify the columns to include in the search results, click Edit Columns, and then Add Columns. Then select the columns that you want to add, and click OK.
5. Click Find.
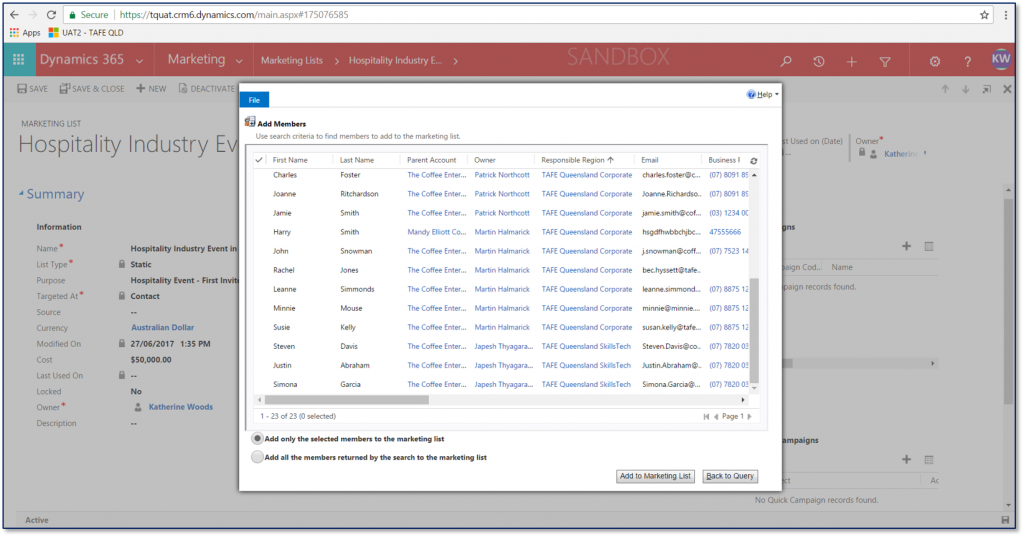
6. Select the members that you want to add, select one of the following, and then click Add to Marketing List.
i. Add only the selected members to the marketing list
ii. Add all the members returned by the search to the marketing list
Remove using Advanced Find
1. In the Add Members dialog box, click Select, and then select the field on which you want to search, such as Account Name or City. You can select fields from the current record type, or from related record types. When you select a related record type, a new line appears with another Select list for the related record type.
2. Click Equals, and then select a query relational operator (for example Contains or Begins With).
3. Click Enter Text, and then type the value you want to locate.
4. To specify the columns to include in the search results, click Edit Columns, and then click Add Columns. Then select the columns that you want to add, and click OK.
5. Click Find.
6. Select the members that you want to remove, select one of the following, and then click Remove from Marketing List.
7. Remove only the selected members from the marketing list
8. Remove all the members returned by the search from the marketing list
Evaluate using Advanced Find
1. In the Add Members dialog box, click Select, and then select the field on which you want to search, such as Account Name or City. You can select fields from the current record type, or from related record types. When you select a related record type, a new line appears with another Select list for the related record type.
2. Click Equals, and then select a query relational operator (for example Contains or Begins With).
3. Click Enter Text, and then type the value you want to locate.
4. To specify the columns to include in the search results, click Edit Columns, and then click Add Columns. Then select the columns that you want to add, and click OK.
5. Click Find.
6. Select the members that you want to keep, select one of the following, and then click Update Marketing List.
7. Keep only the selected members in the marketing list
8. Keep all the members returned by the search in the marketing list
Define the member selection criteria for a dynamic marketing list
1. In any marketing list, in the Members area, click the Add
2. In the Manage Members dialog box, click Select, and then select the field on which you want to search, such as Account Name or City. You can select fields from the current record type, or from related record types.
When you select a related record type, a new line appears with another Select list for the related record type.
3. Click Equals, and then select a query relational operator.
4. Click Enter Value, and then type the value that you want to locate (for example, “Seattle” or “Email”).
For some values, you can click the Lookup icon to open the Select Values dialog box and select the value you want.
5. To specify the columns to include in the search results, click Edit Columns, and then Add Columns. Select the columns that you want to add, and click OK.
6. Click Use Query to add the matching records to your dynamic marketing list.
Associate campaigns or quick campaigns to a marketing list
After you have created a campaign or quick campaign, you can associate it to your marketing list. You can also create a new campaign or quick campaign from your marketing list.
1. In the Campaigns or Quick Campaigns area, click the Add ![]() button.
button.
2. Search for the campaign or quick campaign you want to associate to this marketing list.
Note: If you don’t have any campaigns, or if you want to create a new one, you can click + New.
If you don’t have any quick campaigns, the Quick Campaign Wizard will start.
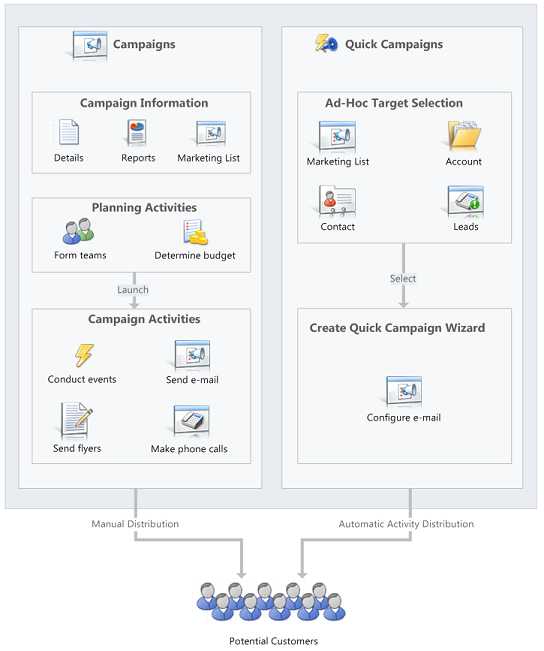
Understand the difference between a campaign and a quick campaign
In Microsoft Dynamics 365, use standard campaigns to manage the end-to-end process of a complete marketing campaign, like managing campaign and planning activities, distributing the activities to other team members, and tracking how the campaign did. Campaigns include extensive tracking features, including detailed information, reports, and multiple marketing lists.
In contrast to standard campaigns, use quick campaigns to automatically distribute a single activity to selected accounts, contacts, or leads, or to a single marketing list. The effects of a quick campaign are immediate.
Create or edit a campaign template
Save time when creating multiple campaigns by creating a campaign template. Campaign templates contain prefilled data that you specify, so you don’t have to re-enter the same information for each campaign. You can either create a new campaign template or copy an existing campaign toas a template.
Create a campaign template
1. Select Marketing in the navigation bar
2. Click on Marketing Lists in the menu options
3. To create a new campaign,
a. Click +New in the command bar.
OR –
To edit an existing campaign,
b. Find and select the required record from the displayed list of records.
OR –
c. Enter a search string to find the required record.
4. Go to Marketing > Campaigns.
5. Click New Template.
– OR –
Open the campaign you want to edit.
6. Add information in the template form just as you do when creating a campaign. In the template form, enter the information you want to appear in campaigns based on this template, and add items such as planning tasks, campaign activities, and marketing lists.
7. Click Save or Save and Close.
Copy an existing campaign as a template
1. Open the campaign that you want to copy.
2. Click Copy as Template, type a name for the template.
3. Click on Save in the command bar.
Create or edit a campaign
The campaigns to store all your marketing information and activities, and to measure the success of your efforts. Campaigns contain planning tasks and campaign activities you need to manage for the marketing campaigns.
You can add strategic campaign information to your campaign, such as:
- Budgets and expenses
- Promotion codes
- Target products
- Marketing collateral, including sales literature
- Target marketing lists
Campaigns can include whatever planning activities you want to perform before you launch the campaign, and also the campaign activities you want to manage as part of the campaign.
1. Select Marketing in the navigation bar
2. Click on Campaigns in the menu options.
3. To create a new campaign,
a. click New.
OR –
To edit a campaign,
a. Find and select the required record from the displayed list of records.
OR –
b. Enter a search string to find the required record.
4. Add or change information in the text boxes.
a. In the Campaign section, enter the campaign details such as, name, type, and the expected response rate.
b. In the Schedules section, enter the proposed and actual start and end dates of the campaign.
c. Under Financials, enter details about the cost of the campaign and campaign activities, and the budget and revenue of the campaign.
d. To track conversations in the planning phase of the campaign, in the Activities area, add activities.
5. When you’re ready to save your data, click Save.
6. To add a marketing list to the campaign, in the Marketing Lists area, click +, and in the Look Up Records dialog box, find and select a marketing list.
7. To create planning and campaign activities for your campaign, for example, identifying advertising channels or prepare campaign communications to send to the members on the marketing lists.
Create a quick campaign
Send an e-mail blast to customers who fit a specific demographic, a mail campaign to clients in a specific region, or perhaps a phone call campaign to previous buyers of a particular product by using a quick campaign in Microsoft Dynamics 365. A quick campaign is a single campaign activity geared toward a targeted audience. Track the success of your quick campaign through campaign responses, and convert the positive responses into new leads, quotes, orders, or opportunities.
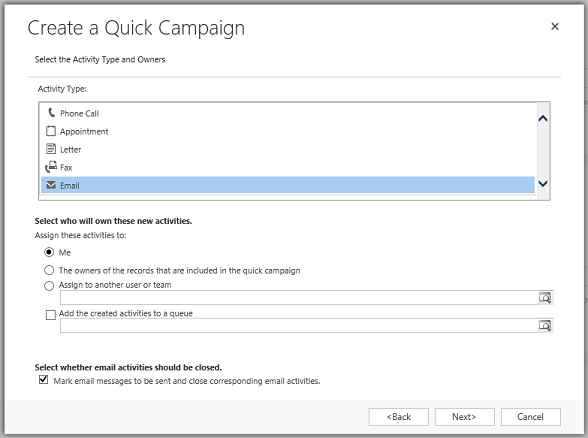
If you need to perform more than one activity for your campaign, such as an email blast and a mailing, create a new campaign instead.
1. Select Marketing in the navigation bar.
2. Click on Marketing Lists in the menu options
3. Open a record, and then in the Quick Campaigns area, click the Add button ![]() .
.
4. In the Quick Campaign Wizard, read the instructions on the Welcome page, and click Next.
5. Specify a name for the quick campaign.
6. Select the type of activity you want to create.
Note: You can also select who you want Microsoft Dynamics 365 to assign the activity to and whether Dynamics 365 should perform the activity automatically for appropriate activities, such as sending email messages. For example, if you are creating a phone call activity for all the sales representatives, you can select the phone call activity, and then select The owners of the records that are included in the quick campaign. Each sales representative can then see the activity and take action on it. However, if you are creating a large number of email activities that Dynamics 365 will perform automatically, you can assign the email activity to yourself instead of the record owners.
7. Add or change information in the text boxes in the activity form, and click Next.
8. Click Create.
Note: You can’t add records to a quick campaign after you create it.
Add an activity to a campaign
Make your marketing campaigns successful by creating, distributing, and assigning planning and campaign activities in Microsoft Dynamics 365. Planning activities are those you want to perform before you launch the campaign, and campaign activities are those you want to manage as part of the campaign. Examples of planning and campaign activities you can add include:
• Identify advertising channels and supporting materials
• Contact media channels to reserve time or space for advertising
• Create or refine target marketing lists
• Contact a design agency to request creation of collateral pieces and advertising materials
By default, a campaign targets an activity to the group of marketing lists that you select for the campaign. If you want to run a campaign activity on a subset of your marketing lists, you can distribute the activity to certain members instead.
Add a planning activity to a campaign
1. Select Marketing in the navigation bar
2. Click on Campaigns in the menu options.
3. In the campaign record you want to add the planning activity to, on the nav bar, click the down arrow ![]() next to the campaign you’re working on and then click Planning Activities.
next to the campaign you’re working on and then click Planning Activities.
4. To add a new activity, click Add New Activity, and then select the type of activity you want to create.
-OR-
To add an existing activity, click Add Existing Activity. In the inline lookup field, search for and select the activity.
5. In the new activity form, add or change information in the text boxes.
6. When you’re ready to save your data, click Save.
Add a campaign activity to a campaign
1. Select Marketing in the navigation bar
2. Click on Campaigns in the menu options.
3. In the campaign record you want to add the campaign activity to, on the nav bar, click the down arrow ![]() next to the campaign you’re working on and then click Campaign Activities.
next to the campaign you’re working on and then click Campaign Activities.
4. Click Add New Campaign Activity.
5. Type in all the information you can, and then click Save. This creates the campaign activity so you can do more things with it, like add marketing lists.
6. To add a marketing list, click +. In the Look Up Records box, type in your search and click the Search button, select one or more marketing lists, and click Add.
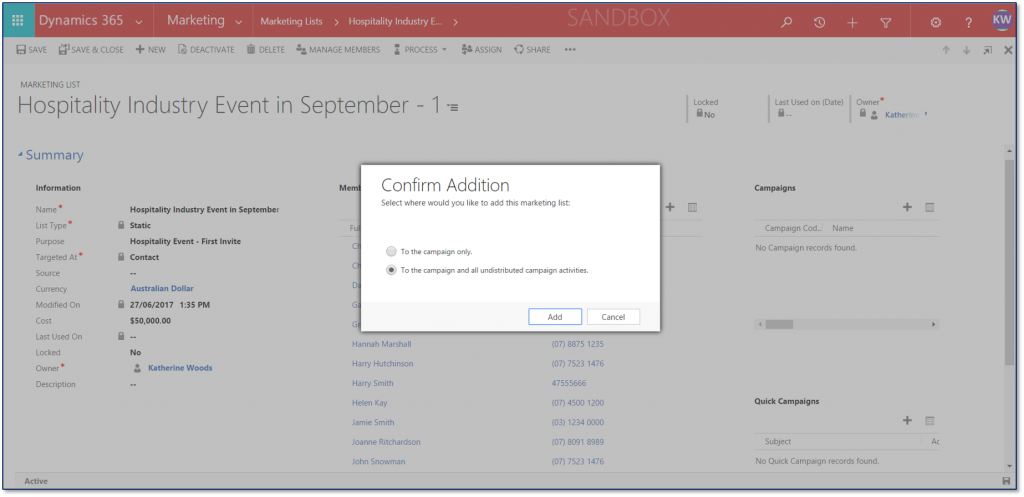
7. To distribute the new campaign activity, on the command bar, click Distribute Campaign Activity.
8. In the activity form, type or modify information in the text boxes, and click Distribute.
9. Choose who will own the activities, and click Distribute.
Note: You can only distribute campaign activities of type “mail merge” to marketing lists that contain the same type of record. For example, if one marketing list contains accounts and a second marketing list contains leads, the mail merge campaign activity will fail. Create a separate mail merge campaign activity for each group of marketing lists with the same record type.
10. After all the distributed activities are closed, you can close the campaign activity. To close the campaign activity, open the campaign activity record, and on the command bar, click Close Campaign Activity. Set an appropriate status for the activity, and click OK.
11. When the activity is completed, update the campaign activity record with the actual costs. Open the campaign activity and update the Actual Cost This can help guide you in planning future campaign activities.