
EduRe – TAFE QLD Help & Training
Dynamics 365 administrators can use the resources and topics provided in this section to help them manage and configure Microsoft Dynamics 365.
In this topic
ο Verify network capacity and throughput for Dynamics 365 clients
ο Best practices for improving application performance
ο Common configuration settings for Internet Explorer
ο Increase data storage limits for websites
ο Install recent updates for Dynamics 365 for Outlook
ο Automatic synchronization for Outlook Online and Offline modes
ο Synchronize only essential data for Outlook Online and Offline modes
ο Track Microsoft Dynamics 365 calendar appointments in Dynamics 365 for Outlook
ο Antivirus or malware application settings
ο Security concepts for Microsoft Dynamics 365
ο Create users and assign Microsoft Dynamics 365 (online) security roles
ο Add teams or users to a field security profile
ο Synchronize user information between Microsoft Dynamics 365 and Active Directory
ο Add or remove territory members
Getting started
As a Dynamics 365 administrator, you’ll find the information that you need here to get your organization started with Microsoft Dynamics 365.
64-bit supported configurations for Microsoft Dynamics 365
Installing and running Microsoft Dynamics 365 applications that connect to database, reporting services, and email features running on other 32-bit computers is generally supported.
Dynamics 365 for Outlook
• Dynamics 365 for Outlook includes a 64-bit version that can be installed on any of the supported 64-bit Windows operating systems.
• The 32-bit version of Dynamics 365 for Outlook can be installed and run on a 64-bit Windows operating system but the version of Microsoft Outlook must be 32-bit.
Email Router
Microsoft Exchange Server 2010 or Microsoft Exchange Server 2013 editions, which are available only for 64-bit systems, are supported, and can run 64-bit, or 32-bit, editions of the Microsoft Dynamics CRM Email Router.
Supported web browsers and mobile devices
Users can access the Microsoft Dynamics 365 Web application on the most recent versions of the following browsers:
• Internet Explorer on Windows
• Microsoft Edge on Windows 10
• Firefox on Windows
• Safari on Mac OS X
• Chrome on Windows or Google Nexus 10
For more detailed information about supported browsers, see Web application requirements for Microsoft Dynamics 365.
For a mobile device, such as an iPad or smartphone, the following apps are available:
• Microsoft Dynamics 365 for iPad
• Microsoft Dynamics 365 for Windows 8
For more detailed information about supported phones and tablets, see Support for Dynamics 365 for phones and Dynamics 365 for tablets.
Performance tuning and optimization
Use this information to help you plan and optimize application performance with Microsoft Dynamics 365.
Verify network capacity and throughput for Dynamics 365 clients
The primary characteristics of a network that affect the performance of Microsoft Dynamics 365 clients, such as the web application or Dynamics 365 for Outlook, are bandwidth and latency.
• Bandwidth is the width or capacity of a specific communications channel.
• Latency is the time required for a signal to travel from one point on a network to another, and is a fixed cost between two points.
One of the main causes of poor performance of Microsoft Dynamics 365 clients is the latency of the network over which the clients connect to the Microsoft Dynamics 365 organization. Lower latencies (measured in milliseconds) generally provide better levels of performance.
Notice that, even if the latency of a network connection is low, bandwidth can become a performance degradation factor if there are many resources sharing the network connection, for example, to download large files or send and receive email.
Networks with high bandwidth don’t guarantee low latency. For example, a network path traversing a satellite link often has high latency, even though throughput is very high. It’s common for a network round trip traversing a satellite link to have five or more seconds of latency. An application designed to send a request, wait for a reply, send another request, wait for another reply, and so on, will wait at least five seconds for each packet exchange, regardless of the speed of the server.
How to check latency
Microsoft Dynamics 365 includes a basic diagnostic tool that analyzes the client-to-organization connectivity and produces a report. To run the Dynamics 365 Diagnostics tool, follow these steps.
1. On the user’s computer or device, start a web browser, and sign in to a Microsoft Dynamics 365 organization.
2. Enter the following URL, https://myorg.crm.dynamics.com/tools/diagnostics/diag.aspx, where crm.dynamics.com is the URL of your Microsoft Dynamics 365 (online) organization.
3. Click Run.
The report displays a table with test and benchmark information. Of particular importance is the Latency Test row value. This value is an average of twenty individual test runs. Generally, the lower the number, the better the performance of the client. Although users may receive a satisfactory experience by using connections with more latency, for best application performance we recommend that the value be 150 ms (milliseconds) or less.
Best practices for improving application performance
• Maximize how quickly your forms load.
• Make sure you aren’t using legacy form rendering, which can make forms take significantly longer to load. More information: System Settings dialog box – General tab
Key preparation and configuration tasks
This topic, which is intended for administrators and business users of Microsoft Dynamics 365, describes common configuration settings and tasks that can help you keep your organization optimized so that you can focus on what’s important. It’s designed to improve your overall experience with Microsoft Dynamics 365, even before your business begins to use it.
Common configuration settings for Internet Explorer
Microsoft Dynamics 365 is a web-based application and uses web browsers, such as Internet Explorer, as the user interface to view, add, or edit information that you’ve stored in the Dynamics 365 database. Make the following common Internet Explorer configuration settings to optimize your Dynamics 365 experience.
Increase disk space for temporary Internet files
To make sure that Internet files for Microsoft Dynamics 365 are not being deleted, increase the disk space for temporary Internet files.
1. Open Internet Explorer, and on the Tools menu, click or tap Internet Options.
2. On the General tab, in the Browsing history section, click or tap Settings.
3. Set the Disk space to use field to 350.
4. Click or tap OK, and then click or tap OK
Retain browsing history
To optimize your Dynamics 365 experience, we recommend that you do not select the option to delete the browsing history when you exit from your browser. If you select this option, it deletes everything marked in your Browsing history settings, such as temporary Internet files, cookies, and history (by default, the check boxes for these options are selected). Deleting your temporary Internet files causes Internet Explorer to cache the files again, and deleting cookies signs you out of Dynamics 365.
1. Open Internet Explorer, and on the Tools menu, click or tap Internet Options.
2. Click or tap the General tab, and in the Browsing history section, make sure that the Delete browsing history on exit check box is cleared.
Microsoft Dynamics 365 occasionally uses pop-up windows. Your browser may be blocking these windows because of the pop-up blocker settings. You must configure the pop-up blocker settings to allow pop-up windows for the Dynamics 365 websites.
Microsoft Dynamics 365 occasionally uses pop-up windows. Your browser may be blocking these windows because of the pop-up blocker settings. You must configure the pop-up blocker settings to allow pop-up windows for the Dynamics 365 websites.
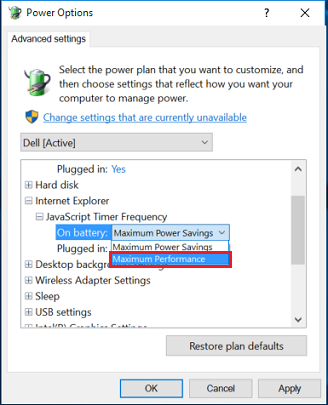
If you experience slower performance in Internet Explorer
If your Dynamics 365 performance is slower in Internet Explorer than in other browsers, set JavaScript Timer Frequency to Maximum Performance.
1. Go to Control Panel > System and Security > Power Options.
2. For your active power plan, click Change plan settings > Change advanced power settings.
3. Expand Internet Explorer > JavaScript Timer Frequency, for On battery and Plugged in, choose Maximum Performance.
Increase data storage limits for websites
Every time you visit a website, Internet Explorer stores the website data as cache, and uses it when you open the website again. This increases your browsing speed. Internet Explorer can store up to a maximum of 10 MB cache data. If your users visit a particular website often, it will store a lot of content on their system, and it may reach the maximum limit of data storage. To avoid this, you may want to increase the data storage limit for your browser.
Here are two ways you can increase the data storage limit for Internet Explorer.
Increase data storage limit by using group policy
1. On your keyboard, press the Windows key + R.
2. In the Run dialog box, type msc, and click OK.
Local Group Policy Editor opens.
3. Navigate to Computer Configuration > Administrative Templates > Windows Components > Internet Explorer > Internet Control Panel > General Page > Browsing History.
4. In the right pane, double-click the setting Set default storage limits for websites.
5. In the Set default storage limits for websites dialog box, click Enabled, and then in the Options section, in the Set default storage limit for websites field, add the required limit.
6. Click Apply, and then click OK.
7. Close Local Group Policy Editor, and restart the computer.
Increase data storage limit by using Registry Editor
1. On your keyboard, press the Windows key + R.
2. In the Run dialog box, type regedit, and click OK.
Registry Editor opens.
3. Navigate to the key: HKEY_LOCAL_MACHINE\SOFTWARE\Policies\Microsoft.
4. Create a subkey Internet Explorer inside Microsoft.
a. Right-click Microsoft, and then click New > Key.
b. Type Internet Explorer as the name of the subkey.
5. Similarly, create a subkey BrowserStorage in the newly created subkey Internet Explorer.
6. Click the BrowserStorage subkey, and in the right pane, right-click, and then click New > DWORD Value.
7. Type DeafultDomainCacheLimitInMB as the name.
8. Double-click the DWORD item you just created.
9. In the Edit DWORD Value dialog box, select Decimal as Base, and then enter the required storage limit in MB, and click OK.
10. Close Registry Editor, and restart the computer.
Configuration settings for Microsoft Dynamics 365 for Outlook
You can configure the following settings to optimize the performance of Dynamics 365 for Outlook.
Install recent updates for Dynamics 365 for Outlook
Use Windows Update to check for updates to Dynamics 365 for Outlook. Typically, these updates help improve performance or ensure greater stability.
Automatic synchronization for Outlook Online and Offline modes
Enabling automatic synchronization allows Dynamics 365 for Outlook to systematically synchronize the data from the Microsoft Dynamics 365 data centre. This ensures that your local data is regularly updated. Therefore, when you go offline, the data required to synchronize locally is a manageable size.
1. Open Outlook that has Dynamics 365 for Outlook installed.
2. On the File tab, click or tap Dynamics 365, and then click or tap Options.
3. On the Synchronization tab, in the Schedule automatic synchronization with Outlook section, make sure that the Synchronize the Dynamics 365 items in my Outlook folders every __ minutes check box is selected.
– OR –
For offline synchronization, on the Local Data tab, in the Select how often to update local data section, make sure that the Update local data every __ minutes check box is selected.
Synchronize only essential data for Outlook Online and Offline modes
By limiting the data that you synchronize with Dynamics 365 for Outlook, you can reduce the network bandwidth consumed by Dynamics 365 users, and therefore improve your overall application performance. To control which records synchronize with Outlook, edit the Outlook filters.
Track Microsoft Dynamics 365 calendar appointments in Dynamics 365 for Outlook
To make sure that your calendar appointments don’t disappear from Dynamics 365 after you begin to track these in Dynamics 365 for Outlook, make sure that your user email address on the respective user record matches your email address being used for Outlook.
Note: The email address may differ from your Microsoft account. It depends on the email addresses you’re using in Outlook and on your Dynamics 365 user record.
Network connections settings
Network connections are established based on the order that the device is listed in the Adapters and Bindings tab of the Network Connections window. For example, if you have enabled a Local Area Network (LAN) and a wireless connection, the order of how a device is connected to the Internet is based on its order in the Adapter and Bindings list. If the LAN connection is higher in the list, most network connections will be established by using the LAN adapter instead of the wireless adapter. To make sure that your network connections are optimized, organize the connections according to your network administrator’s recommendation.
To change the network connection order
1. Right-click Start and then click or tap Run.
2. Type: control netconnections and then click or tap OK.
3. Click or tap Organize > Layout > and verify Menu bar is checked.
4. Click or tap Advanced > Advanced Settings.
5. Click or tap the Adapters and Bindings tab, and then, under Connections, click or tap the connection that you want to move in the list, click or tap the up or down arrow button, and then click or tap OK.
Antivirus or malware application settings
Depending on your antivirus or malware application settings, virus scanning can block certain files, making them inaccessible to other applications and causing an adverse effect on Microsoft Dynamics 365 performance.
Each environment requires a thoughtful decision on what to include and exclude, and there is always a possibility that excluding files from scans could lead to unwanted consequences. Use the following list alongside your well-planned internal IT management policies:
• Check for any interference from desktop security software. Some antivirus programs include a feature known as ScriptScan that can affect the performance of Dynamics 365. Most programs have functionality to disable scanning on certain websites. Make sure that the Dynamics 365 URL is added to this list. For McAfee specifically, see the following KB articles for this setting:
ο McAfee Knowledge Base Article: KB65382
ο Microsoft Support Knowledge Base Article: KB924341
• If you use other antivirus software, make sure that the URL of the Dynamics 365 website is included in the trusted zone for the virus scanning, and disable on-access scanning for the Dynamics 365 website. For more information, see the specific antivirus application documentation.
Manage security, users, and teams
The following section contains information about users, teams, and security in Microsoft Dynamics 365.
Security concepts for Microsoft Dynamics 365
You use the security model in Microsoft Dynamics 365 to protect the data integrity and privacy in a Microsoft Dynamics 365 organization. The security model also promotes efficient data access and collaboration. The goals of the model are as follows:
• Provide a multi-tiered licensing model for users.
• Grant users access that allows only the levels of information required to do their jobs.
• Categorize users and teams by security role and restrict access based on those roles.
• Support data sharing so that users can be granted access to objects they do not own for a one-time collaborative effort.
• Prevent access to objects a user does not own or share.
You combine business units, role-based security, record-based security, and field-based security to define the overall access to information that users have in your Microsoft Dynamics 365 organization.
Business units
A business unit basically is a group of users. Large organizations with multiple customer bases often use multiple business units to control data access and define security roles so that users can access records only in their own business unit. More information: Create or edit business units
Role-based security
You can use role-based security to group sets of privileges together into roles that describe the tasks that can be performed by a user or team. Microsoft Dynamics 365 includes a set of predefined security roles, each of which is a set of privileges aggregated to make security management easier. The bulk of the privileges define the ability to create, read, write, delete and share records of a specific entity type. Each privilege also defines how broadly the privilege applies: at the user level, business unit level, the entire business unit hierarchy or across the entire organization.
For example, if you sign in as a user that is assigned the Salesperson role, you have the privileges to read, write and share accounts for the entire organization, but you can only delete account records that you own. Also, you have no privileges to perform system administration tasks such as install product updates, or to add users to the system.
A user that has been assigned the Vice President of Sales role can perform a wider set of tasks (and has a greater number of privileges) associated with viewing and modifying data and resources than can a user who has been assigned to the Salesperson role. A user assigned the Vice President of Sales role can, for instance, read and assign any account to anyone in the system, while a user assigned the Salesperson role cannot.
There are two roles that have very broad privileges: System Administrator and Customizer. To minimize misconfiguration, the use of these two roles should be limited to a few people in your organization responsible for administering and customizing Microsoft Dynamics 365. Organizations can also customize existing roles and create its own roles to meet their needs. More information: Security roles and privileges
User-based access and licensing
By default, when you create a user the user has read and write access to any data for which they have permission. Also, by default, the user client access license (CAL) is set to Professional. You can change either of these settings to further restrict data and feature access.
Access mode. This setting determines the level of access for each user.
• Read-Write access. By default, users have Read-Write access that allows them access to data for which they have appropriate permission set by security roles.
• Administrative access. Allows access to areas that the user has appropriate permission set by security roles but doesn’t allow the user to view or access business data typically found in the Sales, Service, and Marketing areas, such as accounts, contacts, leads, opportunities, campaigns, and cases. For example, Administrative access can be used to create Dynamics 365 administrators who can have access to perform a complete variety of administrative tasks, such as create business units, create users, set duplicate detection, but cannot view or access any business data. Notice that users who are assigned this access mode do not consume a CAL.
• Read access. Allows access to areas for which the user has appropriate access set by security role but the user with Read access can only view data and can’t create or change existing data. For example, a user with the system administrator security role who has read access can view business units, users, and teams but can’t create or modify those records.
License type. This sets the user CAL and determines what features and areas are available to the user. This feature and area control is separate from the user’s security role setting. By default, users are created with Professional CAL for the most feature and area access that they have permission granted.
Teams
Teams provide an easy way to share business objects and let you collaborate with other people across business units. While a team belongs to one business unit, it can include users from other business units. You can associate a user with more than one team. More information: Manage teams
Record-based security
You can use record-based security to control user and team rights to perform actions on individual records. This applies to instances of entities (records) and is provided by access rights. The owner of a record can share, or grant access to a record to another user or team. When this is done, they must choose which rights they are granting. For example, the owner of an account record can grant read access to that account information, but not grant write access.
Access rights apply only after privileges have taken effect. For example, if a user does not have the privileges to view (read) account records, they will be unable to view any account, regardless of the access rights another user might grant them to a specific account through sharing.
Hierarchy security
You can use the hierarchy security model for accessing hierarchical data. With this additional security, you gain a more granular access to records, allowing managers to access the records of their reports for approval or do work on reports’ behalf. More information: Hierarchy security
Field-based security
You can use field-level security to restrict access to specific high business impact fields in an entity only to specified users or teams. Like record-based security, this applies after privileges have taken affect. For example, a user may have privileges to read an account, but can be restricted from seeing specific fields in all accounts.
Create users and assign Microsoft Dynamics 365 (online) security roles
You use the Office 365 admin centre to create user accounts for every user who needs access to Dynamics 365 (online). The user account registers the user with Microsoft Online Services environment. In addition to registration with the online service, the user account must be assigned a license in order for the user to have access to the service. Note that when you assign a user the global administrator or the service administrator role in the Microsoft Online Services environment, it automatically assigns the user the System Administrator security role in Microsoft Dynamics 365.
Create a user account
When you create a user account in the Office 365 admin centre, the system generates a user ID and temporary password for the user. You have the option to let the service send an email message to the user as clear text. Although the password is temporary, you may consider copying the information to send to the user through a more secure channel, such as from an email service that can digitally encrypt the contents. For step-by-step instructions for creating a Microsoft Online Services user account, see Create or edit users in Office 365.
Notes:
When you create a user and assign a license in the Office 365 admin centre, the user is also created in Dynamics 365 (online). The synchronization process between the Office 365 admin centre and Dynamics 365 (online) can take a few minutes to complete.
By entering a user ID and password, a user can access the Office 365 admin centre to view information about the service. However, the user will not have access to Dynamics 365 (online) until you assign at least one Dynamics 365 (online) security role to this user.
Tip: To force an immediate synchronization between the Office 365 admin centre and Dynamics 365 (online), do the following:
• Sign out of Dynamics 365 (online) and the Office 365 admin centre.
• Close all open browsers used for Dynamics 365 (online) and the Office 365 admin centre.
• Sign back in to Dynamics 365 (online) and the Office 365 admin centre.
Add a license to a user account
You can license the user when you create the user account, or you can license the user later. You must assign a license to every user account that you want to access the online service.
For step-by-step instructions, see Assign, reassign, or remove licenses.
Important: Licensed users must be assigned at least one Microsoft Dynamics 365 security role to access Dynamics 365 (online).
About user licenses
• Microsoft Dynamics 365 (online) uses user licenses to provide access to your organization. You need one user license per person with an active user record who logs into your organization.
• When you add a new person, the New user account form displays the number of user licenses available. If you reach your limit, the On button is no longer available. You can add additional licenses by choosing Billing > Purchase Services from the left-side menu in the Office 365 admin centre.
• An unaccepted invitation requires a user license until the invitation expires two weeks after it was issued.
• If you have more user licenses than you are using, contact support to reduce the number of licenses. You cannot reduce the number of licenses to less than you are currently using or less than your offer allows. Any changes are reflected in your next billing cycle.
• Each user license requires a unique Microsoft account, and every user who logs on to Microsoft Dynamics 365 needs a license. Most Dynamics 365 subscriptions include a specific number of user licenses.
Assign a security role to a user
Security roles control a user’s access to data through a set of access levels and permissions. The combination of access levels and permissions that are included in a specific security role sets limits on the user’s view of data and on the user’s interactions with that data.
Microsoft Dynamics 365 (online) provides a default set of security roles. If necessary for your organization, you can create new security roles by editing one of the default security roles and then saving it under a new name.
You can assign more than one security role to a user. The effect of multiple security roles is cumulative, which means that the user has the permissions associated with all security roles assigned to the user.
Security roles are associated with business units. If you have created business units, only those security roles associated with the business unit are available for the users in the business unit. You can use this feature to limit data access to only data owned by the business unit.
For more information about the difference between Microsoft Online Services administrator roles and Dynamics 365 (online) security roles, see Grant users access to Microsoft Dynamics 365 (online) as a Microsoft Online service.
Important: You must assign at least one security role to every Dynamics 365 (online) user. The service does not allow access to users who do not have at least one security role. Even if a user is a member of a team with its own security privileges, the user won’t be able to see some data and may experience other problems when trying to use the system.
In Dynamics 365 (online)
1. Click Settings > Security > Users.
2. In the list, select the user or users that you want to assign a security role to.
3. Click Manage Roles.
Only the security roles available for that user’s business unit are displayed.
4. In the Manage User Roles dialog box, select the security role or roles you want for the user or users, and then click OK.
(Optional) Assign an administrator role
You can share Microsoft Online Services environment administration tasks among several people by assigning Microsoft Online Services environment administrator roles to users you select to fill each role. You might decide to assign the global administrator role to a second person in your organization for times when you are not available.
There are five Microsoft Online Services environment administrator roles with varying levels of permissions. For example, the password reset administrator role can reset user passwords only; the user management administrator role can reset user passwords as well as add, edit, or delete user accounts; and the global administrator role can add online service subscriptions for the organization and can manage all aspects of subscriptions. For detailed information about Microsoft Online Services administrator roles, see Assigning Admin Roles.
Note: Microsoft Online Services environment administrator roles are valid only for managing aspects of the online service subscription. These roles don’t affect permissions within the Dynamics 365 (online) service.
Enable or disable users
To enable a user, assign a license to the user and add a user to the security group that is associated with an instance of Dynamics 365 (online). If you enable a user that was disabled, you must send a new invitation for the user to access the system.
To disable a user, remove a license from the user or remove the user from the security group that is associated with an instance of Dynamics 365 (online). Removing a user from the security group doesn’t remove the user’s license. If you want to make the license available to another user, you have to remove the license from the disabled user.
Note: Removing all security roles from the user prevents the user from signing into and accessing Dynamics 365 (online). However, it doesn’t remove the license from the user and the user remains in the list of the enabled users in Dynamics 365 (online). Removing security roles from a user isn’t a recommended method of removing access to Dynamics 365 (online).
You must be a member of an appropriate administrator role to do these tasks. More information: Assigning Admin Roles
Enable a user by assigning a license to the user and adding a user to the security group
1. Browse to the Office 365 admin centre and sign in.
2. Click Users > Active users and select the user.
3. Under Product licenses, click Edit.
4. Turn on a Microsoft Dynamics 365 (online) license, and then click Save > Close.
5. In the Office 365 admin centre, click Groups > Groups.
6. Choose the security group that is associated with your Dynamics 365 (online) organization.
7. Under Members, click Edit, and then Add members. Select from the list of users with Office 365 licenses or use Search to find users.
8. Select the users to add to the security group, and then click Save > Close multiple times.
To add multiple users, see: bulk add users to Office365 groups.
Disable a user by removing a license from the user
1. In the Office 365 admin centre, click Users > Active Users and select a user.
2. In the right-side menu, under Product licenses, click Edit.
3. Turn off the Microsoft Dynamics 365 (online) license, and then click Save > Close multiple times.
Disable a user by removing the user from the security group that is associated with an instance of Dynamics 365 (online)
1. In the Office 365 admin centre, click Groups > Groups.
2. Choose the security group that is associated with your Dynamics 365 (online) organization.
3. In the right-side menu, under Members, click Edit.
4. Click Remove members, and then the select users to remove from the security group.
5. Click Save > Close multiple times.
Notes:
You can also delete users in the Office 365 admin centre. When you remove a user from your subscription, the license assigned to that user automatically becomes available to be assigned to a different user. If you want the user to still have access to other applications you manage through Office 365, for example Microsoft Exchange Online or Microsoft SharePoint, don’t delete them as a user. Instead, simply remove the Microsoft Dynamics 365 license you’ve assigned to them.
When you sign out of the Office 365 admin centre, you aren’t signing out of Dynamics 365. You have to do that separately.
Tip: To force an immediate synchronization between the Office 365 admin centre and Dynamics 365 (online), do the following:
• Sign out of Dynamics 365 (online) and the Office 365 admin centre.
• Close all open browsers used for Dynamics 365 (online) and the Office 365 admin centre.
• Sign back in to Dynamics 365 (online) and the Office 365 admin centre.
Create a non-interactive user account
The non-interactive user is not a ‘user’ in the typical sense – it is not a person but an access mode that is created with a user account. It is used for programmatic access to and from Dynamics 365 between applications. A non-interactive user account lets these applications or tools, such as a Dynamics 365 to ERP connector, authenticate and access Microsoft Dynamics 365 (online), without requiring a Microsoft Dynamics 365 (online) license. For each instance of Microsoft Dynamics 365 (online), you can create up to five non-interactive user accounts.
You need to have the System Administrator security role or equivalent permissions in Microsoft Dynamics 365 to create a non-interactive user. First, you’ll create a user account in Office 365 and then in Microsoft Dynamics 365 (online), select the non-interactive access mode for the account.
1. Create a user account in the Office 365 admin centre.
Be sure to assign a Dynamics 365 (online) license to the account.
2. Go to Dynamics 365 (online).
3. Go to Settings > Security.
4. Choose Users > Enabled Users, and then click a user’s full name.
5. In the user form, scroll down under Administration to the Client Access License (CAL) Information section and select Non-interactive for Access Mode.
You then need to remove the Dynamics 365 (online) license from the account.
6. Go to the Office 365 admin centre.
7. Click Users > Active Users.
8. Choose the non-interactive user account and under Product licenses, click Edit.
9. Turn off the Dynamics 365 (online) license, and then click Save > Close multiple times.
10. Go back to Dynamics 365 (online) and confirm that the non-interactive user account Access Mode is still set for Non-interactive.
Create an application user
Introduced in December 2016 update for Microsoft Dynamics 365 (online), you can use server-to-server (S2S) authentication to securely and seamlessly communicate with December 2016 update for Dynamics 365 (online) with your web applications and services. S2S authentication is the common way that apps registered on Microsoft AppSource use to access the Dynamics 365 data of their subscribers. All operations performed by your application or service using S2S will be performed as the application user you provide rather than as the user who is accessing your application.
You will need to create a custom security role and an application user to associate with your registered app. For more information, see MSDN: Build web applications using Server-to-Server (S2S) authentication.
Manage teams
Using teams in Microsoft Dynamics 365 is optional. However, teams provide an easy way to share business objects and let you collaborate with other people across business units. While a team belongs to one business unit, it can include users from other business units. You can associate a user with more than one team.
You can use two types of teams:
• An owner team owns records and has security roles assigned to the team. The team’s privileges are defined by these security roles. In addition to privileges provided by the team, team members have the privileges defined by their individual security roles and by the roles from other teams in which they are members. A team has full access rights on the records that the team owns.
• An access team doesn’t own records and doesn’t have security roles assigned to the team. The team members have privileges defined by their individual security roles and by roles from the teams in which they are members. The records are shared with an access team and the team is granted access rights on the records, such as Read, Write, or Append.
Owner team or access team?
Choosing the type of the team may depend on the goals, nature of the project, and even the size of your organization. There are a few guidelines that you can use when choosing the team type.
When to use owner teams
• Your organization’s policies require the ability for records to be owned by entities other than users, such as the team entity.
• The number of teams is known at the design time of your Microsoft Dynamics 365 system.
• Daily reporting on progress by owning teams is required.
When to use access teams
• The teams are dynamically formed and dissolved. This typically happens if the clear criteria for defining the teams, such as established territory, product, or volume are not provided.
• The number of teams is not known at the design time of your Microsoft Dynamics 365 system.
• The team members require different access rights on the records. You can share a record with several access teams, each team providing different access rights on the record. For example, one team is granted the Read access right on the account and another team, the Read, Write, and Share access rights on the same account.
• A unique set of users requires access to a single record without having an ownership of the record.
About owner teams
An owner team can own one or more records. To make a team an owner of the record, you must assign a record to the team.
While teams provide access to a group of users, you must still associate individual users with security roles that grant the privileges they need to create, update, or delete user-owned records. These privileges can’t be applied by assigning security roles to a team and then adding the user to that team.
If an owner team doesn’t own records and doesn’t have security roles assigned to the team, it can be converted to an access team. It is a one-way conversion. You can’t convert the access team back to the owner team. During conversion, all queues and mailboxes associated with the team are deleted. When you create a team in the Web application, you have to choose the team type Owner.
About access teams and team templates
You can create an access team manually by choosing the team type Access, or let the system create and manage an access team for you. When you create an access team, you can share multiple records with the team.
A system-managed access team is created for a specific record, other records can’t be shared with this team. You have to provide a team template that the system uses to create a team. In this template, you define the entity type and the access rights on the record that are granted to the team members when the team is created.
A team template is displayed on all record forms for the specified entity as a list. When you add the first user to the list, the actual access team for this record is created. You can add and remove members in the team by using this list. The team template applies to the records of the specified entity type and the related entities, according to the cascading rules. To give team members different access on the record, you can provide several team templates, each template specifying different access rights. For example, you can create a team template for the Account entity with the Read access right, which allows the team members to view the specified account. For another team that requires more access to the same account, you can create a team template with Read, Write, Share and other access rights. To be added to the team, a minimum access level a user must have on the entity specified in the template is Basic (User) Read.
Because of the parental relationship between the team template and system-managed access teams, when you delete a template, all teams associated with the template are deleted according to the cascading rules. If you change access rights for the team template, the changes are applied only to the new auto-created (system-managed) access teams. The existing teams are not affected.
Note: A user must have sufficient privileges to join an access team. For example, if the access team has the Delete access right on an account, the user must have the Delete privilege on the Account entity to join the team. If you’re trying to add a user with insufficient privileges, you’ll see this error message: “You can’t add the user to the access team because the user doesn’t have sufficient privileges on the entity.”
Maximum settings for system-managed access teams
The maximum number of team templates that you can create for an entity is specified in the MaxAutoCreatedAccessTeamsPerEntity deployment setting. The default value is 2. The maximum number of entities that you can enable for auto-created access teams is specified in the MaxEntitiesEnabledForAutoCreatedAccessTeams deployment setting. The default value is 5. You can use the Set-CrmSetting Windows PowerShell command to update this value.
More information: TeamSettings or MSDN: Deployment Entities and Deployment Configuration Settings.
Add teams or users to a field security profile
Role-based security controls access to a specific entity type, record-based security controls access to individual records, and field-level security controls access to specific fields. You can use a field security profile to manage the permission of users and teams to read, create, or write in secured fields. For example, the System Administrator field security profile gives full access to all secured fields in Microsoft Dynamics 365.
1. Go to Settings > Security.
2. Choose Field Security Profiles.
3. Choose the profile name that you want to add teams or users to.
4. Under Related, choose Teams or Users.
5. On the Actions toolbar, choose Add.
6. Select a team or user from the list. You can search for a team or user first.
7. Choose Add.
8. Close the field security profile record.
Synchronize user information between Microsoft Dynamics 365 and Active Directory
Microsoft Dynamics 365 supports two methods for authenticating users:
• Integrated Windows Authentication
• Claims-based authentication
By default, customers who purchase Microsoft Dynamics 365 and deploy it on-premises use Windows Authentication. These customers also can set up claims-based authentication for Internet-facing deployments (IFDs) of the product.
With integrated Windows Authentication, each user record in Dynamics 365 must be associated with a user account in Active Directory to enable log on to Dynamics 365. When the user records are associated, Dynamics 365 automatically reads and stores other information about the user record (including the first and last name, the email address, and the globally unique identifier, or GUID) from the Active Directory directory service.
However, changes to the Active Directory information associated with a specific user can create discrepancies with the information maintained in Dynamics 365, thereby preventing the user from accessing Dynamics 365. Specifically, if value of the User SamAccountName logon attribute in Active Directory changes for a user, the corresponding user information in Dynamics 365 won’t match and the user won’t be able log on.
To ensure that the user can successfully log on to Dynamics 365, you must update the information in the Dynamics 365 user record so that it matches the detail in Active Directory.
Before you start, be sure to record the value of the User SamAccountName logon attribute for the affected user before updating the corresponding user record in Dynamics 365.
Note: For information about synchronizing Microsoft Dynamics 365 (online) with Active Directory, see the blog post How to Synchronize CRM Online with your Active Directory.
1. Go to Settings > Security.
2. Choose Users.
3. In the list of users, choose to select the user record you want to update, and then choose Edit.
4. In the User Name text box, type an Active Directory user name that isn’t used by any Dynamics 365 user record.
Important: If you specify a user name that already exists in Active Directory, Dynamics 365 will try to map the user to the updated user in Active Directory, and when it locates an existing record with the same GUID, the mapping will fail
If all the user accounts in Active Directory are used by Dynamics 365 user records, create a temporary Active Directory user account.
5. Save the user record, and then in the User Name text box, type in the User SamAccountName logon value that appears for the user Active Directory, which you recorded prior to starting this procedure.
6. Choose Save and Close.
Add or remove territory members
To accommodate changes in sales territories or the representatives that are assigned to each territory, you can add or remove territory members in Microsoft Dynamics 365.
1. Go to Settings > Business Management.
2. Choose Sales Territories.
3. In the list of territories, under Territory Name, double-click or tap the entry for the territory you want to add people to or remove people from.
4. In the Navigation Pane, expand Common if necessary, and then choose Members.
5. Follow the steps for the task you’re performing:
Add people to a sales territory
a. On the ribbon, choose Add Members, view the text in the Message from webpage dialog box, and then choose OK to close the dialog box.
b. In the Look Up Records dialog box, in the Search text box, type in the name or a part of the name of the user you want to add to the sales territory, and then choose the Start search icon .
c. In the list of records, select the people you want to add to the sales territory, and then tap or click Add.
Remove people from a sales territory
a. In the list of members, select the people you want to remove from the sales territory, and then on the ribbon, choose Remove Members.
b. In the Remove Members dialog box, choose Remove.
Note: When you remove someone from a sales territory, the updated list of members isn’t displayed until you refresh the page.
Audit data and user activity
The Microsoft Dynamics 365 auditing feature logs changes that are made to customer records and user access so you can review the activity later. The auditing feature is designed to meet the auditing, compliance, security, and governance policies of many regulated enterprises.
The audit logs help the Microsoft Dynamics 365 Administrator answer questions such as:
• Which user was accessing the system and when?
• Who updated this field value on this record and when?
• What was the previous field value before it was updated?
• What actions has this user taken recently?
• Who deleted this record?
• What locale was used to make the update?
The following operations can be audited:
• Create, update, deactivate, and delete operations on records.
• Changes to the sharing privileges of a record.
• The N:N association or disassociation of records.
• Changes to security roles.
• Audit changes at the entity, attribute, and organization level. For example, enabling audit on an entity.
• Deletion of audit logs.
• For changes made to entity fields that can be localized, such as the Product entity name or description fields, the locale ID (LCID) appears in the audit record.
System administrators and customizers can start or stop auditing for an organization.
Important: For Dynamics 365 (on-premises), you may notice that auditing can significantly increase the size of the organization database over time. You can delete audit logs by going to Settings > Auditing > Audit Log Management. Additionally, you may want to stop auditing for maintenance purposes. Stopping auditing stops tracking for the organization during the period until auditing is started again. When you start auditing again, the same auditing selection is maintained that was previously used.
Start or stop auditing for an organization
This task requires the system administrator or customizer security role or equivalent permissions.
1. Go to Settings > Administration.
2. Choose System Settings.
3. On the Auditing tab, select the Start Auditing check box to start auditing. Clear the Start Auditing check box to stop all auditing.
4. Select the entities you want to track. To start or stop auditing on specific entities, select or clear the following check boxes:
a. Audit user access. Tracks when a user accesses Microsoft Dynamics 365 including the user name and time.
b. Common Entities. Tracks common entities like Account, Contact, Goal, Product, and User.
c. Sales Entities. Tracks sales-related entities like Competitor, Opportunity, Invoice, Order, and Quote.
d. Marketing Entities. Tracks Campaign entity activity.
e. Customer Service Entities. Tracks Case, Contract, Queue, and Service entity activity.
5. Click OK.
View audit logging details
System administrators can see activity for the entities that are enabled for audit logging.
1. Go to Settings > Auditing.
2. Choose Audit Summary View.
3. In the Audit Summary View, you can do the following:
a. Click Enable/Disable Filters to turn on filtering. Then, you can filter on a specific event, such as Delete
b. Choose an Event to view specific details about the activity, such as field changes that were made during an update to a record and who performed the update.
c. Click the Refresh button to view the most recent activity.
Enable or disable entities and fields for auditing
System administrators or customizers can change the default audit settings for entities and for specific fields for an entity.
To enable or disable auditing for an entity
1. Go to Settings > System.
2. Click Auditing.
3. In the Audit area, choose Entity and Field Audit Settings.
4. Under Components, expand Entities.
5. Open the entity for which you want to enable or disable auditing.
6. To start auditing, on the General tab, in the Data Services section, select the Auditing check box to enable auditing, or clear the Auditing check box to disable it.
By default, when you start or stop auditing for an entity, you also start or stop auditing for all the fields of this entity.
7. Click Save.
8. Publish the customization. To publish for a single entity, choose the entity, such as Account, and then click Publish on the toolbar.
To enable or disable auditing for specific fields on an entity
1. Under the entity for which you want to enable or disable auditing with specific fields, click Fields.
2. To enable or disable a single field, open the field and in the Auditing section, select Enable or Disable.
3. To enable or disable more than one field, select the fields you want, and then on the toolbar click Edit. In the Edit Multiple Fields dialog box, in the Auditing area, click Enabled or Disabled.
4. Click Save.
5. Publish the customization. To publish for a single entity, choose the entity, such as Account, and then click Publish on the Actions toolbar.