
Product Catalog enhancements in CRM 2015
In earlier versions of CRM you could setup the Product, Product Kit, Pricing, and Discounts. But in CRM 2015 Microsoft has done lot of enhancements in the Product Catalog, and they have introduced Product Family and Bundle, which expose a lot of great features in CRM.
Below I have mentioned key points about the Product Catalog enhancements.
- Automatically set the default price level (price list) for an opportunity, quote, order, or invoice based on the current user and the user’s territory relationship with the price level.
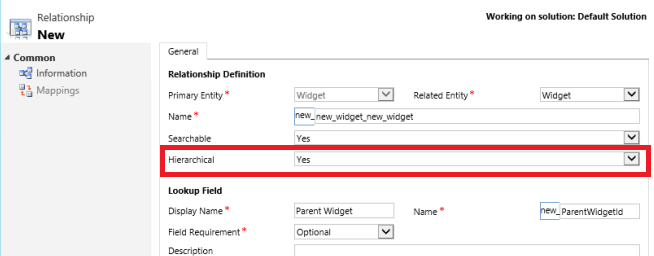
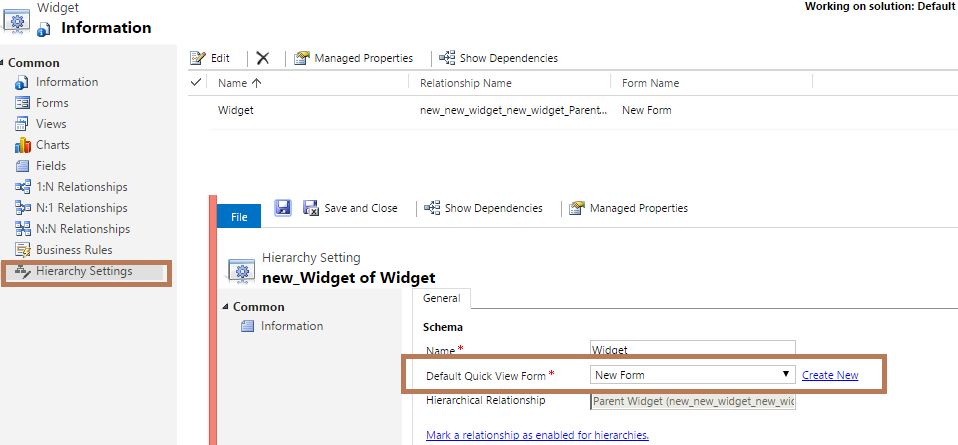
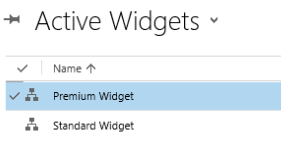
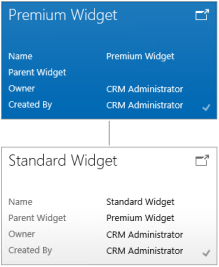
- You can define hierarchies of product families and products.
- Define configurable properties of product family. Hence you can define manufacturer, product description, material, size, color, packaging, and warranty terms etc… and you can change these properties for product to product.
- Also you can specify localized values for certain product properties (attributes) to allow for product names and descriptions to be available in the user’s preferred language.
- Define new relationships, such as cross-sell, up-sell, and accessory, so your sales agents can get the suggestions for related products during sales process.
- Use custom pricing instead of the CRM system pricing to calculate prices when you associate a product or bundle to opportunity, quote, order, or invoice.
- Define per unit discount for products at line level when you add them to opportunity, quote, order, or invoice.
- System setting changes.
Below I have explained each and every point mentioned above in detail.
Automatically set Default Price list:
We have been waiting for this feature; in earlier versions of CRM we generally wrote custom java script.
But now you can choose to automatically set a default price list for an opportunity, quote, order, or invoice based on the sales territory of the user who creates or updates the opportunity, quote, order, or invoice record.
To enable a default price list, you need to setup the following settings and records.
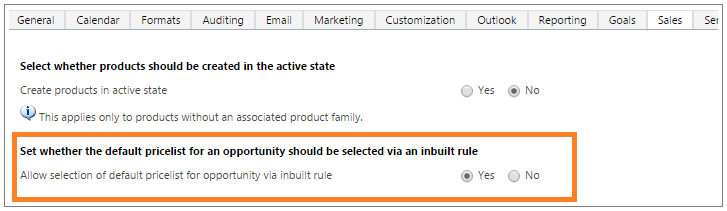
In the System Settings, you need to set the “Allow selection of default pricelist for opportunity via inbuilt rule” as True, as shown in the below screenshot.
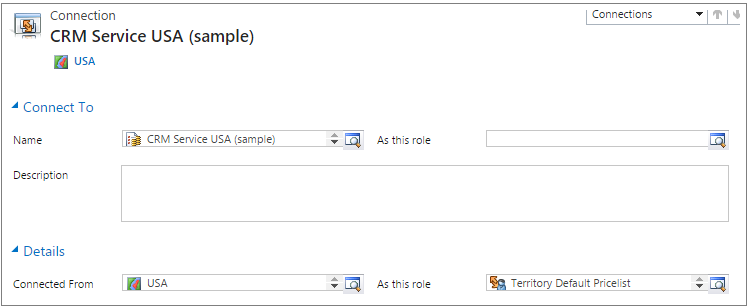
Now you need to create a new Connection between Territory and Price list, with Connection Role “Territory Default Pricelist”, as shown in the below screenshot. In the example below, we have created a Connection between Territory “USA” and Price List “CRM Service USA (sample)”.
And after that, set the Manager of the Territory, for which you would like to setup the Default price list. In below screen, we set the Manager as “First Name Last Name”.

Now if user “First Name Last Name” creates an Opportunity, Quote, Order or Invoice then it will set the Price List.
Note: If you will set multiple territories for Default Price List, then price list field will not be populated and the user must specify a price level for the opportunity, quote, order, or invoice record.
Define Product Family, product and bundle:
Before starting the discussion on this, let us first understand that what Product Family and Product bundle is.
- Product Family: Product family provides a way to categorize the product. Hence you can define a category, and under that Category you can define your products and product bundle. And these products and product bundles inherit the categories of parent product family.
- Product Bundle: Using Product bundle, you can group the products to sell products in an attractive package. It is similar to kit, but kit is deprecated in CRM2015.
Below we have given an image that will explain Product Family, Products and Product bundle.
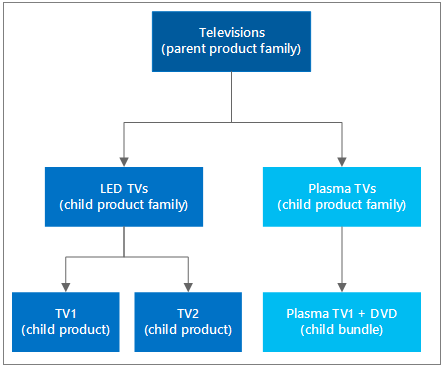
Based on the above screen, you can clearly see that “Televisions” is the parent family for “LED TVs” and “Plasma TVs,” and under a family you can define products and product bundles.
It means using Product Family you can achieve following things into CRM 2015.
- Meaningfully categorize products for your organization.
- Define child family, products and product bundles under a product family.
- Product bundles allow you to sell multiple items together. In earlier versions of CRM, these were known as ‘Kits’, but ‘Kits’ have now been deprecated.
To create a Product Family, Products and Product Bundles in CRM, you need to click on the corresponding buttons.
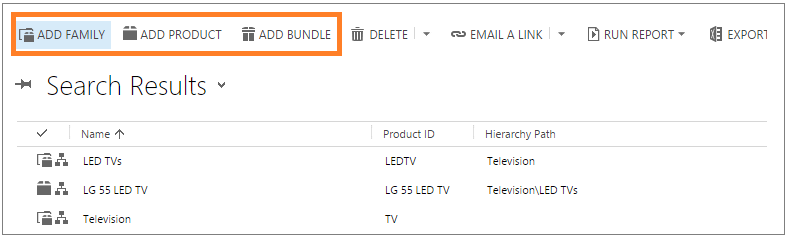
- Clicking on the Add Family button, will open a new Product Family screen.
- Clicking on the Add Product button, will open a new Product screen.
- Clicking on the Add Bundle button, will open a new Product Bundle screen.
Important Note: These products will not be available in Opportunity, Quote, Order or Invoice, unless you publish them.
Hence in CRM 2015, products have their own life cycle; shown below is an image that represents the Product life cycle in CRM 2015.
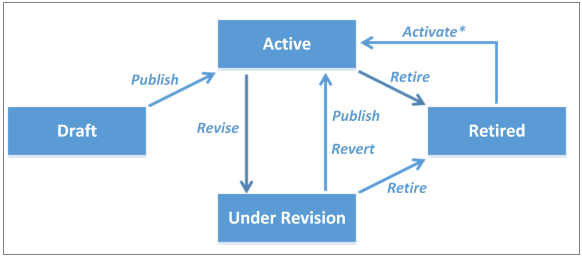
- When you first create a Product, the State of that product will be Draft. Draft products are not available for sale.
- After publishing a Product, the State of product is changed to Active. This action enables products to be selected for sale.
- Products can be revised or retired from the active products list.
- Products “Under Revision” or “Retired”, can be re-published (reactivated).
Configurable properties of products:
Every product is assigned its own set of categories. If we take an example of Television, then we can define the following categories.
- Resolution
- Is 3D
- Screen Size etc…
And if we take an example of Air conditioner, then property might be different.
- Capacity: 1.5 ton, or 2 ton
- Installation Type: Split or Window Air Condition
- Energy Efficiency, etc…
Hence we can say that each and every product may have different kinds of characteristics.
In CRM 2015, you can setup the Product Properties for a Product Family. And these properties are inherited when you create a Product, or Product Bundle within a Product Family.
When you define the properties of a Product Family, then you can select from the following data types for each property.
- Option Set
- Decimal
- Floating Point Number
- Single Line of Text
- Whole Number
You can also set the requirement level of each property. The requirement level dictates whether the property is required or not (Yes or No); when you create an Opportunity, Quote, Order or Invoice for that product.
Important Note: The Products inherited properties, from the Product Family, can be overridden during creation, or revision of the product.
As you can see in below screen, Size is required.
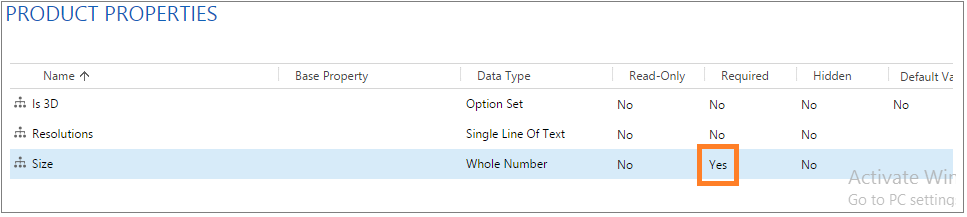
Now if you create an opportunity product for that, then it will display an error unless you set the value for the required properties (i.e. Size in our case). As shown in the below screen.

After setting the value for the required properties (i.e. Size in our case), it will not display any error.

Below we have given some important points about the Product Properties.
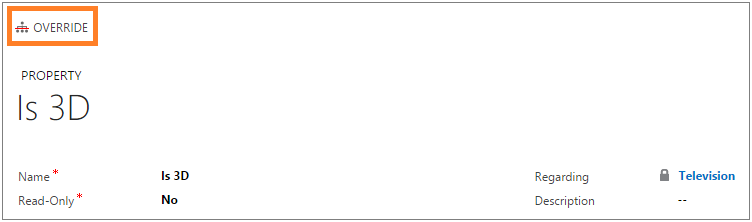
- You can override the property values of the inherited Product Family using the override button, as shown in the below screenshot.
- You can only edit properties, if the product has a Draft or Under Revision state.
- A Read-only product property’s value can’t be changed at run time.
- A hidden property won’t be displayed to sales agents at run time, when they create an Opportunity, Quote, Order or Invoice for that product.
- Also you can’t define properties programmatically using CRM API.
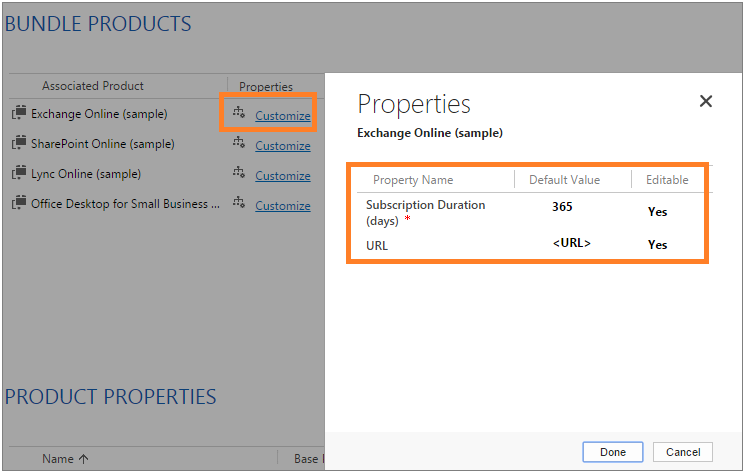
- In a Product Bundle, you can add Products, and then customize the property’s values of bundled product, by clicking on the Customize link, as shown in the below screenshot.
Localize Product properties:
Now you can localize product for different regions, so you can see the localized names that will match the customer’s language preferences. And you can localize the following fields for products.
- Name of Product
- Name of Product Property
- Option name of Option set Product Property
- Option description of Option set Product Property
In our next blog we will discuss Localization of Product.
Define new relationships, such as cross-sell, up-sell, and accessory:
When you sell products or services, it is always a good idea to have all the information about related products defined within your catalog. By defining related products and offers, it empowers your sales personnel to cross-sell or up-sell to your customers.
For example, if any customer enquire about the Surface RT, then your sales people can have the capability to suggest the Surface Pro. Therefore, the Surface Pro is added as an up-sell product for Surface RT using the Product Relationship.
Essentially, Product relationships, help you to cross-sell, up-sell, and sell accessory products or substitutes.
Using relationship, allows you to define the suggestions for your sales personnel, during opportunity and order management. This enables your sales personnel to recommend related products and bundles to your customers.
You can define the following relationships for a product:
- Up-sell
- Cross-sell
- Accessory
- Substitute
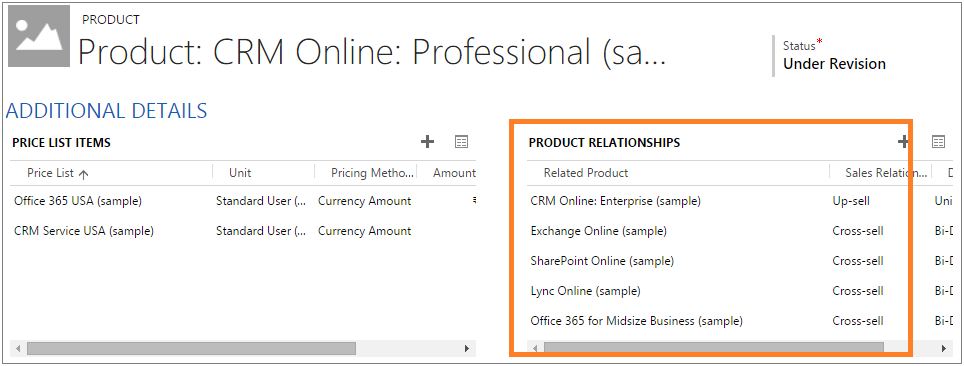
As you can see in below screen, the “CRM Online: Professional” product has relationships with other products, for the purpose of cross-selling or up-selling.
Now, if you will add the “CRM Online: Professional” product into an opportunity, and click on the Suggestions hyperlink; then these related items will be displayed, as shown in the below screenshot.
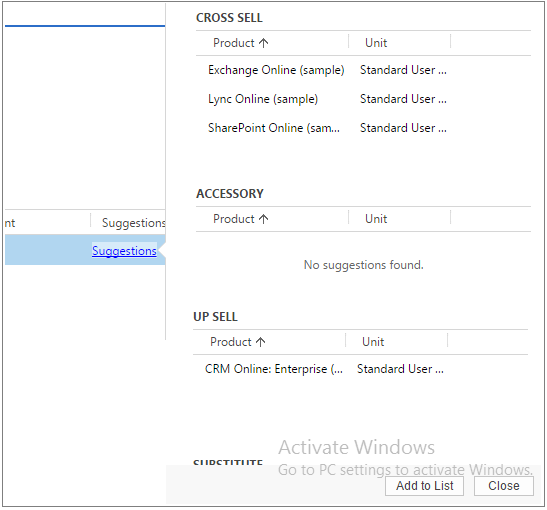
And if the customer is interested in any of the suggested products; then from the same grid, the user can directly select the relevant products by clicking on the “Add to List” button.
Use custom pricing:
The pricing engine in Microsoft Dynamics CRM supports a standard set of pricing and discounting methods, which might be limiting to your business depending on your specific requirements for applying taxation, discounts, and other pricing rules for your products. If you want to define custom pricing for your products in opportunities, quotes, orders and invoices, you can use the CalculatePrice message.
Using the CalculatePriceRequest, you can override default pricing calculations.
This topic will discussed in its own specialty blog posting.
Define per unit discount for products:
In earlier versions of CRM, discounts could only be applied on a per unit level basis. However, in CRM 2015, you can apply discounts either at the line item level or at a per unit level.
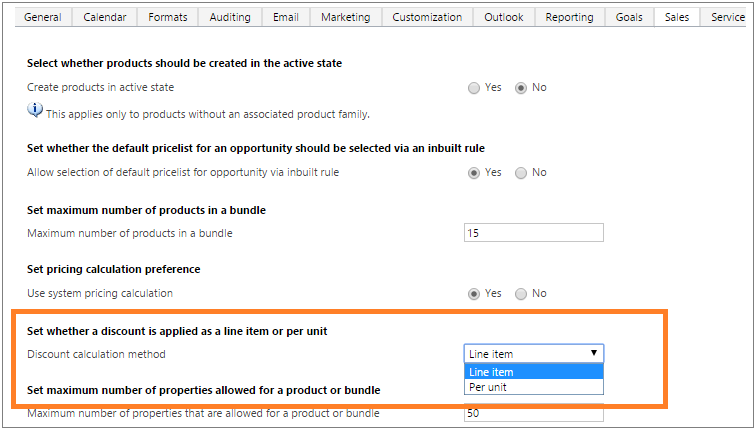
You can specify “Discount calculation method” in the System Settings, to specify whether you need to apply the discount at the Line Item or Per Unit level.
Below we have given an example to explain the discount calculations for Line Item and Per Unit level.
Suppose you create a line item, and set the following values for the Price per Unit, Quantity, and Discount.
- Price per Unit: 100
- Quantity: 10
- Discount: 10
Below we have given the calculations of Extended Amount for different “Discount calculation method” options.
- Line item: If “Discount calculation method” is set to “Line Item”, then the Extended Amount will be 990 = ((Price per Unit * Quantity) – Discount).
- Per Unit: If “Discount calculation method” is set to “Per unit”, then the Extended Amount will be 900 = ((Price per Unit * Quantity) – Discount * Quantity).
System setting changes:
Apart from this Microsoft Dynamics CRM introduces a new TAB into System Settings with named “Sales”, as shown in the below screen.
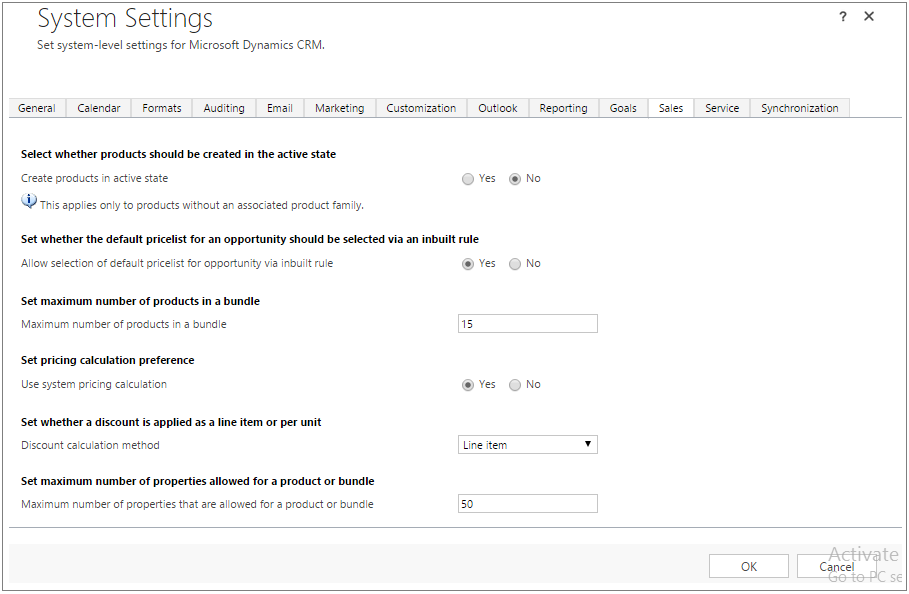
In this section Microsoft Dynamics CRM introduced the following new settings.
- Create Product in Active State: If any product is not associated with a product family, then you can choose to create them directly in an Active state if you set the value of “Create Product in Active State” as yes.
- Allow selection of default price list: It allows you to setup the default price list for a user, when a user creates an Opportunity, Quote, Order and Invoice.
- Maximum number of products in Bundle: It allows you to set the limit of products in a Product Bundle.
- Use System Pricing calculation: It allows you to select whether you need to choose the system pricing calculation or the custom pricing calculations.
- Discount Calculation Method: It allows you to select the Line Item or Per Unit level discount calculation.
- Maximum number of properties: It allows you to set the limit for the number of properties for a product or bundle.
 2942
2942