
EduRe – TAFE QLD Help & Training
What is a Tender Opportunity?
The Tender Opportunity record is used to represent a bid or potential bid made by TAFE Queensland for a project that is being awarded by an external organisation through a tender process.
Tenders are often put out by government departments and are typically large scale contracts or projects such as funding agreements or approved supplier contracts.
The Tender Opportunity form is made up of a Header, Business Process Flow, messages, Body, and Footer, as shown below:
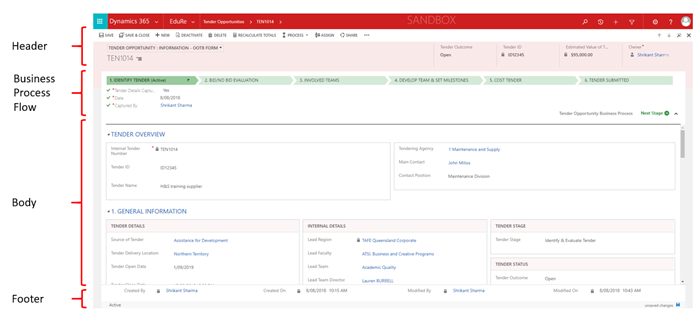
The Tender Opportunity record is broken down into multiple sections within the Body of the form. These sections are aligned with the stages that make up the EduRe Tender business process flow.
The business process flow provides a focus on the information required for each stage of the EduRe Tender Opportunity process.
The stages are Identify Tender, Bid/No Bid Evaluation, Involved Teams, Develop Team and Set Milestones, Cost Tender and Tender Submitted. These stages are meant to guide you through creating a tender opportunity, undertaking an evaluation of the tender, identifying those involved in preparing the tender response, costing the tender and ultimately submitting the tender proposal.
Only the sections within the body of the Tender Opportunity, corresponding with the current and/or completed stages, are visible to the user; all other sections are hidden.
Users can read all Tender Opportunities regardless of the “owning” Business Unit, however, you may only update and assign Tender Opportunities that belong to your Business Unit.
Business scenarios
Scenario 1 – Funding Tender
Jenny is managing a team who are writing a response to a tender released by the Department of Communities whereby funding will be provided for training that assists the development of skills in the community services sector. Jenny co-ordinates a team, prepares a response and submits a proposal to the Department. She manages and tracks this process through the Tender Opportunity in the CRM. The bid is successful and TAFE Queensland is given an allocation of funding to be used in a combination of single subscriber and commercial projects across the state. Jenny updates the Tender Opportunity status as won, and creates a Partnership Opportunity to represent the funding agreement. She then creates a linked Business Opportunity for each TAFE region’s allocation of the funding, and assigns the Business Opportunity to each region’s delivery co-ordinator.
Scenario 2 – Queensland Health
Queensland Rail has released a tender for a panel of preferred suppliers to deliver training services. Jenny co-ordinates a team, prepares a response, and submits a tender bid to Queensland Rail. She manages and tracks this process through the Tender Opportunity in the CRM. The bid is successful and TAFE Queensland becomes one of three preferred suppliers for Queensland Rail for the following 5 years. Jenny updates the Tender Opportunity status as won, and creates a Partnership Opportunity to represent the preferred supplier agreement. Over the period of the agreement, Jenny secures 12 projects to deliver various training programs to Queensland Rail employees across the state. For each of these projects, Jenny creates a linked Business Opportunity and assigns it to the delivery co-ordinator of the project.
Scenario 3 – Large Training Services Agreement
Suncorp Metway has released a tender for a large scale training program to provide online WHS training to all of their branch staff. Jenny co-ordinates a team, prepares a response, and submits a tender bid to Suncorp. She manages and tracks this process through the Tender Opportunity in the CRM. When she is informed that TAFE Queensland’s bid has been successful, Jenny updates the Tender Opportunity status as won, and creates a linked Business Opportunity to manage the won contract.
Business standards
1. Where TAFE Queensland is the tendering agency, all tender bids are to be managed via the Tender Opportunity Module.
2. If a tender bid is successful, the Tender Opportunity status is updated to ‘won’, and a linked Partnership Opportunity and/or Business Opportunity is created to manage the won contract. Note: Partnerships and/or Business Opportunities must only be created after the Tender Opportunity status has been updated to ‘won’.
3. All conversations are recorded as notes and all activities such as meetings, phone calls, emails, milestones, proposals, other documents, etc.… are recorded against the Tender as it moves through the stages.
Create a Tender Opportunity
1. Select EduRe in the navigation bar
2. Click on Tender Opportunities in the menu options
3. Choose +NEW from the command bar
4. Enter the relevant information
5. Click on SAVE & CLOSE (to save the entered information and close the Tender Opportunity)
– OR –
6. Click on SAVE (to save the Tender Opportunity and continue working on the record)
Identify Tender
The Identify Tender stage is where the overview of the tender and general information about the tender is recorded.
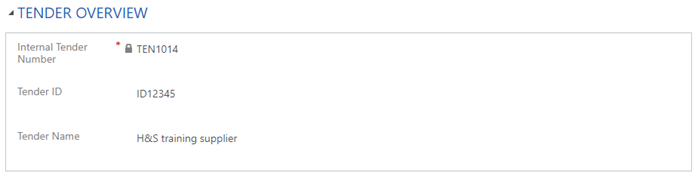
Tender Overview
The Tender Overview section is used to capture the high level tender details, such as the Tender name and ID or reference number provided by the tendering organisation, as well as who the tendering agency/organisation is and who the main contact is at the agency/organisation.
General Information
The General Information section is where the details of the Tender are captured; such as the Tender details, internal details, stage and status of the tender as well as any known competitors to the tender.
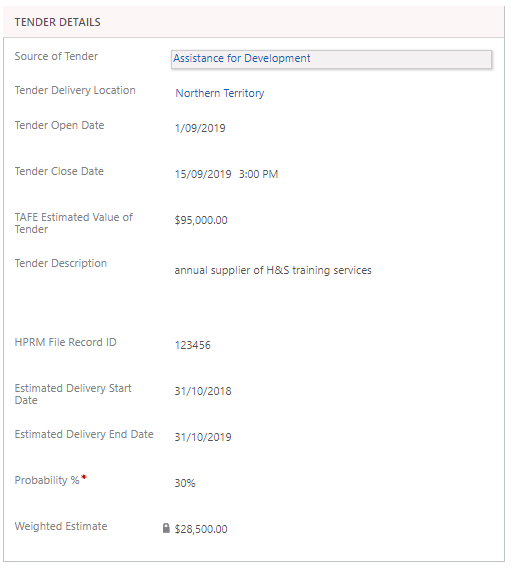
Tender Details
The Tender Details is where the source of the tender is defined (where TAFE Queensland found out about the tender, e.g. QTenders), along with the delivery location, open and close date for tender response, estimated value of the tender and a short description of the tender. Should any documentation stored within an external file store, this can also be referenced in this section under the HRPM File Record ID section.
This section also captures the estimated time period that the contract would cover should the tender be successful, as well as the estimated probability % that the tender will be won.
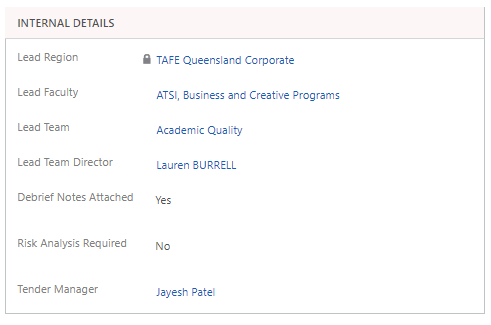
Internal Details
The Internal Details section is where TAFE Queensland’s details pertaining to the response of the tender are recorded. These details include the lead region, faculty and teams involved in the tender, as well as identifying the Tender Manager and Lead Team Director.
Tender Stage
The Tender Stage is displayed under this section also. The Tender Stage updates as the you move the Tender through each step of the Tender Opportunity Business Process.

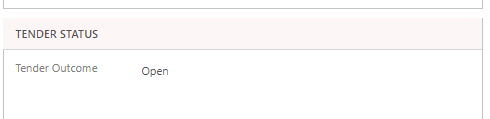
Tender Status
The Tender Status details the tender outcome. The Tender Status is a manual field to be updated by the Tender Owner (the user responsible for the Tender record) over the lifecycle of the Tender Opportunity.
Competitors
The Competitors section allows you to identify any known competitors who may be competing for this Tender. Competitor Accounts may only be added to a Tender once the Tender Opportunity has been saved, by clicking on the +Plus sign outlined below.

Accounts which are displayed as Competitors are those Accounts which have the Competitor flag recorded against the Account record.
Completing the Identity Tender stage
1. The flag icon in the business process flow ribbon indicates the current stage of the Tender Opportunity. Once you have completed all the required information within the section, click on the Tender Details Captured field to change it to yes. This action will automatically populate the Date and Qualified By fields.
2. Click on Next Stage. This action will then complete the Identify Tender stage, and the next section, Bid/No Bid Evaluation, will be available for completion.

Bid/No Bid Evaluation
The Bid/No Bid Evaluation stage is where you are guided through the internal evaluation process to inform stakeholders as to whether the tender is worth the effort to pursue.
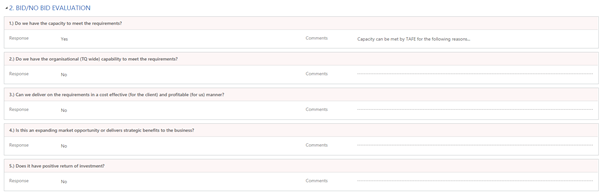
Bid/No Bid Evaluation Questions
Each question within the Bid/No Bid Evaluation section is to be completed with a Yes/No response, along with corresponding comments.
Completing the Bid/No Bid Evaluation stage
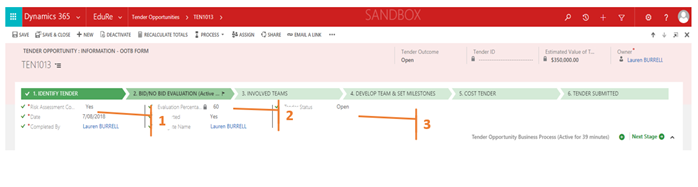
Each question in the evaluation section carries a percentage weighting of 20%; and will total up and be displayed in the Evaluation Percentage below the Business Process Ribbon, whereby the following sections are to be completed to move the Tender Opportunity to the next stage:
1. Indicate that a Risk Assessment has been completed for this Tender Opportunity. The date and user field will auto-populate once you have made your selection
2. The Evaluation Percentage will automatically populate based on the question responses, if the Tender Opportunity is supported change the field to Yes and record the appropriate delegate name. They must be a system user to be recorded.
3. If required, update the Tender Status. If the Evaluation Questions total up to 60% or more an option to change the status to Considered and Decided Not to Proceed will be available for use if required.
4. Once all sections completed, move to the next stage. This will enable the next section, Involved Teams.
Involved Teams
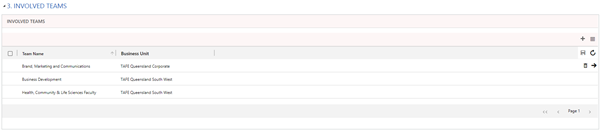
It is within the Involved Teams section that you record the teams that are involved in responding to the Tender Opportunity.
Adding Involved Teams
Multiple teams can be added to a Tender Opportunity, but selecting the +Plus on the right; as highlighted in Green below.
Completing the Involved Teams stage
1. Indicate that Involved Teams stage has been completed and teams added to the Tender Opportunity
2. Select next stage to progress the Tender Opportunity to the next stage in the Business Process

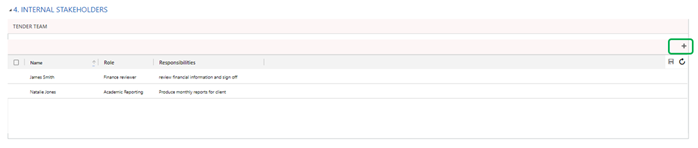
Develop Team and Set Milestones (Internal Stakeholders)
Within the Develop Team and Set Milestones stage you can record internal stakeholders; those team members who are involved in the Tender Opportunity, as well as set milestones to specific team members.
Tender Teams
Using Tender Teams you can record against a Tender Opportunity those who are involved in the Tender. You can add, edit, delete and save one or more records in Tender Teams by using the function bar in Green below.
Milestones
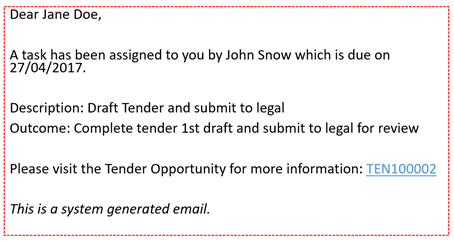
Using the Milestones, specific actions can be assigned to individual team members. Those team members must be users within the system to be assigned Milestones. You can add, edit, delete and save one or more Milestone records in Tender Teams by using the function bar in Green below.

Once a Milestone has been assigned to a user, they will receive an email notification informing them that they have a Milestone assigned to them. The email notification will display three fields from the Milestone; Due date, Milestone Description and Desired Outcome as seen in the email example below:
Completing the Develop Team and Set Milestones stage
1. Indicate that Tender Teams have been created and Milestones have been set
2. Click on the Next Stage to move into the next step in the Business Process

Cost Tender
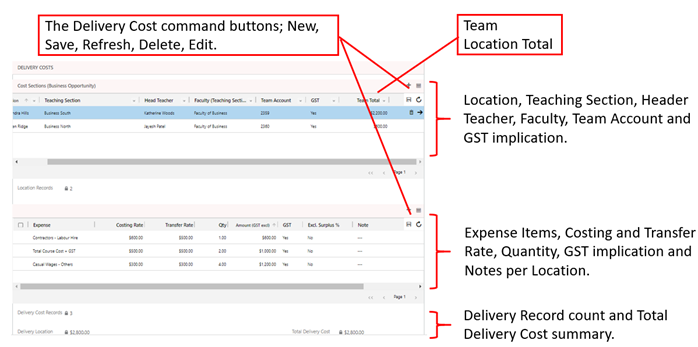
The Cost Tender stage is used to capture and maintain information regarding the costs associated with the Tender Opportunity. The costs are broken down into three main segments, Delivery, Non-Delivery and Funding; allowing you to identify all the costs and funding sources explicitly.
Important Note: If custom pricing is required for this agreement, the TQ Costing and Pricing Tool must be used before completing this section in the CRM. If a custom costing has been completed, you must also attach a copy of the completed costing in the Notes section.
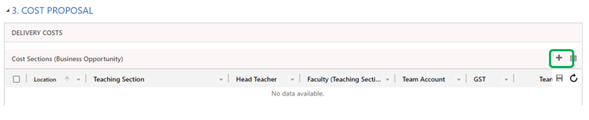
Delivery Costs
The Delivery Costs section is used to capture the total revenue applicable to each team involved in the potential delivery of the services.
1. In the first table, enter a row for each team delivering services in this opportunity. The location should refer to the location of the team, not necessarily the location where the program is being delivered. To add a new Cost Section record, click (+) in the top right of the table
1. Complete the Quick Create: Cost Section options as required
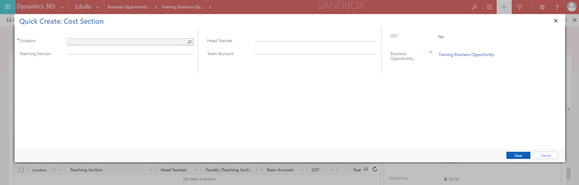
Tip: If you’re unable to find the correct team, scroll to the bottom of the options displayed and select ‘look up more records’. You will then be presented with a ‘Lookup Record’ pop up where you can search for further options. Note you may also need to change the ‘Look In’ field to ‘Active Teaching Sections’
3. Click on the save icon at the top right corner of the table once all Cost Sections are added.
Tip: If you need to edit or remove a Cost Section, select the applicable record within the table and scroll to the right, where you will be presented with options to delete either delete the record reopen the Quick Create: Cost Section and edit as required.
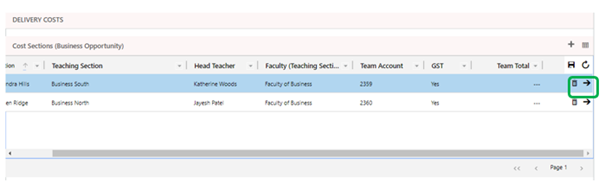
4. In the second table, enter a row for each service or program being delivered by clicking the (+) in the top right of the table to enter cost details.

Tip: In the Cost Section field, select the team delivering the program or services. You will only be able to select from teams you have added in the first table.
5. In the expense field, use either Total Course excl. GST or Total Course + GST as appropriate.
6. In the Costing Rate field, indicate the total revenue TAFE receives for one service delivery (e.g. the student contribution + subsidy amount for a single student completing a program). In the Quantity field, indicate the number of services being delivered (e.g. number of students).
7. If GST is applicable, click on the GST field to switch from ‘No’ to ‘Yes’.
8. In the note section, you may indicate the DP number, qualification code, or any other relevant information.
9. Click on the save icon at the top right corner of the second table.
Tip: you will only be able to add costs once you created and saved a Location and a team.
Note: use F5 to refresh the web page if the Delivery Cost command buttons are not visible.
Non-Delivery Costs
The Non-Delivery Costs table is currently not in use by TAFE Queensland, therefore does not need to be completed.
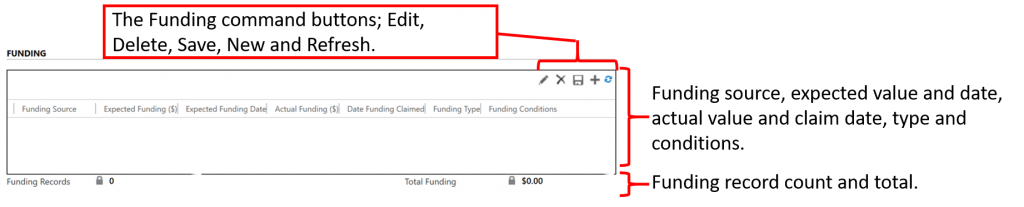
Funding
The Funding section is used to identify revenue TAFE Queensland expects to receive for this opportunity from sources other than the client (i.e. subsidies), and captures the fund sources, values, and conditions. These funds offset the total Cost to the Client within the Cost Summary.
1. Add a row for each type of funding applicable to this business opportunity.
2. In Expected Funding, enter the total amount expected to be received from the subsidy.
3. In the Funding Conditions section, you may also indicate how this figure was calculated (e.g. $1,000 per x10 students on the program).
Note: use F5 to refresh the web page if the Funding command buttons are not visible.
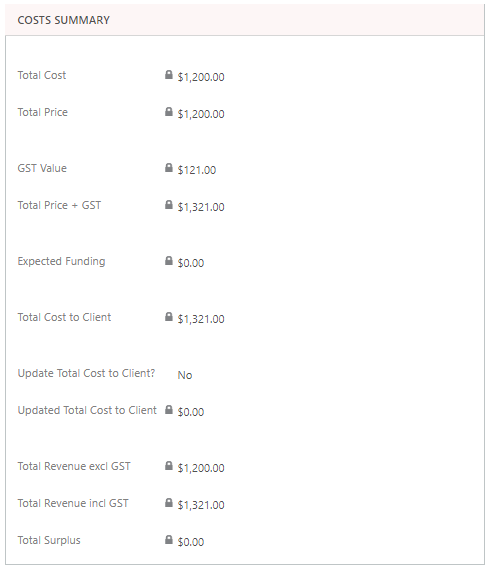
Recalculating the Cost Summary
The Cost Summary section summarizes the values entered in the Delivery Costs, Non-Delivery Costs and Funding sections.
To calculate for the first time, or recalculate the summary values, you must use the following method.
1. Click on the Recalculate Opportunity button in the command bar.
Tip: if this button is not visible, look in more commands (the 3 dots).

After recalculating, check the costs summary table to ensure information has been added correctly.
Tip: Check the Total Cost to Client, Expected Funding and Total Revenue values are correct.
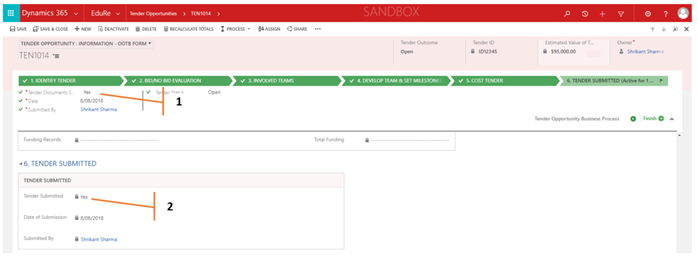
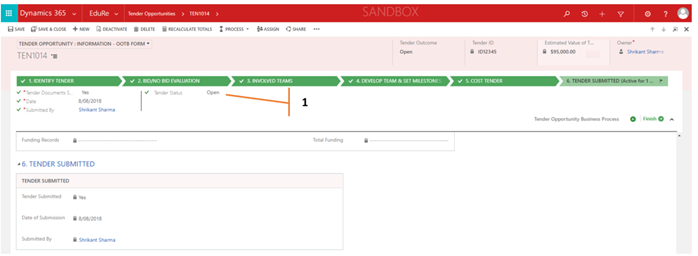
Tender Submitted
The Tender Submitted stage where the submission and the outcome of the Tender is recorded.
Tender Submitted
At the Tender Submitted stage complete:
1. Submitted Signed Documents
2. Tender Submitted details will automatically populate based on completion
Closing a Tender Opportunity as Won/Not Won
Once the outcome of the Tender is known, users can then close the Tender Opportunity accordingly. There are a selection of Tender Status options to record against a Tender Opportunity, namely:
- Active
- Declined
- Awaiting Outcome
- Considered and Decided Not to Proceed
- Not Won
- Open
- Shortlisted
- WIP (work in progress)
- Won
- Referral
Depending on the selection of Tender Status, you can record additional information, such as:
If Not won – a field for Tender Outcome Reason and Lost to Competitor will appear
If Won – a field for Tender Outcome Reason will appear
It is the Tender Managers responsibility to maintain the Tender Status of a Tender Opportunity record.
Closing a Tender as Won or Not Won
Complete the following:
1. Tender Status – as “Won” or “Not Won” accordingly
2. Click Finish
Assigning a Tender Opportunity to other users or teams
If a Business Opportunity should be owned by another person within your organisation, you can assign the record to that person.
You can also assign a record to a team, or to yourself.
1. Select EduRe in the navigation bar
2. In the list of Tender Opportunity records, select the record that you want.
– OR –
Open the Tender Opportunity record you want.
a. In the command bar, click the More Commands button (•••), and then click Assign.
3. If using the Dynamics 365 web application:
a. In the command bar, click More Commands (•••), and then click Assign.
If using Dynamics 365 for Outlook: In the Collaborate group, click Assign.
4. In the Assign dialog box, click:
a. Assign to me
– OR –
b. Assign to another user or team
Click Lookup, and then click Look Up More Records.
From the Look for drop-down list, select User or Team.
In the Search box, type the name, click the search icon, and then click the name to select it.
Click Add.
5. Choose OK.