Author:Devendra

Finance

Custom Price Calculations in CRM 2015

In our last few discussions we have focused on the Product Catalog enhancements. And in this discussion we will look at the Custom Price Calculation feature, which is related to the Product Catalog enhancement.


As we know, the pricing engine in Microsoft Dynamics CRM supports a standard set of pricing and discounting methods. These standard fields and methods might be a limitation on your business depending on your specific requirements for applying taxation, discounts, and other pricing rules for your products.


Suppose we need to identify and apply additional Taxes, like GST, VAT, Stamp Duty, or state and federal taxes independently on each line items. This would have been very difficult to achieve in previous versions of Dynamics CRM, because only one Tax field on line items was available. If we created custom fields for additional taxes, then it was really hard to include those in the calculation of the Extended Amount on each line item.


But now it is easy in CRM 2015, we can apply the Custom Price Calculation on the following entities.

  1. Opportunity
  2. Opportunity Product
  3. Quote
  4. Quote Product
  5. Order
  6. Order Product
  7. Invoice
  8. Invoice Product


To use the custom pricing for your opportunities, quotes, orders, and invoices, you need to do the following things:


  1. Set the value of the OOBPriceCalculationEnabled attribute to false from System Settings, as shown below.
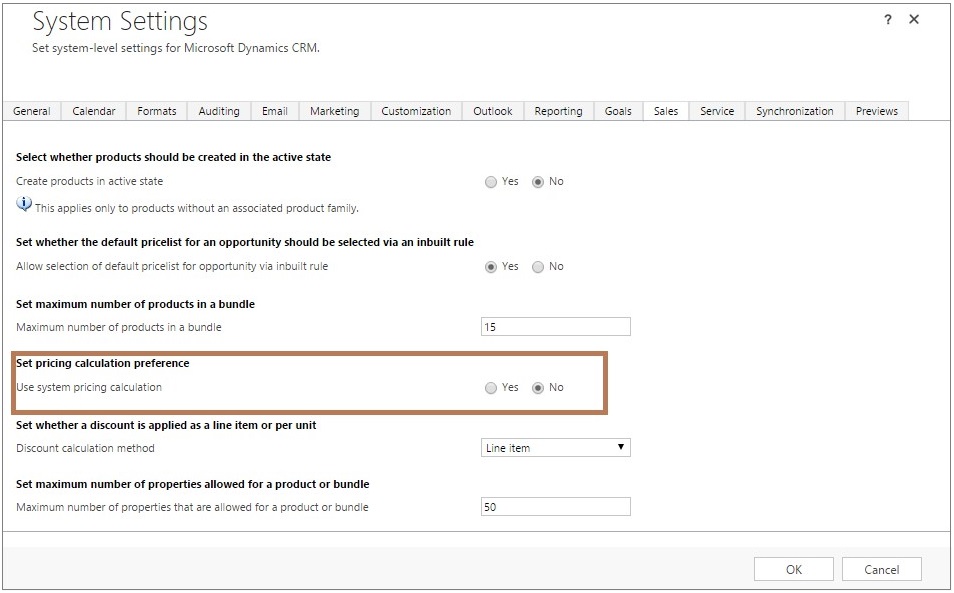
d-blog-5-1

  1. Create a plug-in that contains your custom pricing logic for calculating the price for your opportunity, quote, order, or invoice and on corresponding line items.
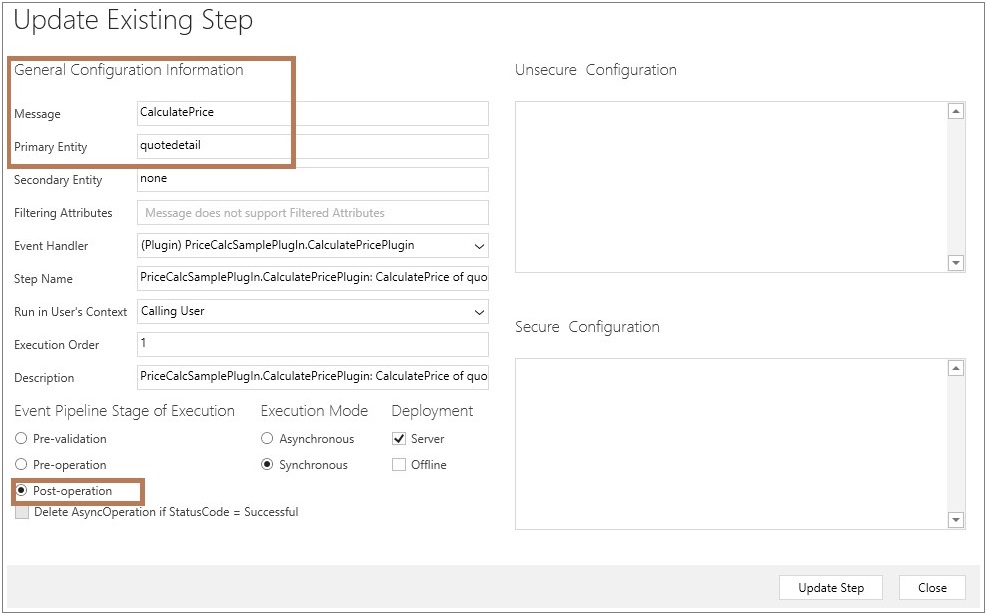
  2. Register the plug-in on the CalculatePrice message on Post stage.


When the OOBPriceCalculationEnabled attribute is set to 0, every time an opportunity, quote, order, or invoice is created or changes, the plug-in registered on the CalculatePrice executes to calculate prices as specified in your custom code in the plug-in. The CalculatePriceRequest message doesn’t have any usage scenario of its own. It’s exposed so that you can plug in your own custom pricing calculation logic if you don’t want to use the out-of-box pricing provided by CRM.


If you want to revert to using the out-of-box pricing for your opportunities, quotes, orders, and invoices, set the value of the OOBPriceCalculationEnabled attribute to True.


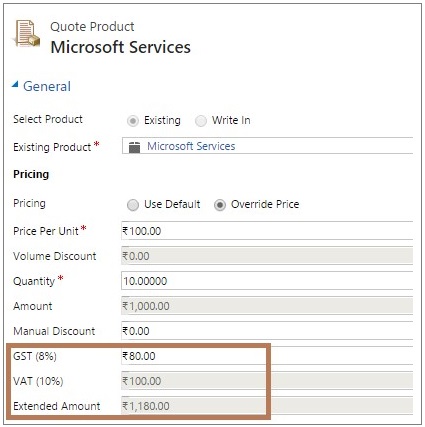
We had one scenario in which we need to apply the GST and VAT based on the Amount and calculate the Extended Amount on the Quote Product, as shown below.
d-blog-5-2
As you can see in the above screen shot, we are calculating GST and VAT based on the Amount, and all taxes have been included in calculating the Extended Amount.


For example, we used the following logic in our plug-in.

decimal total = 0;

decimal vat = 0;

decimal gst = 0;

decimal extended = 0;


total = total + ((decimal)e[“quantity”] * ((Money)quoteItem[“priceperunit”]).Value);

gst = total * (decimal)0.08;

vat = total * (decimal)0.1;

extended = total + gst + vat;

quoteItem[“baseamount”] = new Money(total);

quoteItem[“tax”] = new Money(gst);

quoteItem[“new_vat”] = new Money(vat);

quoteItem[“extendedamount”] = new Money(extended);


service.Update(quoteItem);


And we have registered that plug-in on Post stage of CalculatePrice Message of Quotedetail, as shown below.

d-blog-5-3

If you want to implement the Custom Pricing calculation, then you can use the sample plug-in which is provided by Microsoft, and that will really help you and save your lot of time. Below I have given the URL of that plug-in example.


https://msdn.microsoft.com/en-us/library/dn817877.aspx


Again below we have given some important facts about the custom pricing calculations.


  1. You must set the OOBPriceCalculationEnabled value to False to enable the custom pricing calculation.
  2. You must register the plug-in on the Post Stage of the CalculatePrice message.
  3. Once you have enabled the custom pricing calculation, then the Amount and Extended Amount on line items and all totals on headers will no longer be system calculated. And you have to register your plug-in for these calculations.
  4. Also one most important thing is that, it seems that when you enable the Custom Pricing, then the calculation happens in asynchronous mode, hence you need to refresh the form to view the changes, if you change Price or Quantity within line items.

Product Localization

Product Localization in CRM 2015

“Small things can make a big difference” Yes this is what Microsoft has done in their latest release of CRM 2015 for Products.


In our earlier blog Product Catalog enhancement in CRM 2015, I briefly explained about all areas of Product Catalog that are modified in CRM 2015.


In this blog we have explained how the product localization works and how we can setup that in CRM 2015.


If we take an example of a multinational clothing company, and suppose that company sells “Trousers” in USA, Spain and China, then in earlier versions of CRM we needed to create 3 products with following names.

  • Trousers for US English
  • Pantalones for Spanish
  • 褲子 for Chinese


But now in CRM 2015, you just need to create only one Product record and you can localize the name of that product for all of the installed languages.


Along with Product name you can localize the following properties of the Products.

  • Product.Name
  • DynamicProperty.Name
  • DynamicPropertyOptionSetItem.DynamicPropertyOptionName
  • DynamicPropertyOptionSetItem.DynamicPropertyOptionDescription


I have created one Product Family in CRM named Trousers, and added 2 properties one is Size and another is Type, as shown below.

Product Family


Type is an Option Set property, and we have added 2 types into that.

trousers


Now I would like to set the Name in the Spanish language as well. Hence I have changed my language to Spanish and again opened the same product record. But this time it shows Name of product and properties in Read-only format. As shown below.

Familia De-Productos


So the question is, how can we change the name in different languages?


Don’t worry, you just need to follow the below steps for localization of the Product.

  • Open CRM, and go to Settings à Data Management.
  • Now click on the Export Field Translation link, as shown below.

Data Management


It will export “CrmFieldTranslations.zip” file.

  • Extract that zip file then you will see the following 2 XML files.
  1. [Content_Types].xml
  2. CrmFieldTranslations.xml


As shown below.

translation


  • Now you need to edit the “CrmFieldTranslations.xml” file in excel, then you will see Localize Labels sheet. As shown below.

CRM Field Translation


In that sheet, you can see the columns for the various installed languages in the System. Those column names indicate the language codes of the installed languages in the CRM.

  1. 1003: for US English
  2. 1036: for French
  3. 2052: for Chinese
  4. 3082: for Spanish.


And apart from language columns this sheet contains the following additional columns as well.

  1. Entity Name: It displays the name of Entity like Product, or DynamicProperty etc…
  2. Object Id: It displays the Guid of corresponding Product or DynamicProperty record.
  3. Object Column Name: It display the field name of the corresponding entity.


  • Now you need to set the corresponding values for the various languages, as shown below, I have set the values for French, Chinese and Spanish languages.

CRM Field Translation


  • Now you need to save the “CrmFieldTranslations.xml” file and again zip the “[Content_Types].xml” and “CrmFieldTranslations.xml” files. As shown below.

Content Type

  • Click on “Import Field Translations”.

Data Management

  • Then select our zip file and click on the OK button.

Data Management

After completing the import, if you change your language, then you can see the Name and other Description in other languages as well. As shown in below screens.


In Spanish

resumen


resumen


In Chinese

chinese


chinese


Below I have given some important facts about Product Localizations.

  1. Records with localized attributes are read-only unless your preferred language is the organization’s base language. You can’t manually change the products values of localized attributes into different languages.
  2. If your language in CRM is not the Organisation’s base language, then you can’t create the Product record.
  3. When you query on product using values for localized attributes, the conditions will be evaluated using your preferred language first and will revert to the base language if there is no localized value for that attribute.


Suppose your CRM base language is English, and another language Spanish, is installed into CRM.
And there is product defined in CRM and the name of that product is as follows.

In English: Trousers
In Spanish: Pantalones


Now suppose, your preferred language is Spanish and if you search product with name “Trousers”, then first it will search in your referred language i.e. Spanish, but it will not find any result. After that, it will search in using the Base language and display the result. As shown below.

D-blog-4-15


Hope this will help you!

catalog

Product Catalog enhancements in CRM 2015

In earlier versions of CRM you could setup the Product, Product Kit, Pricing, and Discounts. But in CRM 2015 Microsoft has done lot of enhancements in the Product Catalog, and they have introduced Product Family and Bundle, which expose a lot of great features in CRM.


Below I have mentioned key points about the Product Catalog enhancements.

  1. Automatically set the default price level (price list) for an opportunity, quote, order, or invoice based on the current user and the user’s territory relationship with the price level.
  2. You can define hierarchies of product families and products.
  3. Define configurable properties of product family. Hence you can define manufacturer, product description, material, size, color, packaging, and warranty terms etc… and you can change these properties for product to product.
  4. Also you can specify localized values for certain product properties (attributes) to allow for product names and descriptions to be available in the user’s preferred language.
  5. Define new relationships, such as cross-sell, up-sell, and accessory, so your sales agents can get the suggestions for related products during sales process.
  6. Use custom pricing instead of the CRM system pricing to calculate prices when you associate a product or bundle to opportunity, quote, order, or invoice.
  7. Define per unit discount for products at line level when you add them to opportunity, quote, order, or invoice.
  8. System setting changes.


Below I have explained each and every point mentioned above in detail.


Automatically set Default Price list:


We have been waiting for this feature; in earlier versions of CRM we generally wrote custom java script.


But now you can choose to automatically set a default price list for an opportunity, quote, order, or invoice based on the sales territory of the user who creates or updates the opportunity, quote, order, or invoice record.


To enable a default price list, you need to setup the following settings and records.


In the System Settings, you need to set the “Allow selection of default pricelist for opportunity via inbuilt rule” as True, as shown in the below screenshot.
D-blog-3-1

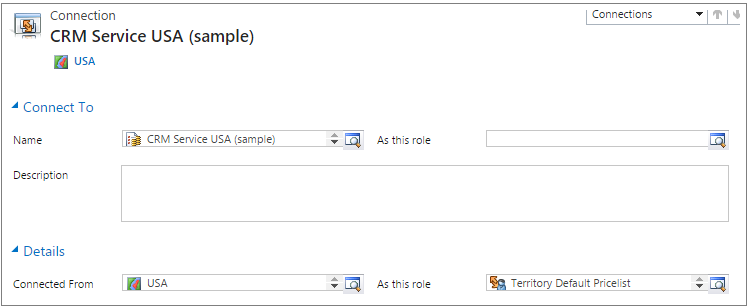
Now you need to create a new Connection between Territory and Price list, with Connection Role “Territory Default Pricelist”, as shown in the below screenshot. In the example below, we have created a Connection between Territory “USA” and Price List “CRM Service USA (sample)”.

D-blog-3-2
And after that, set the Manager of the Territory, for which you would like to setup the Default price list. In below screen, we set the Manager as “First Name Last Name”.

D-blog-3-3

Now if user “First Name Last Name” creates an Opportunity, Quote, Order or Invoice then it will set the Price List.


Note: If you will set multiple territories for Default Price List, then price list field will not be populated and the user must specify a price level for the opportunity, quote, order, or invoice record.


Define Product Family, product and bundle:


Before starting the discussion on this, let us first understand that what Product Family and Product bundle is.

  • Product Family: Product family provides a way to categorize the product. Hence you can define a category, and under that Category you can define your products and product bundle. And these products and product bundles inherit the categories of parent product family.
  • Product Bundle: Using Product bundle, you can group the products to sell products in an attractive package. It is similar to kit, but kit is deprecated in CRM2015.


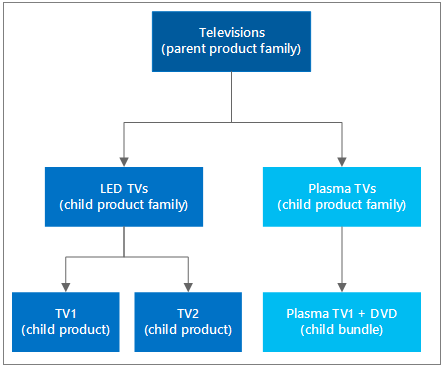
Below we have given an image that will explain Product Family, Products and Product bundle.

D-blog-3-4

Based on the above screen, you can clearly see that “Televisions” is the parent family for “LED TVs” and “Plasma TVs,” and under a family you can define products and product bundles.


It means using Product Family you can achieve following things into CRM 2015.

  • Meaningfully categorize products for your organization.
  • Define child family, products and product bundles under a product family.
  • Product bundles allow you to sell multiple items together. In earlier versions of CRM, these were known as ‘Kits’, but ‘Kits’ have now been deprecated.


To create a Product Family, Products and Product Bundles in CRM, you need to click on the corresponding buttons.

D-blog-3-5


  • Clicking on the Add Family button, will open a new Product Family screen.
  • Clicking on the Add Product button, will open a new Product screen.
  • Clicking on the Add Bundle button, will open a new Product Bundle screen.


Important Note: These products will not be available in Opportunity, Quote, Order or Invoice, unless you publish them.


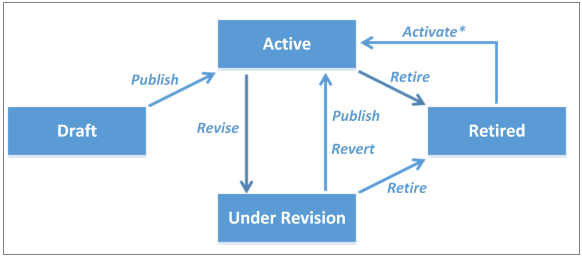
Hence in CRM 2015, products have their own life cycle; shown below is an image that represents the Product life cycle in CRM 2015.

D-blog-3-6

  • When you first create a Product, the State of that product will be Draft. Draft products are not available for sale.
  • After publishing a Product, the State of product is changed to Active. This action enables products to be selected for sale.
  • Products can be revised or retired from the active products list.
  • Products “Under Revision” or “Retired”, can be re-published (reactivated).


Configurable properties of products:

Every product is assigned its own set of categories. If we take an example of Television, then we can define the following categories.

  • Resolution
  • Is 3D
  • Screen Size etc…


And if we take an example of Air conditioner, then property might be different.

  • Capacity: 1.5 ton, or 2 ton
  • Installation Type: Split or Window Air Condition
  • Energy Efficiency, etc…


Hence we can say that each and every product may have different kinds of characteristics.


In CRM 2015, you can setup the Product Properties for a Product Family. And these properties are inherited when you create a Product, or Product Bundle within a Product Family.


When you define the properties of a Product Family, then you can select from the following data types for each property.

  • Option Set
  • Decimal
  • Floating Point Number
  • Single Line of Text
  • Whole Number


You can also set the requirement level of each property. The requirement level dictates whether the property is required or not (Yes or No); when you create an Opportunity, Quote, Order or Invoice for that product.


Important Note: The Products inherited properties, from the Product Family, can be overridden during creation, or revision of the product.


As you can see in below screen, Size is required.

D-blog-3-7

Now if you create an opportunity product for that, then it will display an error unless you set the value for the required properties (i.e. Size in our case). As shown in the below screen.

D-blog-3-8

After setting the value for the required properties (i.e. Size in our case), it will not display any error.

D-blog-3-9

Below we have given some important points about the Product Properties.

  • You can override the property values of the inherited Product Family using the override button, as shown in the below screenshot.

D-blog-3-10


  • You can only edit properties, if the product has a Draft or Under Revision state.
  • A Read-only product property’s value can’t be changed at run time.
  • A hidden property won’t be displayed to sales agents at run time, when they create an Opportunity, Quote, Order or Invoice for that product.
  • Also you can’t define properties programmatically using CRM API.
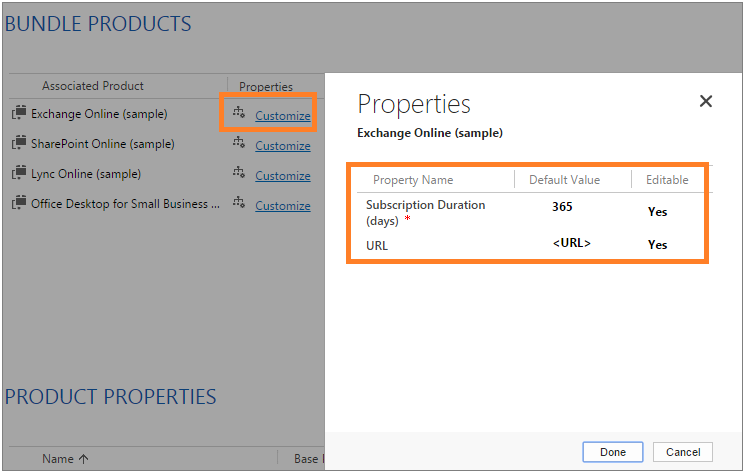
  • In a Product Bundle, you can add Products, and then customize the property’s values of bundled product, by clicking on the Customize link, as shown in the below screenshot.

D-blog-3-11

Localize Product properties:


Now you can localize product for different regions, so you can see the localized names that will match the customer’s language preferences. And you can localize the following fields for products.

  • Name of Product
  • Name of Product Property
  • Option name of Option set Product Property
  • Option description of Option set Product Property


In our next blog we will discuss Localization of Product.


Define new relationships, such as cross-sell, up-sell, and accessory:


When you sell products or services, it is always a good idea to have all the information about related products defined within your catalog. By defining related products and offers, it empowers your sales personnel to cross-sell or up-sell to your customers.


For example, if any customer enquire about the Surface RT, then your sales people can have the capability to suggest the Surface Pro. Therefore, the Surface Pro is added as an up-sell product for Surface RT using the Product Relationship.


Essentially, Product relationships, help you to cross-sell, up-sell, and sell accessory products or substitutes.


Using relationship, allows you to define the suggestions for your sales personnel, during opportunity and order management. This enables your sales personnel to recommend related products and bundles to your customers.


You can define the following relationships for a product:

  • Up-sell
  • Cross-sell
  • Accessory
  • Substitute


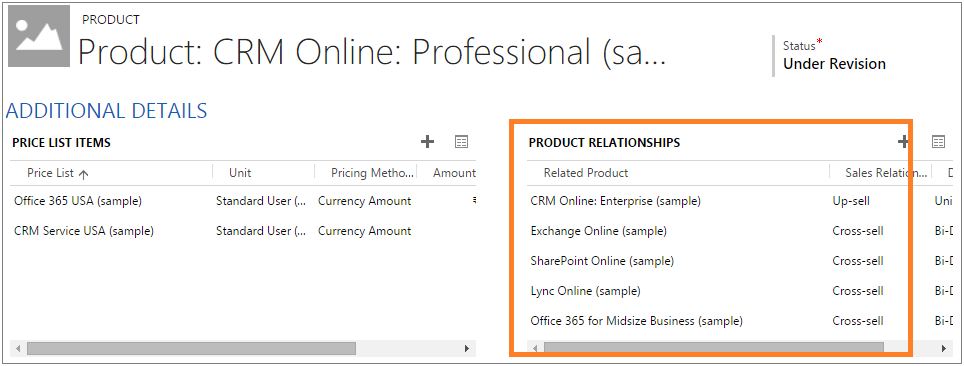
As you can see in below screen, the “CRM Online: Professional” product has relationships with other products, for the purpose of cross-selling or up-selling.

D-blog-3-12

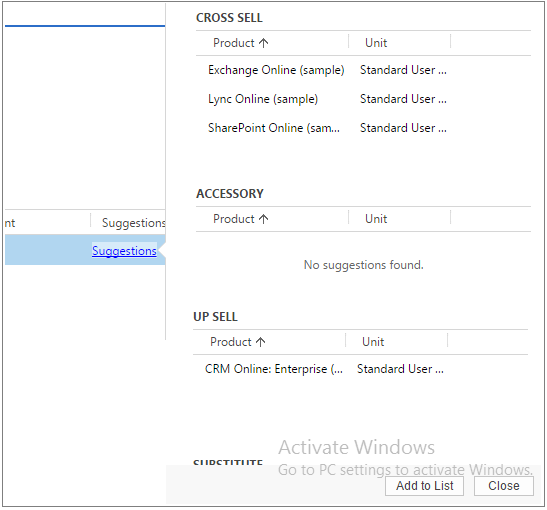
Now, if you will add the “CRM Online: Professional” product into an opportunity, and click on the Suggestions hyperlink; then these related items will be displayed, as shown in the below screenshot.

D-blog-3-13

And if the customer is interested in any of the suggested products; then from the same grid, the user can directly select the relevant products by clicking on the “Add to List” button.


Use custom pricing:


The pricing engine in Microsoft Dynamics CRM supports a standard set of pricing and discounting methods, which might be limiting to your business depending on your specific requirements for applying taxation, discounts, and other pricing rules for your products. If you want to define custom pricing for your products in opportunities, quotes, orders and invoices, you can use the CalculatePrice message.


Using the CalculatePriceRequest, you can override default pricing calculations.


This topic will discussed in its own specialty blog posting.


Define per unit discount for products:


In earlier versions of CRM, discounts could only be applied on a per unit level basis. However, in CRM 2015, you can apply discounts either at the line item level or at a per unit level.

D-blog-3-14

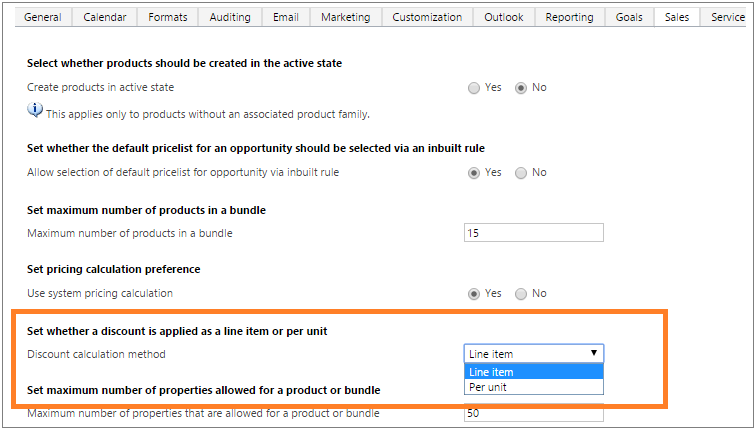
You can specify “Discount calculation method” in the System Settings, to specify whether you need to apply the discount at the Line Item or Per Unit level.

Below we have given an example to explain the discount calculations for Line Item and Per Unit level.


Suppose you create a line item, and set the following values for the Price per Unit, Quantity, and Discount.

  • Price per Unit: 100
  • Quantity: 10
  • Discount: 10


Below we have given the calculations of Extended Amount for different “Discount calculation method” options.

  • Line item: If “Discount calculation method” is set to “Line Item”, then the Extended Amount will be 990 = ((Price per Unit * Quantity) – Discount).
  • Per Unit: If “Discount calculation method” is set to “Per unit”, then the Extended Amount will be 900 = ((Price per Unit * Quantity) – Discount * Quantity).


System setting changes:


Apart from this Microsoft Dynamics CRM introduces a new TAB into System Settings with named “Sales”, as shown in the below screen.

D-blog-3-15

In this section Microsoft Dynamics CRM introduced the following new settings.

  1. Create Product in Active State: If any product is not associated with a product family, then you can choose to create them directly in an Active state if you set the value of “Create Product in Active State” as yes.
  2. Allow selection of default price list: It allows you to setup the default price list for a user, when a user creates an Opportunity, Quote, Order and Invoice.
  3. Maximum number of products in Bundle: It allows you to set the limit of products in a Product Bundle.
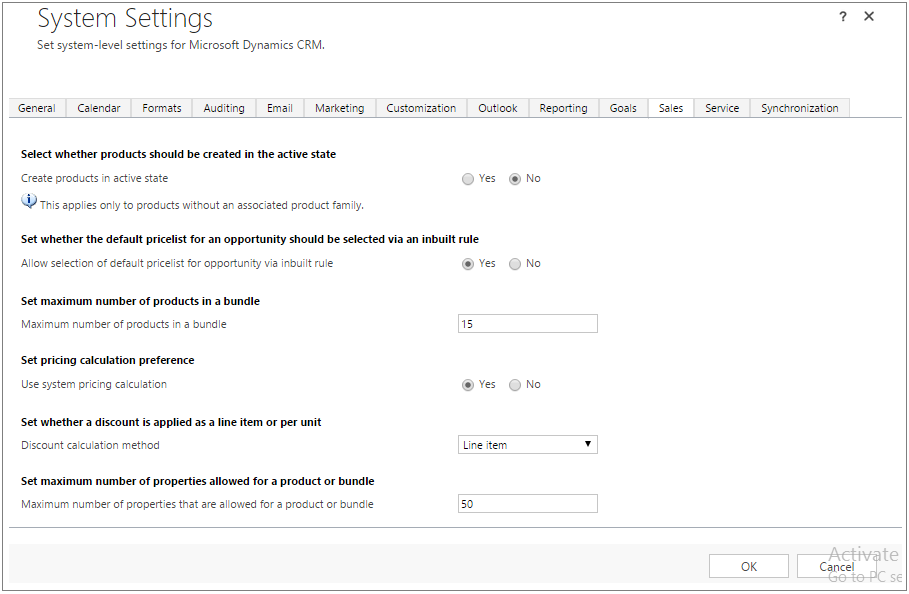
  4. Use System Pricing calculation: It allows you to select whether you need to choose the system pricing calculation or the custom pricing calculations.
  5. Discount Calculation Method: It allows you to select the Line Item or Per Unit level discount calculation.
  6. Maximum number of properties: It allows you to set the limit for the number of properties for a product or bundle.


Heirarchy Secutity

All about Hierarchy Security in CRM 2015

In our previous blog, we have discussed Hierarchy Visualization, and in this blog we will discuss Hierarchy Security.


Below I have explained some brief and important points about the Hierarchy Security.

  1. It is an extension of the Dynamics CRM Security Model.
  2. It offers more granular access to records.
  3. It reduces maintenance costs, because it is easy to maintain and does not require a large number of Business Units.


The hierarchy security model is an extension to the existing Microsoft Dynamics CRM security models that use business units, security roles, sharing, and teams. It offers more granular access to records for an organization and helps to bring the maintenance costs down. For example, in complex scenarios, you can start with creating several business units and then add the hierarchy security. This will achieve more granular access to data, with far less maintenance costs, than a large number of business units may require.


Basically Hierarchy Security is divided into two parts.

  • Manager hierarchy
  • Position hierarchy


Important points about Manager hierarchy

  1. Based on the direct reporting security model.
  2. This is established based on the Manager Field of the System user.
  3. Managers are able to access the data of their subordinates. And able to perform work on behalf of them.
  4. A manager must have at least the user level Read privilege on an entity, to see the data of their subordinates.
  5. Only restricted to the BU.


Important points about Position hierarchy

  1. Not based on direct reporting structure, as Manager Hierarchy.
  2. We can define various Job Positions & arrange Position hierarchy based on that Position. It means users at a higher position can access the data of lower positions.
  3. The direct higher positions must have Read, Write, Update, Append, AppendTo access to the lower positions’ data in the direct ancestor path. The non-direct higher positions, have Read-only access to the lower positions.
  4. Not restricted to the BU.
  5. With the Position hierarchy security, a user at a higher position can access records owned by a lower position user or by the team that a user is a member of.
  6. In addition to the Position hierarchy security model, the users at a higher level must have at least the user level Read privilege on an entity to see the records that the users at the lower positions have access to.


The Position hierarchy is *not* based on the direct reporting structure, like the Manager hierarchy. A user doesn’t have to be an actual manager of another user to access user’s data.


But based on the position, higher position’s user can access the data of the lower position’s users.


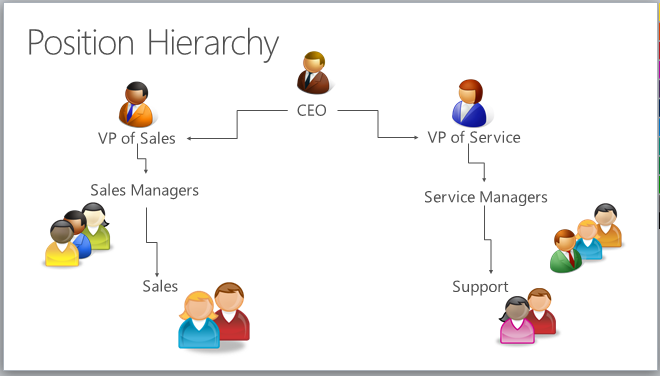
If we take an examples of the positions that are given into the below image. Then you can see CEO is on the higher position and VP of Sales and VP of Service is on the lower position. It means, the user at CEO’s Position can access the records of the users that are into the VP of Sales and VP of Service positions.

D-blog-2-1
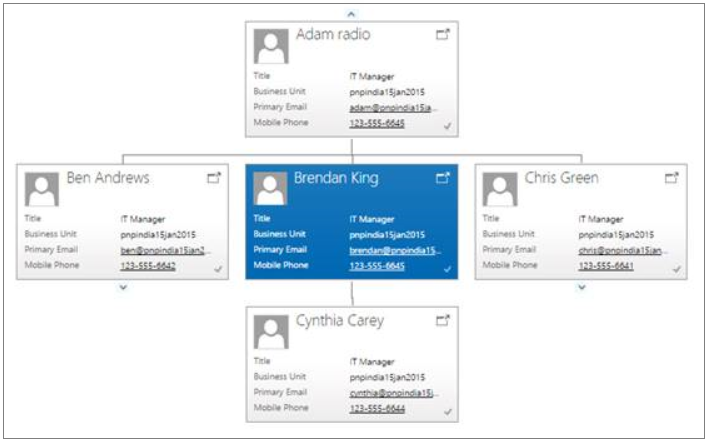
The Manager Hierarchy is worked based on the Manager Field of the user. As shown in the below screen, Adam is the manager of the Ben, Brendan, and Chris.

D-blog-2-2
Hence, if we setup the Manager Hierarchy, then Adam can access the data of Ben, Brendan, and Chris.


Note: With the Position hierarchy security, a user at a higher position has access to the records owned by a lower position user.


In addition to the Position/Manager hierarchy security model, the users at a higher level must have at least the user level Read privilege on an entity to see the records that the users at the lower level.


How to enabled Hierarchy Security:


To set up the security hierarchy, you must have an Administrator security role.


The hierarchy security is disabled by default.


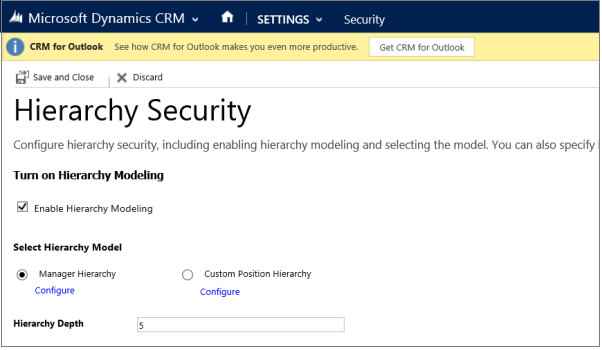
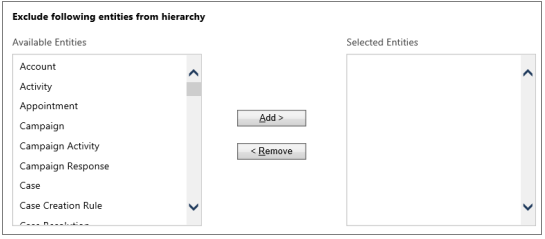
To enable, go to Microsoft Dynamics CRM > Settings > Security > Hierarchy security and select Enable Hierarchy Modeling. After enabled the hierarchy modeling, choose the specific model by selecting the Manager Hierarchy or Custom Position Hierarchy. All system entities are enabled for hierarchy security out-of-the-box, but, you can exclude selective entities from the hierarchy.

D-blog-2-3
Set the Depth to a desired value to limit how many levels deep a manager/position has a Read-only access to the data of their reports.

D-blog-2-4


NOTE: To make any changes in Hierarchy security, you must have the Change Hierarchy Security Settings privilege.

For example, if we take an example of the following image.

D-blog-2-2

And set the Depth = 1 in Manager Hierarchy Security settings, then Adam can only access the records of Ben, Brendan, and Chris. And in case if we set the Depth = 2, then Adam can access the records of Cynthia as well as Ben, Brendan, and Chris.


Set up Manager and Position Hierarchies:


The Manager hierarchy is easily created by using the manager relationship on the system user record. You use the Manager (ParentsystemuserID) lookup field to specify the manager of the user.


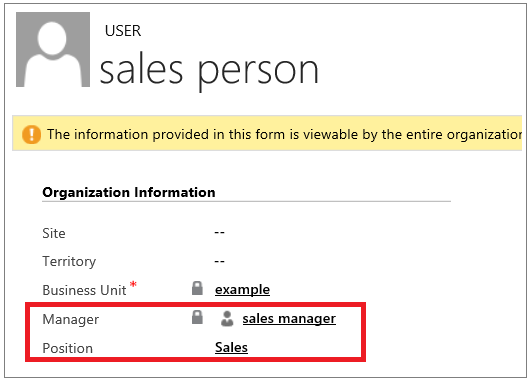
If you have already created the Position hierarchy, you can also tag the user with a particular position in the Position hierarchy. In the following example, the sales person reports to the sales manager in the Manager hierarchy and also has the Sales position in the Position hierarchy.

D-blog-2-5

To add a user to a particular position in the Position hierarchy, use the lookup field called Position on the user record’s form.


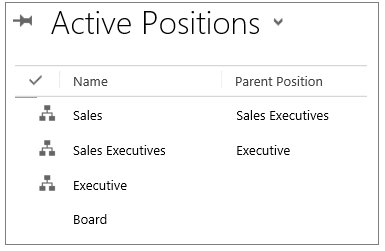
To create a Position hierarchy, go to Microsoft Dynamics CRM > Settings > Security > Positions. For each position, provide the name of the position, the parent of the position, and the description. Add users to this position by using the lookup field called Users in this position. Below is the example of the Position hierarchy with the active positions.

D-blog-2-6

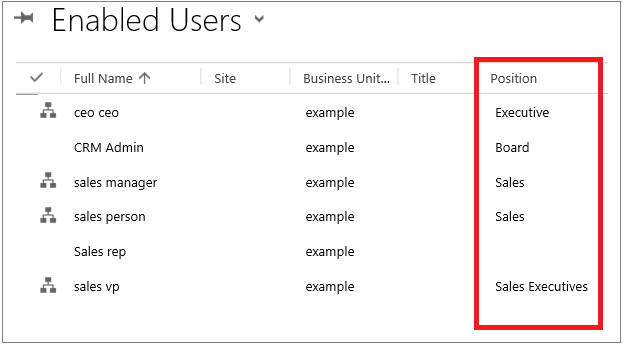
In the below screen, I have given an example of the enabled users with their corresponding positions.

D-blog-2-7

Use hierarchy security models in conjunction with other existing security models for more complex scenarios. Avoid creating a large number of business units, instead, create fewer business units and add hierarchy security.


Performance considerations:


Keep the effective hierarchy security to 50 users or less under a manager/position.

You can use the Depth setting to reduce the number of users in hierarchy security.


I Hope this has helped you to understand Hierarchy Security!!!

Heirarchy

All about Hierarchy Visualizations in CRM 2015

The two most awaited things that Microsoft has introduced in CRM 2015.


  1. Hierarchy Visualizations: It gives you the ability to see the insight of any record in a hierarchical manner. The best thing about this, it is not restricted to the account entity only, you can even setup this for custom entities as well.
  2. Hierarchy Security: In earlier versions we could only setup the security in CRM, based on User or Team Security Roles and sharing particular records between users or teams. But it was always felt that there should be a way for Managers to easily work or view their subordinate’s items. And in CRM 2015 we can achieve this by using Hierarchy Security.


This blog will explain all about Hierarchy Visualizations, and in a subsequent blog we will explain about Hierarchy Security.


Hierarchy Visualizations:

We can get valuable business insights by visualizing hierarchically related data. And it gives you a number of benefits


  • View and explore complex hierarchical information.
  • View key performance indicators (KPIs) in the contextual view of a hierarchy.
  • Visually analyze key information across the web and tablets.
 

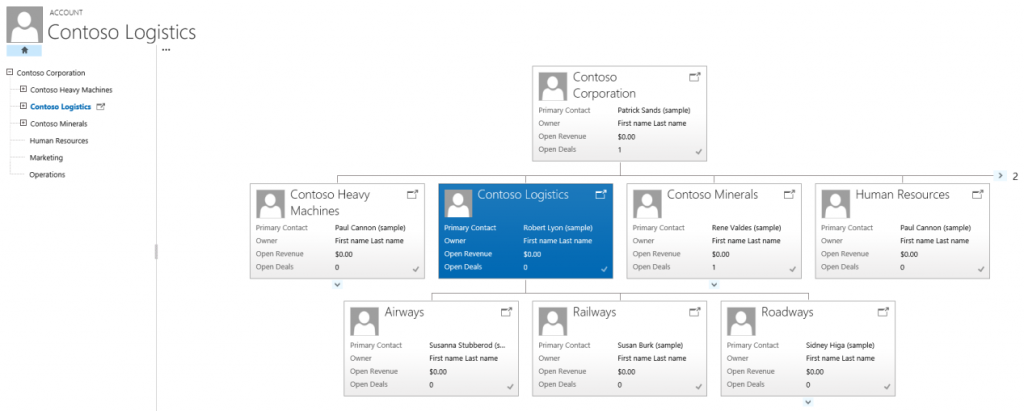
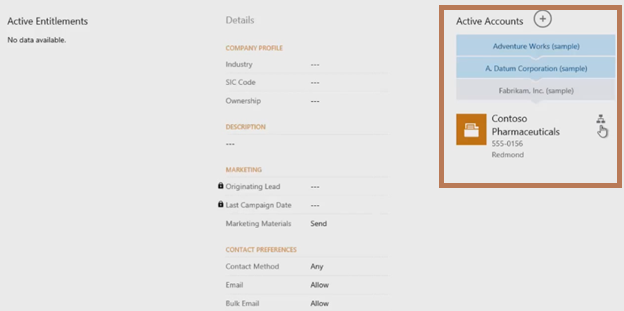
In the below screen, you can see the Hierarchy of an entire “Contoso Corporation” organization.

blog-1


And Microsoft has enabled the Hierarchy for Tablet clients as well. As shown below.

blog-1-1

Some Important points for Hierarchy Visualizations:


  • Hierarchy Visualization is controlled by relationships, and specifically self-referential relationships. It means that the primary entity and the related entity must be the same.
  • Only one (1: N) self-referential relationship per entity can be set as hierarchical. In this relationship the primary entity and the related entity must be of the same type, such as account_parent_account.
  • Can’t change hierarchy relationship for OOB entities.
  • Business unit is not enabled for Hierarchy Visualizations.
  • Custom entities are supported.
  • Only the first 4 fields of the Quick view form will be displayed on the KPI tile in hierarchy.
  • Only the Quick view form is supported for the KPI tiles in hierarchy.
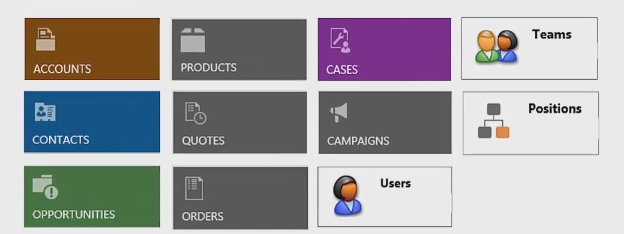
  • Only the following OOB entities are enabled for hierarchy visualization. You can’t enable other OOB entities.

blog-1-2
Using Advanced Find or the CRM API, you can query data in CRM.


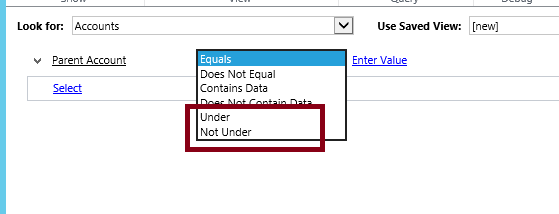
Hierarchical data structures are supported by self-referential one-to-many (1:N) relationships of the related records. In the past, to view hierarchical data, you had to iteratively query for the related records. Now, you can query the related data as a hierarchy, in one step. You’ll be able to query records using the Under and Not Under logic. The Under and Not Under hierarchical operators are exposed in Advanced Find and the workflow editor as well.

blog-1-3
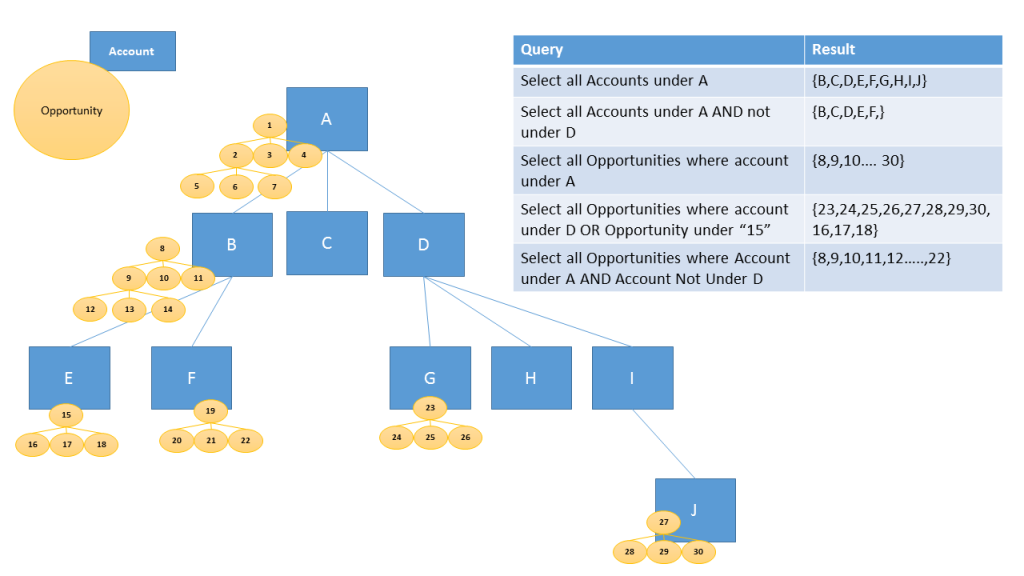
The below image represents this, what result you will get, when you do the Query on the Hierarchal data.

blog-1-4

How to setup Hierarchical Visualization for a custom entity:

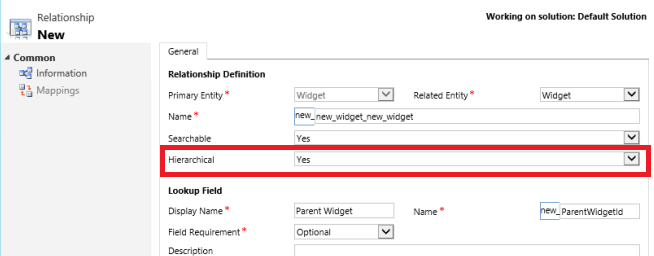
For a custom entity like new_widget, you need to create (1:N) self-referential relationship like new_new_widget_new_widget and mark it as hierarchical, as shown here.

blog-1-5

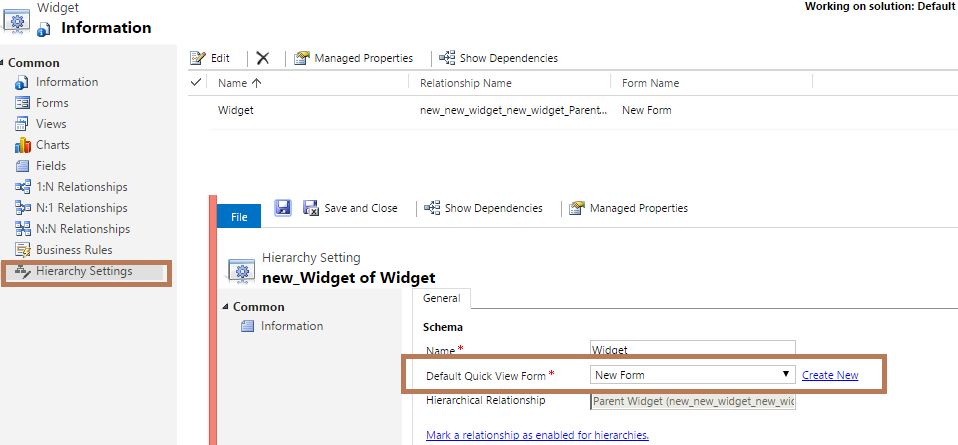
To change the Hierarchy Visualization settings, you need to go to the Solution, and under the new_widget entity, go to the Hierarchy Settings. There you can setup the Default Quick view form. As shown below.

blog-1-6
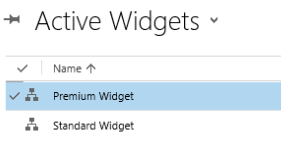
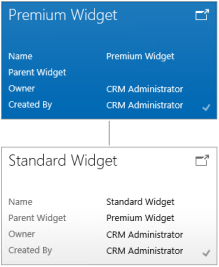
After entering the Hierarchy Settings for the Widget entity, you will be able to see the hierarchy representation.

blog-1-7

blog-1-8
Hence it seems, that Hierarchy Visualization is a very powerful function, with which to view the insight of a record. But it still seems that one thing is missing; we can’t setup Visualization for cross entity relationships.


For example, you can depict the account hierarchy showing accounts at multiple levels, but you can’t show accounts and contacts in the same hierarchy visualization.


We hope that Microsoft will enable this functionality for cross entity relationships in near future.


I hope this has helped!!!

In Next blog we will discuss details about Hierarchy Security.

CRM To MDM

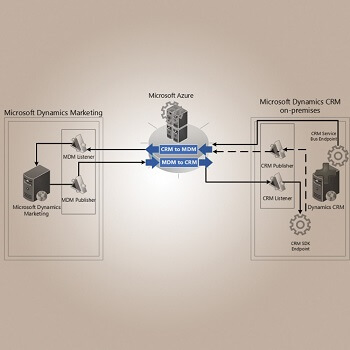
Configure Microsoft Dynamics Marketing Connector for CRM on-premises/IFD

To set up the MDM (Microsoft Dynamics Marketing) Connector with CRM on premise/IFD, you need to execute the following steps.


  • Configure CRM to Expose CRM certificate.
  • Install Marketing Connector for Microsoft Dynamics CRM.
  • Configure ACS Name Space on Windows Azure.
  • Add CRM certificate on Azure Service Bus.
  • Configure MDM & Start Initial Synchronization.


Configure CRM to Expose CRM certificate:


If you are using a Microsoft CRM online environment, then this step is *not* needed, because CRM online exposes the certificate, as shown in the below screenshot.
Microsoft CRM


After completing the below steps, CRM on-premises & IFD will expose the certificate.
The following items are pre-requisites for this.

  • A certificate from an issuing authority.
  • Logon access to a user account with the System Administrator role on the server.


Install the certificate in the certificate store of the server running the Microsoft Dynamics CRM asynchronous service.


Note: If the CRM application and Asynchronous service is installed on the same server, then you do not need follow the above step.


Generate a public key file in Base64 format from the certificate. To do this:

  • right-click on the certificate in the Personal/Certificates list
  • then under All Tasks in the context menu, select Export


Provide read access to the certificate for the asynchronous service user:

  • Right click on the certificate and click on the All Tasks
  • then click on the Manage Private Keys, as shown in the below screenshot

Microsoft CRM

Then provide the read permission to the user, that is running the Asynchronous service. As shown in the below screenshot.

Microsoft CRM

In our case, we have given the read permission to the “CRM-AsynS” user, because our Asynchronous service is running under this user.


Configure MSCRM_Config database:

Add CRM Powershell Snap in.

Add-PSSnapin Microsoft.Crm.PowerShell


This command adds the CRM Windows PowerShell snap-in to the current session. The snap-in is registered during installation and setup of the CRM server.


Now you need to run the following command to Set the CRM certificate.


Set-CrmCertificate –CertificateType AppFabricIssuer –Name <issuerName> -StoreName My –StoreLocation LocalMachine -StoreFindType FindBySubjectDistinguishedName –DataFile <certificateFilename>


Issuer name <issuerName> can be any name. However, you will be using this same issuer name when configuring Microsoft Azure Active Directory Access Control Service (ACS). The DataFile parameter value is the file name or path of the public certificate key file.


After performing the above steps, the certificate will be visible your CRM IFD environment. As shown in the below screenshot.

Microsoft CRM


Before, performing the above steps, it was displaying as follows.

Microsoft CRM


Install Marketing Connector for Microsoft Dynamics CRM:


Download “Microsoft Dynamics Marketing CRM Connector” and install it.


After installation is complete, you will find the DynamicsMarketingConnectorSolution_managed.zip file in the installation path. As shown in the below screenshot.


Now in CRM, you will need to import the “DynamicsMarketingConnector_for_CRM2015_managed.zip” solution. As shown in the below screenshot.

Microsoft CRM


And provide the “Dynamics Marketing Connector” security role to the user, you are setting up the connector with. As shown in the below screenshot.

Microsoft CRM


Configure ACS Name Space on Windows Azure:


To configure the ACS Name space on Windows Azure, you need to first Add the Azure Account into your Power Shell. And for that you need to run the following command in Power Shell.


Add-AzureAccount


After running this command, it will display the login screen for Azure, as shown in the below screenshot.

Microsoft CRM


Now you need to run the following command to create the ACS Name space in Azure.


New-AzureSBNamespace -Name YOUR_NAMESPACE -NamespaceType Messaging -Location “YOUR_LOCATION” -CreateACSNamespace 1


As shown in the below screenshot.

Microsoft CRM


Then, it will create the Service Bus in Azure. As shown in the below screenshot.

Microsoft CRM


Add the CRM certificate to the Azure Service Bus:

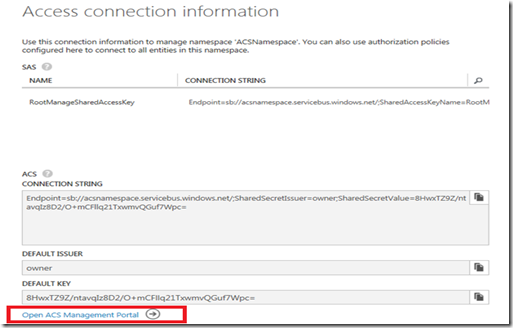
Now select your Service Bus and click on the “Connection Information” button on the Azure screen, then it will open the following screen.

Microsoft CRM


Note: you need to copy the Default Key, this is the Management Key. This key will be used when configuring MDM.


Click on the “Open ACS Management Portal” option. This action will open the ACS Management Portal.


In the portal you will need to add the CRM certificate. This certificate must contain the public and private keys.


To add the certificate, go to the Certificates and Keys and click on the “Add Token Signing Certificate or Key” option, as shown in the below screenshot.

Microsoft CRM


In the Add Token Signing Certificate or Key page, you need to import your certificate and provide the password of that certificate.

Microsoft CRM


After the wizard completes, your certificate will be displayed as follows.

image
Configure MDM & Start Initial Synchronization:


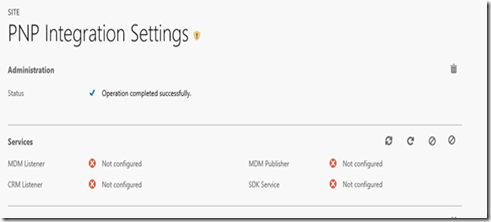
To configure MDM connector, login to the Dynamics Marketing, and go to Settings and Integration Option. As shown in the below screenshot.

Microsoft CRM


Now enable the CRM Connector Service, as shown in the below screenshot.

Microsoft CRM


The action above will enable the services, as shown in the below screenshot.

Microsoft CRM


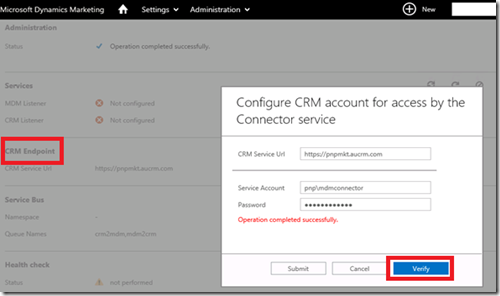
Now configure the CRM End Points. To do this, you will need to give the CRM Service User information. This user will be used for integrating the MDM and CRM.

Microsoft CRM


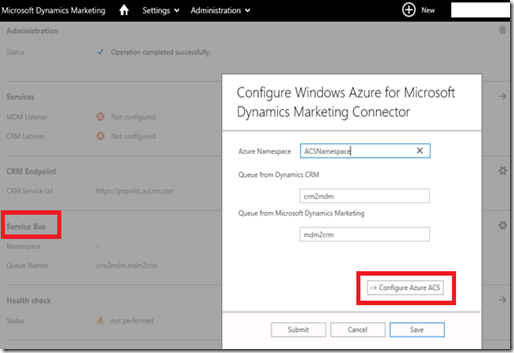
Now configure the Service Bus. To do this, you will need to provide the Azure Namespace, and ensure that you do not change the name of the Queue of CRM or MDM. As shown in the below screen.

Microsoft CRM


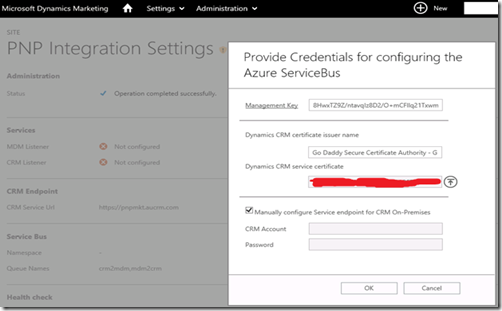
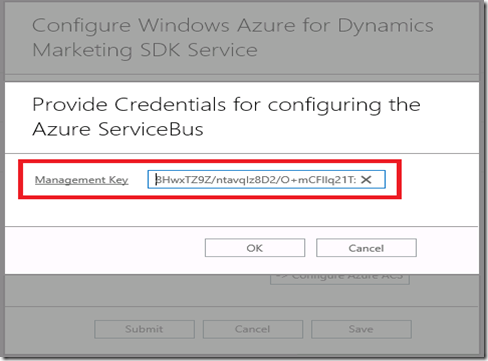
Now click on “Configure Azure ACS” option. In the “Provide Credentials for configuring the Azure ServiceBus” page, set the following values.


Management Key, this is the Default key, which we have copied in the earlier steps, when we were adding the CRM certificate in the Azure Service Bus.

Microsoft CRM


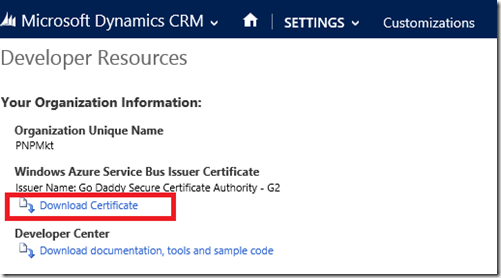
Dynamics CRM Service Certificate, you need to download the CRM certificate from the Developer Resources, screen, as shown below. And then you need to import that into the Dynamics CRM Service Certificate.

Microsoft CRM
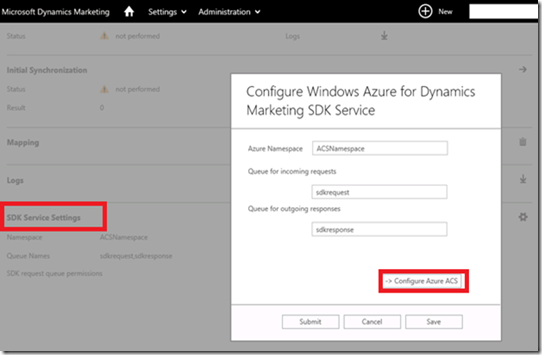
Now edit the SDK Service Settings, as shown in the below screen.

Microsoft CRM


Then click on the “Configure Azure ACS” option. In the “Provide Credentials for configuring the Azure ServiceBus” page, paste the Management Key, which we copied during the adding CRM certificate in Azure Service Bus.

Microsoft CRM


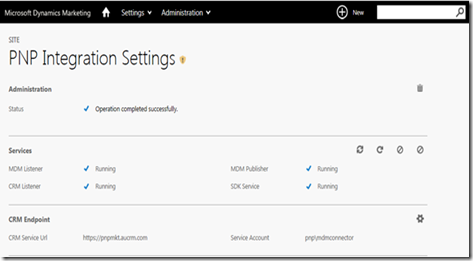
Now, it should start displaying that all the Services running, as shown below.

Microsoft CRM


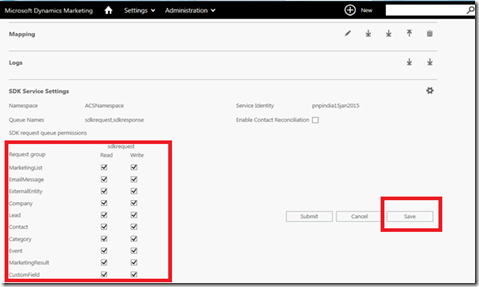
Now select appropriate options, and save the changes, as shown in the below screenshot.

Microsoft CRM


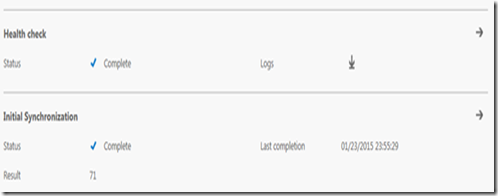
After setup is complete, you can perform a Health Check and the Initial Synchronization. As shown in the below.

Microsoft CRM


If you need to diagnose any issues with the MDM Connector, you can download the log from the Log section of the Marketing Integration page, as shown in the below screen.

Microsoft CRM


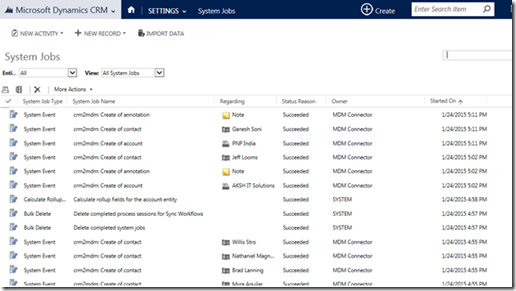
And from the CRM Side, you can view the System Jobs. As shown in the below screenshot.

Microsoft CRM


Hope this help you to configure the MDM integration with CRM!

Visit our website www.ecleva.com or if you have any query than don’t hesitate to Contact us.